How to take a screenshot on Laptop – easy methods.
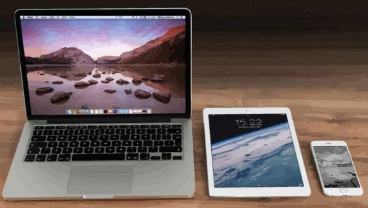
How to screenshot on Laptop and other Devices
How to screenshot on Laptop is one of the most frequent queries on the Internet because taking screenshots on a Laptop is an activity that is often performed by the device users.
Screenshot lets you capture exactly what you’re seeing on your device screen to share with others or for reference later. Taking, saving, and sharing screenshots can be extremely helpful. In fact, some insist that screenshot is the most important thing on the internet.
Most Operating Systems have got built-in features for capturing and saving screenshots that work great for basic tasks. However, there are also many third-party programs for taking screenshots on a Laptop that offer more ease of use and features.
Whether you’re running Windows or Mac, the methods described in this post about how to take a screenshot on Laptop, are absolutely free and without any hassle.
What is a screenshot or screencap?
Before I go to show how to take a screenshot on Laptop running on Windows or Mac, first let us look into, what is a screenshot.
A screenshot or screencap is an image of the visible items displayed on the device screen that can be saved as a graphics file. A screenshot on a Laptop is taken to show someone any problem you are facing with the system or for whatever other reasons. Various programs are available for taking Laptop screenshots on Windows or other Operating Systems, but it is not at all difficult to do it without any special program. Let’s now see how to take a screenshot on Laptop.
How to screenshot on Laptop running on Windows and Mac?
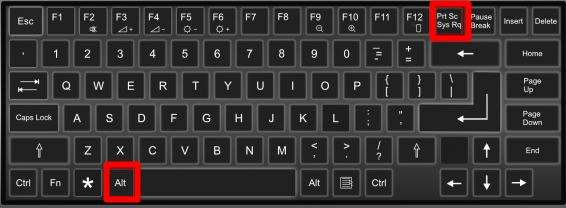
How do you screenshot on Laptop running on Windows? Using the print screen button on a Laptop is the easiest way for taking screenshots on a Laptop on Windows. Here’s, how to screenshot on Laptop using the PrtScn key which is located at the upper right corner of most of the keyboards:
When you press the PrtScn button once it will take a screenshot of your entire Laptop screen. Hitting this button essentially copies an image of your entire screen to the clipboard (the memory area that temporarily stores information). You’ll then need to paste the image into a program be it a Word document, Paint, or some other image editing program to view, edit or save your screenshots. The image will be saved as a PNG file. To open ‘Paint Program’ on your system for editing the image,
Go to Start -> All Programs -> Accessories->Paint…
If you’ve got a multi-monitor setup, and want to capture only the active window select the window you want to capture, then press the Alt key and the PrtScn button at the same time. The picture of the active window will be taken and copied to the clipboard.
If you are using Windows 8 or Windows 10, simply click the Windows Key + PrtScn Key to automatically save a full-screen screenshot within the Screenshots folder of your picture directory.
In case of any difficulty in locating or using the PrtScn button you might prefer to use another built-in program in Windows called ‘Snipping Tool’. This free program has been a part of the Windows Operating System for a long time. Once launched, it allows you to take a screenshot easily.
How to screenshot on Windows using the ‘Snipping Tool’.
Here’re the steps to follow on how to take screenshot on PC using the ‘Snipping Tool’:
1. Select Start, type snipping tool on search, and then select it in the search results;
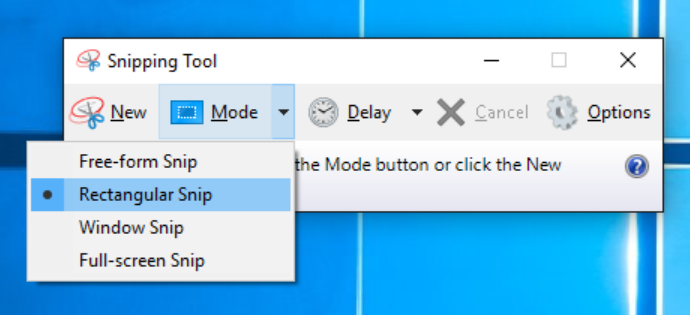
2. To take a new screenshot, select New. Or, to choose the type of snip you want, select Mode (or, in older versions of Windows, the arrow next to New), and then choose a capture mode. You can choose from one of four types of snip, free-form, rectangular, window, and full-screen. The rectangular area is the most commonly used option. When you select it, your PC screen will dim and you use your mouse to draw a rectangle around the portion you want to capture and then release your mouse to get the screenshot. You can then edit the screenshot, using highlighter and pen tools;
3. Use the Save and Copy buttons at the top of the snip to save or copy it to the clipboard;
How to screenshot on Windows 10 Laptop?
In order to screen capture Windows 10 Laptop follow any of these methods:
1. Press the PrtScn button to copy the screen to the clipboard;
2. Press the Windows+PrtScn buttons on your keyboard to save the screen to a file;
3. Use the built-in Snipping Tool;
How to take a screenshot on Laptop running on Mac OS?
How to screenshot on Laptop on a Mac? When using Mac, press cmd+shift+numeral 3 keys at the same time if you want to take a screenshot of the entire screen area. A PNG format of the image file of the screen will be automatically saved on your desktop.
If you want to capture a select area of your screen then press cmd +shift +numeral 4 keys together. Your cursor will turn into a cross-hair. Now, click and drag the cursor to select the area you want to capture. When you are ready to take a screenshot, release the mouse button. The screenshot is taken and it is saved as a file on the Desktop.
An alternative to the keyboard shortcuts on the Mac platform is to use the ‘Grab’ tool. Grab is a program that is included for free  in Mac OS in the utility folder under Applications. It allows you to take screenshots easily by clicking the Capture button and then selecting the type of screenshot that you’d like to take. It can take a screenshot of the entire screen, a window, or a selected section, and it has a timer so you can capture items like drop-down menus. Grab captures images in TIFF format (Tag Image File Format) which you can save in your desired file.
Frequently asked questions
Now that I have shown how to take screenshot on PC or Laptop running on Windows and Mac let me also answer some of the related questions often asked by device users.
How to take screenshot on an HP Laptop?
To take a screenshot on an HP Laptop, press the Print Screen or PrtSc key on the keyboard, which will capture the whole screen and save it to the clipboard on your Laptop. Now you can paste the screenshot on an image editor like the Paint app or Photoshop.
How to screen capture on a Dell Laptop without Print Screen button?
Place the cursor in one of the corners of the screen then hold the left button of the mouse and drag the cursor diagonally to the opposite corner of the screen. Now release the button for taking screenshot of the entire screen. The screen image is opened in the Snipping Tool, where you can save it by pressing “Ctrl-S.”
How to screenshot on a smartphone or tablet?
Taking a screenshot on a smartphone or tablet depends on the operating system used. Following are the methods on how to screenshot on a smartphone or tablet running on different Operating Systems:
How do I screenshot on my Android?
For the majority of Android phones and tablets (Android 4.0 or later), there are built-in options for capturing screenshots. To take a screenshot you simply press and hold the ‘Power’ and ‘Volume-down’ buttons together (there is a slight knack to this action: press the power button too soon and the display will switch off; press the volume-down button too soon and your screenshot may be marred by an onscreen volume slider).
After 1 or 2 seconds the screen will flash white and the screenshot will be saved in your photo Gallery, usually inside the screenshots folder. A notification will appear in the drop-down bar at the top of the screen, giving you options to delete, share or edit the image.
If your device has a physical home button, as is the case with the Galaxy S series, there is a different method for taking a screenshot.
You Press and hold the home button and the power button at the same time. You’ll hear the camera shutter sound, along with a short flashing animation. You’ll now be able to see the screenshot in the Gallery app, or in Samsung’s built-in “My Files” file browser
In case your phone doesn’t have a built-in screenshot feature you have the option to try an app to take a screenshot. One of the top-rated free screenshot apps is Screenshot Easy, which uses the same basic triggers as Android itself.
For older Android Phones running anything earlier than 4.0, the only real way to capture a screenshot is to use an app.
How to take screenshot on iPhone or iPad?
On iPhone 8 or earlier, iPad, and iPod touch:
Press the Power button (Side button) and the Home button simultaneously and release both buttons quickly;
On an iPhone X or later:
Press the Side button and the Volume up button simultaneously and release both buttons quickly.
A thumbnail of your screenshot appears in the lower-left corner of your device. Press and hold the thumbnail to share the screenshot;
To find the screenshot, go to Photos > Albums and tap Screenshots.
How to screen capture on Windows Phone?
Windows Phones make it a simple process like other devices to take a screenshot. The methods used to screenshot windows are given below for different versions:
Taking screenshots on Windows Phone 8
A built-in feature for taking screenshots on Windows Phone 8 is already there and you don’t need any third-party tool for taking screenshots with it. All you need to do is press the Power and Start buttons at the same time. Doing so will take a screenshot of whatever is currently on the screen. During the capturing, the screen of your device will flash and a usual photo-clicking sound will be there.
Taking screenshots on Windows Phone 8.1 and Windows 10 Mobile
Taking a screenshot of anything in Windows Phone 8.1 and Windows 10 Mobile is quite easy and it involves pressing only two buttons. Just press and hold the Power and Volume Up buttons at the same time and you will see the text “Saving to Screenshots” on the top side of the screen. The screenshot is automatically saved in the Screenshots sub-folder under the Picture folder.
How to screenshot on BlackBerry?
Q and Z series
Blackberry Q and Z series comes with an in-built feature for capturing screenshots. To take a screenshot of your BlackBerry device, hold the Volume Up and the Volume Down keys (located on the right side) together until you hear the shutter sound. The screenshot image will appear in your Pictures app under the ‘Recent’ tab.
Curve and Bold series
The curve and bold models don’t come with the in-built feature for taking screenshots like the Q and Z series. The only real way to capture a screenshot for these models is to use an app.
You may also like to read: How to Record iPhone Screen
Conclusion
On going through the post on how to screenshot on Laptop and other devices it is apparent that most of the Operating Systems have got built-in features for capturing and saving screenshots for basic tasks. While Android and iOS users will typically use their respective built-in methods to take a screenshot on a Smartphone or tablet, for taking screenshots on a Laptop running on Windows and Mac, users have a lot of third-party alternatives to choose from. However, third-party apps may have their appeal but when you are using multiple devices it’s good to have knowledge about the built-in methods available in them for taking screenshots.
If you have any other suggestions on how to take a screenshot on Laptop running on Windows and Mac and on other devices it will be appreciated if you share the same in the comment section below for our readers.
Ibrahim Sameh
Nov 03. 2016
This post is an easy to understand and an excellent guide for newbie’s looking to understand the procedure of taking screenshots on their devices. There are a lot of apps available for taking screenshots and to name a few apps are Screenshot easy, Super screenshot. For most android smartphones pressing and holding the Volume Down + Power button does the task but in case of devices of Samsung one need to press the Power + Home for a screenshot.
Sandeep
Aug 13. 2017
Excellent post and Thanks for clarifying most of us on these useful and important steps to take screenshot!
Shoaib Santo
Sep 13. 2020
Hey Radharenu, thank you so much for writhing this kind of awesome article. Actually I was finding the solution of this problem for a long time but could not get the answer of this question.
But I have a different opinion. If you don’t mind I want to know your suggestion about this. Actually I hear the Lighshot is the best tool for this type of work. Then I need your suggestion about this matter that which tool do you suggested for me to use?
Thank You
radharenu ganguly
Sep 16. 2020
Hi Santo,
‘Lightshot’ and ‘Skitch’ are the two very good FREE apps that work with Mac and Windows
Androidena
Oct 04. 2020
Some apps may make it difficult to take screenshots through the normal means. This is where your device’s built-in Screen Recording tool comes in. While its primary purpose is to record video of your screen, you can pause the video and take a screenshot this way.
Linda Purl
Feb 28. 2021
good post Thanks for clarifying
Willmiar Furgesin
Jun 10. 2023
This article was very helpful for me to learn how to take a screenshot on my PC. I followed the steps and it worked perfectly. Thank you for sharing this information. How can I take a screenshot of a specific area on my screen without using any additional tools? I know there is a Snipping Tool app, but I want to do it with just keyboard shortcuts. Is there a way to do that? By the way, if you have an Asus laptop and you want to learn how to take a screenshot on it, you might want to check out this article: https://laptopflix.com/how-to-take-a-screenshot-on-asus-laptop/. It has some useful tips and tricks for Asus users.
Willmiar Furgesin
Jun 27. 2023
This is a very helpful article for anyone who wants to learn how to take a screenshot on PC. I followed the steps and it worked perfectly. Thank you for sharing this information. However, I have a question. How can I take a screenshot of a specific area on my screen? I have an Asus laptop and I heard there is a shortcut for that, but I don’t know what it is. Do you have any idea? By the way, if you are looking for more tips and tricks on how to use your Asus laptop, you might want to check out this website: https://laptopflix.com/how-to-take-a-screenshot-on-asus-laptop/. It has some great articles on various topics related to Asus laptops.