How to transfer pictures from iPhone to iPhone?
How to transfer Photos from iPhone to iPhone?
In this article, I am going to show 4 easy methods to transfer photos from iPhone to iPhone or share photos from one iPhone or iPad to another without spending a dime.
‘How to transfer pictures from iPhone to iPhone’ is a question you may often hear from iPhone users who have just upgraded their phones to a newer model. But transferring pictures from iPhone to iPhone is not at all a difficult process. This guide will show you how easily you can transfer or share your photos from one iPhone or iPad to another in 4 simple ways including using a free photo transfer app that can be really useful.
Here’re the 4 methods you can try for transferring photos from iPhone to iPhone,
1. Use AirDrop;
2. Use iCloud;
3. Use iTunes;
4. Use the free photo transfer app – Simple Transfer;
Now let’s see how to transfer photos from iPhone to iPhone using the above methods.
How to transfer photos from iPhone to iPhone
1. Use AirDrop for transferring pictures from iPhone to iPhone
AirDrop is an Apple technology that uses Bluetooth and WiFi wireless networking to let users share files directly between their iOS devices and Macs. Once it’s enabled, you can use it to share photos, contacts, notes, and more between two iPhones without the need for a wireless network. Instead, your device will create a mini-WiFi network for you just for the transfer and then close it once the transfer is completed. Using AirDrop is one of the quickest and simplest ways to transfer photos from iPhone to iPhone safely. However, the use of AirDrop requires an iPhone 5 or newer model and both phones must be running on iOS 7 or higher version.
Here’re the steps to follow to transfer photos using AirDrop:
Step 1: Make sure that both Bluetooth and Wi-Fi are active in both the iPhones and that the two devices are physically close to each other;
Step 2: Go to Settings, and tap General> tap AirDrop;
Step 3: Choose ‘Everyone’ to let your device be detected by the other iPhone;
Step 4: On your iPhone go to the Photos app, tap the ‘Select’ button at the top, and choose the one or more photos that you wish to transfer. Next, tap the ‘Share’ button located at the bottom left corner of the screen represented by a box with an arrow coming out of the top;
Step 5: Now you will see rows of icons representing your various sharing options (list of devices and the names of persons of nearby AirDrop users). Tap the desired recipient you want to share with and the photo gets delivered instantly. You should see a “Sent” confirmation below the person’s name.

If you don’t see the recipient’s name in the AirDrop list, make sure his/her iPhone is unlocked and that both Bluetooth and Wi-Fi are active;
2. Transfer photos from iPhone to iPhone using iCloud
If you want to transfer photos from iPhone to iPhone using iCloud, first make sure to back up the photos using iCloud Photo Library. Apple’s iCloud Photo Library makes it easy to access all of your photos from all of your devices. However, before you follow the steps you need to ensure the following things,
i. Both the iPhones are running on iOS 8.3 or later;
ii. Both phones are connected to a wireless network;
iii. Same Apple ID is used to log into both devices;
iv. iCloud Photo Library is turned ON for both the iPhones;
v. Your iCloud has enough storage capacity to save the photos;
Next, follow the steps below on how to transfer all photos from iPhone to iPhone:
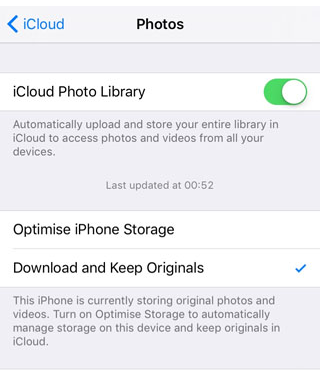
Step 1: Turn on the iCloud Photo Library on your iPhone. To do this go to Settings > tap on iCloud > tap on Photos;
Step 2: Toggle “iCloud Photo Library” ON;
Step 3: Beneath the iCloud Photo Library setting you’ll see two options – ‘Optimize iPhone Storage’ and ‘Download and Keep Originals’. Choose between these two options.
(The former allows you to upload your full-resolution photos to iCloud, and then replace the images on your iPhone with optimized versions that take up less space. The latter allows access to the full-resolution images stored on your iPhone even when you don’t have an internet connection. However, this option will fill up your iPhone’s storage more quickly);
Step 4: It takes a while to upload photos to the iCloud Photo Library depending on how many photos you have on your device and the speed of your internet connection. When you first activate the iCloud Photo Library, you’ll see a progress bar telling you how many photos have been uploaded to iCloud;
Step 5: Once the photos are uploaded and stored in your iCloud Photo Library, they are synced or transferred to all of your iCloud-enabled devices.
Step 6: You can now view those photos by opening the ‘Photos’ App and choosing ‘All Photos’ on the target iPhone;
3. How to transfer pictures from iPhone to iPhone using iTunes
Before I show how to transfer photos to iPhone using iTunes, it needs to be mentioned that this method will only work if you have disabled iCloud on your iPhone. However, disabling the iCloud on your iPhone may result in deleting the photo stream from your iPhone. So, you need to be cautious while using this process.
For transferring pictures from iPhone to iPhone via iTunes, first, you have to copy photos from your iPhone to the Computer and then transfer those photos from your computer to the other iPhone. Follow the steps below to transfer photos from iPhone to iPhone via iTunes:
For Mac.
Step 1: Connect your iPhone to your Mac with a USB cable;
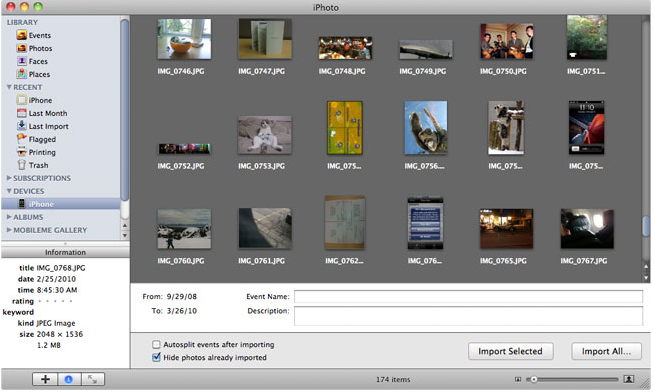
Step 2: Make sure ‘iPhoto’ runs on your Mac. Launch iPhoto if it doesn’t open automatically;
Step 3: Select the photos you want to transfer;
Step 4: Click ‘Import’ or ‘Import Selected’ to transfer photos from iPhone to Mac;
Apart from ‘iPhoto’, you can also use a program called ‘Image Capture’ to transfer photos from iPhone to Mac
For Windows.
Step 1. Connect your iPhone to your Computer with a USB cable;
Step 2. Click Import Pictures and Videos when ‘AutoPlay’ appears;
Step 3. Choose a destination folder to store your iPhone photos;
Step 4. Click Import;
Next transfer photos from your computer to the other iPhone using iTunes.
Remove the first iPhone from your computer and connect the other one. From here on, the steps are the same for both Mac and Windows:
Step 1. Connect the second iPhone to Computer with a USB cable;
Step 2. Launch iTunes if it doesn’t open automatically;
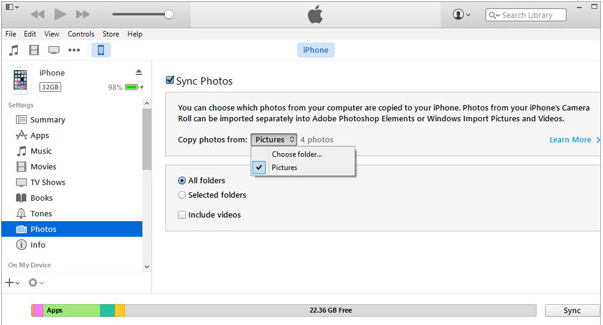
Step 3. Tap on the iPhone icon on the top;
Step 4. Click on the ‘Photos’ tab in the left panel;
Step 5. Select ‘Sync Photos’ and choose the folder from which you want to transfer the photos to the second iPhone;
Step 6. After selecting it click on the “Sync” or “Apply” button at the end of iTunes and there you have it;
4. Transfer photos from iPhone to iPhone using a free photo transfer app

Simple Transfer by Rambax is one of the easiest photo transfer apps to use for transferring photos and large videos wirelessly, without the need for iTunes or other programs. The app is compatible with iOS 8.1+. Works on Windows, Mac, and Linux.
This free program offers a variety of features such as multiple photo and video transfers from PC to device, as well as between iOS devices simply by selecting an album and tapping on “Select All”. There is no quality loss during the transfer of the photos. Photos are transferred with full resolution including metadata and videos are transferred with the highest quality available.
Apart from that, it allows the user to create new albums in the directories that photos and videos are moved to, plus there is no limit concerning the number or size of files you can transfer. Simple Transfer also offers a slideshow of photo albums to make it easier for you to check whether you’re transferring the right files, and it’s really convenient that it supports up to 8 minutes of background transfer (i.e. the transfer is not interrupted for even after 8 minutes after it started).
‘Simple Transfer’ is one of the best choices when it comes to free photo and video transfers, and it certainly lives up to users’ expectations. This app is available only on the App Store for iPhone and iPad
You may also like to read: How to use AirDrop on iPhone
Frequently asked questions
Before I conclude let me also address some related queries often made by iPhone users.
How can I transfer photos from my old iPhone to my new iPhone?
Here’s how to use AirDrop to transfer photos from your old iPhone to your new one
1. On your new iPhone, go to Settings > Tap General > AirDrop;
2. Choose ‘Everyone’;
3. Next, go to the Photos app on your old iPhone;
4. Select the photos you want to transfer and tap ‘Share’;
What is the easiest way to transfer photos from iPhone?
Here’s the easiest way to transfer photos from iPhone:
1. Connect your iPhone to a PC with a USB cable;
2. Turn on your iPhone and unlock it;
3. On your PC, select the Start button and then select Photos to open the Photos app;
4. Select Import > From a USB device, then follow the instructions;
You may also like to read this related post: How to transfer videos from iPhone to computer
Conclusion
If you are going to switch over from your old iPhone to an upgraded version, one of the primary things that may come to your mind – is how do I transfer photos from iPhone to iPhone.
After going through this post on how to transfer pictures from iPhone to iPhone it is hoped that there should no longer be a problem for you to transfer your precious photos and videos from your old iPhone to the new one. Thanks to iOS and iCloud, this can be done quite easily and pretty much anywhere (as long as you have access to WiFi).
You may also like to read: How to transfer photos from Android to iPhone