Why my iPhone not connecting to WiFi?
How to fix iPhone won’t connect to WiFi issue?
You may sometimes find iPhone users making the query – why my iPhone won’t connect to WiFi or why my iPhone not connecting to WiFi but other devices are?
In most cases, the ‘iPhone WiFi not working’ issue can be fixed by following some simple steps. However, in some cases, more advanced techniques may have to be tried for troubleshooting the iPhone WiFi issue. In this post, I will suggest a few simple solutions when your iPhone won’t connect to the internet but other devices will.
Find below 11 simple steps to fix iPhone trouble connecting to WiFi. But, before trying the suggested steps for troubleshooting iPhone WiFi issue, ensure your WiFi router is working all right and that you are within range. If you’re too far from your router you won’t get a signal.
After each step check, whether your iPhone can still not connect to WiFi.
Why might my iPad not connect to WiFi?
If your iPad refuses to join the WiFi party, you’re not alone—this is a common frustration. Several culprits could be at play: perhaps your iPad is out of range of your router, you’ve entered the wrong WiFi password (it happens to the best of us), or there could be an issue lurking within your iPad’s network settings or hardware.
Interestingly, since iPadOS shares much of its DNA with iOS—the same system running your iPhone—the troubleshooting steps are nearly identical. If your iPhone can connect but your iPad won’t, the process of fixing it will feel comfortably familiar. Whether it’s toggling WiFi off and back on, forgetting the problematic network and reconnecting, or giving your device a proper restart, these techniques are just as effective for both Apple devices. So, if you run into WiFi woes on your iPad, you can use the same fixes you’d try on your iPhone.
Why isn’t my iPad connecting to WiFi—and what fixes should I try?
Much like a stubborn housecat, your iPad may refuse to play nicely with WiFi for a variety of reasons. Let’s walk through the usual suspects and practical fixes to get it back online (without needing a techie at your elbow).
Quick Checks Before Troubleshooting
Before you start poking around in settings, double-check these basics:
- Are you within range of your WiFi router? Walls and distance can make a real difference.
- Is your internet working on other devices? If everything else is offline, your router may be the culprit.
- Have you recently changed your WiFi password? Your iPad might be clinging to its old, outdated credentials.
iPad and WiFi: Common Causes & Solutions
If your iPad is still off the grid, here’s a step-by-step troubleshooting checklist:
1. Restart your iPad
It almost sounds too simple, but turning your iPad off and back on often clears up minor glitches. Hold down the power and either volume button (on newer models), or just the top button if you have a trusty old Home button model, then slide to power off. Wait a few seconds, and power it up again.
2. Remove any bulky or metallic iPad cases
Believe it or not, a heavy-duty case can weaken WiFi signals. Try removing your case and see if reception improves.
3. Toggle WiFi Off and On
Open your Settings, tap WiFi, and toggle it off, wait a moment, and then switch it back on. Often, this simple reset nudges your iPad back onto the network.
4. Forget and Reconnect to the Network
Sometimes your iPad’s memory just needs a fresh start:
- Go to Settings > WiFi
- Tap the “i” beside your network name
- Select “Forget This Network,” then reconnect with your password
5. Check for Airplane Mode
Airplane Mode blocks all wireless connections. Swipe down from the top right corner for Control Center and make sure the airplane icon isn’t highlighted. If it is, tap it off.
6. Review Content or Privacy Restrictions
If you’ve ever used Screen Time or parental controls, they might limit connectivity. Head to Settings > Screen Time > Content & Privacy Restrictions and ensure restrictions aren’t blocking network access.
7. Restart your WiFi router
If all else fails and no device in the house is connecting, unplug your router and modem for 30 seconds, then plug them back in. Give it a minute or two to fully reboot.
Still Stuck? Reset Your iPad’s Network Settings
If your iPad still refuses to budge, you can clear out all saved networks and freshen up its wireless settings:
- Settings > General > Transfer or Reset iPad > Reset > Reset Network Settings
This won’t erase your apps or data, but you’ll need to re-enter your WiFi passwords afterwards.
The Nuclear Option: Factory Reset
If you’re at your wits’ end and nothing has worked—even after trying these steps—consider a full factory reset. Back up your data first! Then go to Settings > General > Transfer or Reset iPad > Erase All Content and Settings. Afterward, you can restore from your backup.
If, after these steps, your iPad remains steadfastly offline while other devices work fine, a hardware issue could be at play. At that point, it’s worth reaching out to Apple Support for a deeper look under the hood.
My iPhone won’t connect to WiFi – steps to fix
When you see your iPhone not connected to WiFi try the following steps to fix iPhone trouble connecting to WiFi:
1. Ensure WiFi and router are turned on
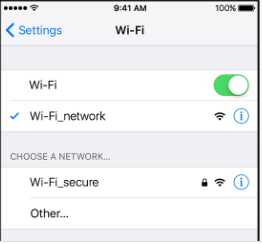
If you are not sure why won’t my iPhone connect to WiFi / Internet, the first thing to do is to ensure that WiFi is set to the ‘ON’ position and you are within range and you can see your network on the device. You are also to check whether the wireless router is connected to the modem and turned ON. To do this,
Go to settings > tap WiFi > toggle the switch next to WiFi to turn WiFi on. If you find that iPhone WiFi won’t turn on because the settings are grayed out, update to the latest iOS.
Apple regularly releases updates that address bugs and connectivity issues, as well as critical security patches that can help prevent malware and keep your device protected. To check for updates, go to Settings > General > Software Update. For extra peace of mind, you can enable automatic updates by tapping Automatic Updates and adjusting your settings. Keeping your iPhone up to date often resolves WiFi problems that pop up unexpectedly.
To join a network, tap the name of the WiFi network. A blue checkmark beside the network’s name will mean you’re connected.
A password-protected WiFi network has a lock icon next to its name. To join such a network you are required to enter the password when prompted;
Fix the ‘iPhone won’t connect to WiFi’ issue
Check Your Network Settings
Sometimes, the culprit behind your iPhone not connecting to WiFi is hiding in your network settings. One simple option that often gets overlooked is the “Auto-Join” feature. If Auto-Join is turned off for your WiFi network, your iPhone won’t connect automatically—even if you’re within range and the network is available. This means you might have to manually select your network each time, which can be a hassle (especially if you forget).
To make sure your device hops onto trusted networks without extra effort, go to Settings > WiFi, tap the ‘i’ icon next to your network, and ensure Auto-Join is toggled on. This way, your phone will remember to reconnect to your WiFi whenever it’s in range, saving you the trouble of having to do it yourself.
If you find that, despite turning on Auto-Join, your iPhone still struggles to hook up to WiFi, there might be something bigger at play—like interference from nearby devices or a glitch in your saved settings. But always start by double-checking those network options; sometimes the simplest tweaks are all you need.
Double-Check Advanced Network Settings
If your WiFi network stubbornly refuses to appear on your iPhone (even after triple-checking the basics), it’s time to peek under the hood at a few advanced settings that can be common culprits.
- Hidden Network Name (SSID): Some networks are set up to hide their SSID, meaning you won’t see them in your WiFi list. If that’s the case, you’ll need to manually enter the network name and password under Settings > WiFi > Other. It’s easy to forget a single character, so double-check for typos.
- MAC Address Filtering: Some routers use MAC filtering as a security feature. This only lets pre-approved devices connect. If your iPhone isn’t already on the router’s “allowed” list, you’ll have to add your device’s MAC address (find it under Settings > General > About > Wi-Fi Address).
Network Mode & Channel: Networks running on uncommon frequencies or using unusual security settings can sometimes trip up Apple devices. Keeping your router’s security set to WPA2 or WPA3 and using standard channels (like 1, 6, or 11 for 2.4GHz) can help keep things straightforward.
If you’re not the ruler of your home network or aren’t sure about making these tweaks, it’s perfectly fine to reach out to your internet provider (or the tech-savvy person in your house) for a helping hand. Getting those settings ironed out makes the rest of the troubleshooting go much smoother.
2. Toggle WiFi or Airplane Mode
Turn off the WiFi, turn it back on, and then check if the ‘iPhone not connected to WiFi’ issue has been fixed. If not, turn the Airplane mode on, and a few seconds later turn it back off. Then, check again.
3. Restart your iPhone
Sometimes force restarting your iPhone can be a very effective solution to iPhone trouble connecting to WiFi.
To force restart your iPhone,
i. Press and hold the sleep/wake button until the red slider appears;
ii. Drag ‘Slide to power off ‘ to turn your iPhone off;
iii. Once the device is off, press and hold the sleep/wake button (until you see the Apple logo) to turn the device back on again;
4. Check for issues with the WiFi network
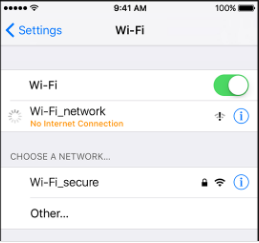
If the iOS detects an issue with the WiFi connection, iPhone users will find their iPhone cannot connect to WiFi.
You will see a WiFi recommendation under the name of your network when iOS detects an issue. To get more information about the problem with your WiFi network, tap the WiFi network for suggested solutions.
Sometimes, your iOS device won’t connect to WiFi because there’s something wrong with the router itself. An easy way to rule out hardware problems is to check the connection on other devices—if your laptop, tablet, or another phone also can’t connect, the issue likely lies with your WiFi router or modem rather than your iPhone. Testing with multiple devices can help you quickly pinpoint whether the problem is network-wide or isolated to your iOS device.
5. Check Content Restrictions and Parental Controls
Sometimes, your iPhone’s inability to connect to WiFi isn’t about the network or hardware—it’s the digital babysitter standing in the way. If you (or the previous owner) enabled parental controls, certain content and privacy restrictions might be blocking access to websites, apps, or even tampering with network features, which can in turn cause connection hiccups.
To see if Content & Privacy Restrictions are the culprits:
- Go to Settings on your iPhone or iPad
- Tap Screen Time
- Select Content & Privacy Restrictions
If the toggle is enabled, consider switching it off temporarily to determine if these restrictions are interfering with your WiFi connection. Alternatively, you can review specific settings under this menu—especially anything related to web content or app access—and adjust them as needed. This is especially important if you inherited your iPhone from a younger family member, or if you’ve tested Screen Time features in the past and forgot to turn them off.
A quick check and a little toggle action may be all that stands between you and flawless wireless browsing.
6. Forget the WiFi network
If you are having an iPhone problem connecting to WiFi network despite entering the correct password then forget the network and re-join it. To do this,
Go to settings > WiFi > tap the network you can’t join > tap ‘Forget This Network > tap ‘Forget’ to confirm your action.
Now go back to Settings > WiFi > rejoin the network by selecting it and re-entering the password.
Double-check your WiFi password
It’s surprisingly easy to mistype a WiFi password—especially if you’re juggling a string of random letters, numbers, and special characters. Make sure you’re using the latest password for your network, and pay close attention to capitalization; even one misplaced capital letter will keep you locked out. If you’re not certain you have the right password, check with the person who manages your WiFi or look at the back of your router (where some ISPs like Spectrum or Xfinity print the default password).
A simple mistake in the password field is often the culprit—so before you start blaming your iPhone, double-check that password and try again.
7. Reset Network Settings
It has been often found that the ‘iPhone won’t connect to WiFi’ issue could be resolved by simply resetting the network settings. Therefore, if you find that your iPhone is not connecting to WiFi even after trying the above solutions, reset your network settings. To do this,
Go to settings > tap General > tap Reset > tap Reset Network Settings> Enter your passcode if asked > tap Reset network settings to confirm your action.
However, this step will clear the memory caches and DHP settings and reset the network settings with factory-recommended settings. You will, therefore, lose your current cellular and WiFi settings, WiFi passwords, VPN, and APN settings by implementing this step.
Should You Reset Network Settings on a Managed Device?
If your iPhone is set up by your school or workplace—especially if it connects to networks managed by your IT department—it’s wise to hit the brakes before diving into a network reset. Wiping network settings will erase saved WiFi networks, VPN setups, and custom configurations that may have been put in place with company policies in mind.
Before proceeding, reach out to your organization’s IT department or network administrator (whether it’s your local school’s tech staff or the folks keeping your office WiFi humming). They’ll let you know whether it’s safe to reset—or they might even handle it for you, ensuring your device is ready to reconnect to business-critical services like secure VPNs, Xerox printers, or company portals.
A little due diligence up front can save you from an awkward Monday morning without email access or shared drive connectivity.
8. Turn ‘OFF’ WiFi Assist
‘WiFi Assist’ is a new feature in iOS 9 and later versions. This feature helps you to always have a stable internet connection on your device. Whenever your iPhone encounters a weak or poor WiFi network, ‘WiFi Assist’ will automatically switch to Cellular Data. In many cases, toggling WiFi Assist ‘ON’ and ‘OFF’ could solve WiFi issues on iPhone. You may, therefore, give a try to this ‘WiFi Assist’ feature if you are not sure about ‘why is WiFi not working on my iPhone’. To do that,
Go to settings > tap Cellular > tap WiFi Assist> toggle the feature ‘ON’ and turn it back ‘OFF’
9. Turn off Location Services for WiFi networking
When an iPhone won’t connect to the internet it is reported by many users that the iPhone problem connecting to WiFi could be resolved by simply turning off the location services. To implement this,
Go to settings > tap Privacy > tap Location Services > tap System Services > turn off WiFi networking by moving the slider to the ‘Off’ position
10. Switch to Open DNS or Google DNS
Faulty DNS Servers from your Internet service provider may sometimes cause network connectivity problems or speed issues. Changing the existing DNS server to more reliable ‘Open DNS‘ or ‘Google DNS’ services can solve the problem when your iPhone is not connecting to WiFi. To change DNS settings,
Go to settings > tap WiFi > tap on the info button (i) right next to the network > tap on numbers next to DNS > the Keyboard appears > enter the new DNS address.
For the DNS address, you can enter either Google DNS (8.8.8.8 or 8.8.4.4, or both separated by a comma) or Open DNS (208.67.220.123 or 208.67.222.123).
11. Restore iPhone to Factory Settings
In most cases, one of the solutions listed above should be able to fix the issue – why won’t my iPhone connect to WiFi but other devices will?
However, in case none of these solutions helps and still there is iPhone problem connecting to WiFi when other devices can connect, your last option would be to reset your iPhone to factory default settings before taking it to a repair center.
Since resetting your iPhone to factory settings would erase all your stored data in the device, don’t forget to back up your data before starting the process. To restore your iPhone to factory settings follow the steps below:
Go to settings > tap General > tap Reset > tap Erase All Content and Settings > enter the passcode when asked for > tap Erase iPhone to confirm this action.
You can also restore your iPhone to factory default settings via iTunes.
When the reset is complete, your iPhone will be back to default factory settings. You can then either set it up as a new iPhone or restore it from the backup.
How to Back Up Your iPhone Without WiFi
If you’re preparing to restore your iPhone to factory defaults but can’t connect to WiFi, don’t worry—there are still ways you can back up your important data.
Option 1: Back Up Using Mobile Data
You can back up your device to iCloud using cellular data. However, keep in mind that this might consume a large amount of data, so check with your carrier if you have a limited data plan before proceeding. To do this, go to Settings > tap your name > tap iCloud > tap iCloud Backup > turn on “Back Up This iPhone” and then tap “Back Up Now.”
Option 2: Back Up Using a Computer and iTunes/Finder
Alternatively, you can create a local backup without needing any internet connection by using your computer:
- Connect your iPhone to your computer via USB cable.
- If you’re using a Windows PC or a Mac with macOS Mojave or earlier, open iTunes. For macOS Catalina or later, open Finder.
- Select your iPhone from the list of devices.
- Click “Back Up Now” to start the process.
Backing up this way ensures your photos, contacts, and app data are safely stored before you move on to the next step.
Try more options
Even after following each step above there is still a problem with iPhone connecting to WiFi you should look into these options also:
i. Make sure you have the latest version of iOS;
ii. Try to use your WiFi network on other devices. If you can’t get online using other devices, there is a possibility of a service outage. In such case you are to contact your Internet Service Provider for help;
iii. Try to connect your device to a WiFi network in a different location. If your iPhone can connect there, your WiFi network needs attention;
iv. Update your WiFi router with the latest firmware. Contact the manufacturer of your router to make sure that the router supports your Apple product. Routers from trusted providers, such as your internet service provider, are also typically updated with relevant firmware that helps to avoid compatibility issues with newer devices and keeps your network secure. Regular firmware updates not only improve performance but also help fix bugs and patch security vulnerabilities, ensuring your WiFi runs smoothly with all your devices.
How to Update Your Wi-Fi Router and Check Compatibility
If you’ve ruled out issues with your iPhone and suspect your Wi-Fi router is the culprit, here’s how to make sure your network setup is up-to-date and fully compatible with your Apple device:
- Check Firmware Updates: Log in to your router’s admin panel using your web browser. Look for a section labeled “Firmware Update” or “System Update.” Download and install any available updates. Popular brands like Netgear, TP-Link, Asus, and Linksys frequently release updates to address performance, bug fixes, and new compatibility requirements.
- Confirm Device Compatibility: Review your router’s documentation or visit the manufacturer’s website to see if it fully supports the current iOS version on your iPhone. You might also find a list of recommended settings for Apple devices—these can improve reliability and speed.
- Try Different Frequencies: Most modern routers offer both 2.4 GHz and 5 GHz networks. If you’re experiencing trouble on one, connect your iPhone to the other—5 GHz is generally faster and less crowded, but has a shorter range.
- Refresh the Connection: Turn off your router and modem by unplugging them for about 30 seconds, then plug them back in. This simple reset can often clear up minor connectivity hiccups.
- Physical Positioning: Ensure your router is powered on and positioned centrally. Avoid placing it near walls, metal shelves, or large electronics, which can block the WiFi signal. If you’re far from the router, moving closer may instantly improve connectivity.
Following these steps takes just a few minutes and can make a significant difference in how your iPhone interacts with your home network. If you continue to have trouble, contacting your router manufacturer or ISP’s support service may uncover additional fixes you haven’t tried.
Switching Between 2.4 GHz and 5 GHz WiFi Networks
If your router broadcasts both 2.4 GHz and 5 GHz networks, you have flexibility to choose the connection that best suits your environment. Here’s how to make the most of these options:
- Check Signal Strength: Make sure your router is powered on and that you’re within range. The 2.4 GHz band travels farther and passes through walls more easily, making it ideal if you’re using your iPhone in a distant room. On the other hand, the 5 GHz band usually offers faster speeds and less interference, but works best when you’re closer to your router due to its shorter range.
- Switch Networks on Your iPhone: Go to Settings > Wi-Fi. You’ll typically see both network names available (sometimes with “5G” or “5 GHz” in the label). Tap the network you want to join.
- Test for Stability: If you notice sluggish speeds or frequent drops on one band, try switching to the other. Many modern routers allow you to assign unique names (SSIDs) to each frequency band, making it easier to pick the best one for your needs.
In summary, experiment with both frequencies—choose 5 GHz when you need high speeds nearby, and 2.4 GHz if you need consistent connectivity further from the router. This small tweak can make a big difference in your iPhone’s WiFi experience.
Remove Your iPhone Case to Boost WiFi Signal
Sometimes, something as simple as your iPhone case could be the culprit behind weak or unstable WiFi. Thick, heavy, or metallic cases may obstruct your device’s antennas and interfere with the wireless signal. If you notice drops in your WiFi performance, try taking off the case and reconnecting to your network. This quick check can often make a noticeable difference in your signal strength—especially if your case is on the bulky side or has metal components.
Extra tips to avoid future WiFi headaches
- Keep your iPhone storage clean: Make sure your device isn’t bogged down with digital clutter. A phone running low on storage or overloaded with unnecessary files can sometimes have trouble connecting to WiFi smoothly. Regularly deleting unused apps or large files can help keep things running efficiently.
- Enable automatic iOS updates: Apple regularly releases updates that fix bugs and improve connectivity. Turning on automatic updates by going to Settings > General > Software Update > Automatic Updates ensures you’re always up to date with the latest fixes.
- Invest in a reliable router: Using a high-quality router (from a trusted brand, not just the cheapest one you can find) helps provide a strong, stable WiFi signal—especially in busy households with lots of devices. If your router is several years old, consider upgrading to one that supports the latest standards.
- Restart your devices regularly: Both your iPhone and your router benefit from the occasional restart. This can clear out temporary glitches and refresh the connection.
How Often Should You Restart Your Device or Router?
If you’re aiming for a WiFi connection that just works—without random hiccups—giving both your iPhone and your router a quick restart every so often can do wonders. Think of it like hitting the reset button to clear out any digital cobwebs or lingering glitches.
A good rule of thumb is to restart your router and devices at least once every couple of weeks, or whenever you start noticing slowdowns or unstable connections. Simply power them off, wait about 10 seconds, and turn them back on. This simple habit helps keep everything running smoothly and can often resolve minor connectivity quirks before they turn into bigger headaches.
Reduce interference: Keep your router away from other electronics that might cause interference, like microwaves or cordless phones, and place it in a central spot for the best coverage.
Taking these small steps can help you avoid WiFi issues in the future and keep your iPhone connected when you need it most.
Can Your iPhone or iPad Case Affect WiFi Signal?
It might surprise you, but your phone or tablet case could actually be the sneaky culprit behind spotty WiFi. Especially if you’re rocking a bulky or metal case, you risk weakening your device’s ability to pick up wireless signals. Some bigger or metal-lined cases can act like tiny shields, interfering with—or even blocking—your WiFi reception.
Here’s a quick troubleshooting tip: if your iPhone or iPad seems stubborn about connecting, simply remove your case and try joining the WiFi network again. You might notice an instant improvement in speed or stability.
And while it’s not the most common cause of network headaches, keeping your device “unclothed” every now and then (or choosing a case made of plastic or silicone) can help ensure your signal stays strong. Sometimes, the simplest fixes really do make all the difference.
Check your router and cables
If you’ve gone through these steps and you’re still having trouble, take a closer look at your router setup. Try connecting with another device—if that also can’t access the internet, power off your router and check that all cables are snugly connected. Wait a couple of minutes, then turn the router back on and see if the network returns.
What if you don’t manage your network?
If you’re not the one in charge of your WiFi setup—maybe you live in a shared space or use internet provided by your landlord or another household member—don’t fret. If you can’t dive into your router’s settings or troubleshoot the network yourself, your best move is to reach out to the person or service that handles your internet connection. This could be your roommate, building manager, or even a tech support line from your Internet Service Provider (think names like Spectrum, Comcast, or AT&T).
Let them know what issues you’re running into, and mention any error messages or connection troubles you’ve observed. Most ISPs have support teams ready to walk you through the next steps or send a technician if needed. Don’t be shy about asking for help—that’s exactly what they’re there for!
Is Your internet being throttled?
Another factor that can impact your iPhone or iPad’s connection is internet throttling. This happens when your Internet Service Provider (ISP) intentionally slows down your internet speed—often during peak hours, heavy data usage, or after you’ve exceeded a data cap in your plan.
How does throttling show up? You might notice videos buffering endlessly, slow downloads, or web pages that take an eternity to load, even though your Wi-Fi signal appears strong. It can be incredibly frustrating, especially when everything else seems to be working smoothly.
If you suspect throttling is the culprit:
- Test your internet speed: Use tools like Speedtest by Ookla to compare your current speed against what your plan promises.
- Restart your router: Sometimes this can temporarily improve your speeds. If you haven’t already, give your router (and modem, if you have one) a fresh start. Unplug them from power, wait about 30 seconds, then plug them back in. This simple reset can clear up lingering issues and restore your connection.
- Contact your ISP: If you consistently notice reduced speeds, reach out to your provider. They can let you know if there are any known slowdowns, outages, or throttling policies affecting your service.
Remember, being aware of throttling means you’re one step closer to solving those pesky Wi-Fi problems on your Apple devices.
Invest in a reliable router
Sometimes, the culprit is actually the router itself. Budget routers can be unreliable, offering a weak or unstable signal—especially if multiple devices are connected at once. If you notice frequent disconnects, consider upgrading to a high-quality router from a reputable brand like Netgear, TP-Link, or ASUS. Trusted providers, such as your internet service provider, often supply routers that are kept up-to-date with the latest firmware, reducing compatibility issues and keeping your network secure. Remember to reboot your router occasionally; this not only clears its cache but can also trigger important firmware updates.
Double-check your Wi-Fi settings and try basic troubleshooting
Before calling in the cavalry, it’s worth checking a few things on your device:
- Make sure Wi-Fi is enabled: Open your Settings app, tap Wi-Fi, and verify it’s switched on. Tap your network name and look for that reassuring blue checkmark.
- Disable Airplane Mode: Sometimes it’s as simple as toggling off Airplane Mode in Settings.
- Check Wi-Fi Assist: Scroll down to Cellular settings and make sure Wi-Fi Assist is turned off. This feature sometimes causes unexpected connectivity issues.
- Restart your device: If the Wi-Fi setting is grayed out or unresponsive, a quick restart might do the trick.
If you still see “No Internet Connection” or your device refuses to get online, move on to the router:
- Update your router’s firmware if possible, and confirm it supports your devices (Netgear, TP-Link, ASUS, and other reputable brands are generally reliable).
- Try switching frequencies: If your router supports both 2.4GHz and 5GHz, alternate between them to see if one works better.
- Reboot everything: Unplug your router and modem, wait a minute, then plug them back in. Sometimes a fresh start is all your network needs.
Tackle potential software conflicts
If you use VPNs or security apps, temporarily uninstall (not just disable) them and restart your device. Sometimes these apps interfere with your connection. If uninstalling fixes the problem, but you must keep the software, contact the provider’s support for further help.
Narrow down the problem
If your iPhone or iPad is the only device on the fritz, try connecting it to a different Wi-Fi network (like a local coffee shop or a friend’s house). If you can’t connect anywhere, the issue likely lies with your device. But if all your devices are affected, focus on your home network or ISP.
Narrow Down the Problem
- Test other devices: See if laptops, tablets, or smart TVs in your home are having the same trouble. If they’re all offline, your network or internet provider is probably to blame.
- Try another Wi-Fi network: Head to a different location—coffee shops, libraries, or even your neighbor’s porch (with permission, of course)—to see if your device connects. If it still refuses to play nice, the problem is likely with your device.
- Check for hidden networks: Sometimes networks don’t broadcast their names or use security settings that block new devices. If you’re unsure, reach out to whoever manages your network.
Reset your network settings (if all else fails)
- Open Settings > General > Transfer or Reset > Reset > Reset Network Settings.
- Keep in mind, this wipes saved Wi-Fi networks and passwords, VPN, and cellular settings—so have those details handy.
If your device starts working after the reset, great! If not, and you’re still seeing that stubborn “No Internet Connection” message, it’s time for reinforcements.
Contact your Internet Service Provider or Apple Support
If none of your devices can connect after resetting the router, there may be a wider service outage, or your router could be faulty. In this case, call your Internet Service Provider—they may be able to reset your connection remotely, or at least let you know if there’s an outage in your area. If it turns out your iPhone is the only device with issues, it could be a hardware problem, so reach out to Apple Support or an authorized technician for further troubleshooting.
Pro Tip:
If you’re using your device on a work or school network, and you’re not the IT guru, check with your administrator before resetting network settings—some configurations may need their magic touch.
What can be done while the iPhone is offline and not connected to Wi-Fi?
If your iPhone is temporarily offline and you’re waiting for that WiFi connection to spring back to life, it’s still a great time to tidy things up on your device. For example, you can sift through your photo library and clear out duplicates or similar-looking snapshots that have accumulated over time—no internet required. Take a moment to organize your albums, get rid of old screenshots, or delete random images you no longer need.
Not only does this free up precious storage space, but it also makes finding your favorite photos much easier down the road. If you want a little extra help, apps like Google Photos can assist in sorting and identifying duplicate pictures, letting you streamline your entire gallery without needing to be connected.
So, while the WiFi gremlins do their thing, why not put the downtime to good use and give your iPhone a quick declutter?
Does digital clutter or low storage affect WiFi on iPhone?
It might not be the first thing that comes to mind, but a cluttered iPhone with limited free storage can impact your device’s general performance—including, at times, its ability to maintain a stable WiFi connection. When your iPhone is packed to the brim with unused apps, old downloads, and mountains of photos, it can struggle to run smoothly. The device may lag as it juggles background processes, especially if you’re running low on storage. This sluggishness sometimes puts extra stress on system resources, which can then affect network-related features—including your WiFi.
Keeping your iPhone tidy by removing unnecessary files and freeing up space isn’t just about organization—it can actually help your phone run faster and stay reliably connected to WiFi. If nothing else, a streamlined device tends to cooperate better, whether you’re hopping between apps or just trying to stay online.
Frequently asked questions
Before I conclude let me also address some of the queries often asked by iPhone users about, why my iPhone won’t connect to WiFi.
How do I fix iPhone connects to WiFi but no Internet?
There could be various reasons why your iPhone connects to WiFi but no Internet connection. Here are the steps to follow to fix the problem:
1. Reboot your iPhone and WiFi Router/modem;
2. Enable/Disable Airplane Mode;
3. Install software updates on your device;
4. Forget your WiFi network and rejoin;
5. Turn off WiFi Assist;
6. Turn off VPN;
7. Reset Network Settings;
8. Use Google DNS;
If you still see a message like “No Internet Connection,” there might be another issue at play. In that case, check your router and network settings to ensure everything is functioning properly. Sometimes the problem is with your network equipment or your Internet provider, not your iPhone.
Should I uninstall VPN or security software to resolve WiFi connectivity issues?
If you have security or VPN software installed, try temporarily uninstalling the software (not just disabling it), then restart your device and test again. If removing the security or VPN software solves the problem but you need to use it, reach out to your VPN provider or security software support for further assistance.
To break it down:
- Uninstall the VPN or security software (simply turning it off might not be enough).
- Restart your iPhone to clear out any lingering settings or connections.
- Test your WiFi connection to see if the issue is resolved.
- If this fixes your WiFi—but you rely on that software—contact the support team for your VPN or security app for guidance. Many providers like NordVPN or Bitdefender offer troubleshooting tailored to mobile connectivity issues.
For those who depend on VPNs for work or privacy, it’s important to strike a balance between staying secure and staying connected. If you find yourself toggling between working WiFi and necessary security tools, a quick chat with your software provider can often uncover a compatibility fix or a recommended setting.
Why is my iPhone not connecting to WiFi but other devices are?
If your iPhone is not connecting to WiFi network while other devices are,
1. Make sure your router is within range and it is on;
2. Turn on Auto Join if it is Disabled under your Wi-Fi network name;
3. Check for any issue with your Wi-Fi network;
4. Make sure that your Router is connected to the Modem and turned on;
5. Try restarting your iPhone;
6. If still your iPhone can not connect to WiFi, reset your Network Settings. If you’re using iOS 15 or later, tap Settings > General > Transfer or Reset iPhon> Reset > Reset Network Settings. If you’re using iOS 14 or earlier, tap Settings > General > Reset > Reset Network Settings;
But wait—don’t forget about your router itself!
Sometimes the issue isn’t your iPhone at all, but the box blinking in the corner (or hiding behind a stack of old bills). Here are a few extra steps that often get overlooked:
- Update your router’s firmware. Outdated firmware can cause mysterious connectivity issues, so check the manufacturer’s website for updates.
- Check your distance. If you’re two rooms and a wall of lead paint away from your router, signal strength will suffer. Try moving closer.
- Try a different frequency. Many routers broadcast both 2.4 GHz and 5 GHz signals. If one isn’t working, jump to the other—sometimes your phone just prefers the taste of one over the other.
- Give your router and modem a fresh start. Unplug them for 30 seconds, then plug them back in. It’s the classic “have you tried turning it off and on again?”—and it really does work more often than you’d think.
By giving both your iPhone and your WiFi network a quick tune-up, you’ll increase your chances of a speedy reconnection—without needing an IT degree (or a magic wand).
How do I get my iPhone to connect to WiFi?
To Connect to Wi-Fi on your iPhone,
1. Go to Settings > WiFi;
2. Turn on WiFi and your iPhone will search for available WiFi networks automatically;
3. Tap the WiFi network you want to join;
How do I fix greyed-out WiFi?
To fix greyed-out WiFi follow the steps below:
1. Make sure that your device is using the latest software;
2. Ensure that the Airplane mode is off;
3. Reset the network settings. To do this,
go to Settings > General > Reset > Reset Network Settings;
Why won’t my iPhone connect to WiFi or the internet?
When your iPhone won’t connect to the internet reset your Network Settings.
To do this, go to Settings > General > Transfer or Reset iPhone > Reset > Reset Network Settings;
You might also find this related post useful: iPhone keeps disconnecting from WiFi -here’s how to fix the problem
Conclusion
It is hoped that in most cases the fixes suggested above would be able to satisfy the not-so-uncommon query of iPhone users – why my iPhone won’t connect to WiFi?
As already mentioned, ‘iPhone can not connect to WiFi’ is not an unusual issue. However, despite trying all the above fixes if you still see your iPhone not connecting to WiFi and you are not sure ‘why is WiFi not working on my iPhone’, then there may be a hardware problem, which may be best diagnosed and repaired by a designated Apple Authorized Service Provider. In such a case take your iPhone to your nearest Apple Store for a check-up or contact Apple support online for alternatives.
Also, if you have reset your network settings and your device shows that it’s connected to WiFi but you still can’t access the internet, the issue might not be with your iPhone at all. In this scenario, it’s a good idea to contact your Internet Service Provider (ISP) for assistance, as there could be an outage or other problems on their end preventing your device from accessing the internet.
If you have any other suggestions for possible solutions to why won’t my iPhone connect to WiFi or the internet, it would be appreciated if you please share the same in the comment section below.
You may also like to read: No service on iPhone – how to fix (solved)