A step-by-step guide for Netgear extender setup.
How to setup Netgear WiFi extender?
Today in this post I am going to provide an easy guide on how to setup Netgear WiFi extender to extend the range of your WiFi network at home. But before I show the steps of how to setup Netgear WiFi range extender let’s first see what is a WiFi extender.
What is a WiFi Extender?
Due to the ever-increasing use of wireless devices like cell phones, game consoles, TVs, tablets, and PCs in our homes, demand for better coverage of WiFi has increased significantly. Many of the users are not aware of the fact that the range of their existing routers cannot cover all the places in their homes. The places where the WiFi signals cannot reach are known as ‘dead spots’. The existing old routers also do not offer the desired stability to work with multiple devices all at a time. Such connectivity problems can be resolved only by replacing the old routers with modern mesh-network routers, which are too expensive. Mesh WiFi systems, such as those from Orbi and other leading brands, offer several advantages that help tackle dead spots and unreliable connections:
- Seamless Coverage: Unlike traditional extenders, mesh WiFi provides uniform signal strength throughout your home without requiring separate network names (SSIDs).
- Simplified Network Management: Mesh systems allow you to manage your entire home WiFi through a single, user-friendly interface—making monitoring and control a breeze.
- Improved Performance: With dedicated WiFi radios, mesh setups deliver better speed and stability, particularly in larger houses or in environments crowded with multiple devices.
- Flexible Expansion: You can always upgrade mesh WiFi coverage by adding more satellites, ensuring fast, reliable connections even in those hard-to-reach corners.
However, you can now get rid of these WiFi ‘dead spots’ in your house in a cost-effective way by setting up WiFi extenders through which you can expand the range of your WiFi routers…
Benefits of seamless coverage, easy management, and superior performance with Mesh WiFi
Now, you might be wondering what makes a mesh WiFi system stand out from traditional extenders. Aside from being the hot topic among tech enthusiasts from New York to New Delhi, mesh WiFi systems—like those from Google Nest, TP-Link Deco, or Eero—come with some game-changing advantages:
- Seamless Whole-Home Coverage: Mesh systems use multiple units that communicate with each other, blanketing your entire home in a single WiFi network. Gone are the days of switching between network names (SSIDs) in different rooms—walk from the basement to the attic without any interruption to your streaming or video calls.
- Centralized Control and Effortless Management: Most mesh setups offer an easy-to-use mobile app, letting you manage your entire WiFi network from one place. You can see who’s connected, pause internet for the kids at dinner, or even run speed tests right from your couch—no technical wizardry required.
- Consistent Speed and Reliable Connectivity: Thanks to dedicated connections between mesh units, your devices enjoy stable speeds—whether you’re gaming in the garage or Zooming in the sunroom. Mesh networks especially shine in large homes or apartments with lots of walls, or if you have a “device-happy” family that loves their gadgets.
So, if you need strong, hassle-free WiFi in every corner of your castle, a mesh system might just be the upgrade you’ve been looking for.
However, you can now get rid of these WiFi ‘dead spots’ in your house in a cost-effective way by setting up WiFi extenders through which you can expand the range of your WiFi routers. The Range Extenders or WiFi extenders can work with any standard router and bring better coverage and strength to the WiFi signal.
While WiFi extenders are a practical and affordable solution for most households, they aren’t always the perfect fit for every situation. WiFi extenders can help you boost coverage and eliminate dead zones, but in larger homes or environments saturated with many devices, their performance might not always be consistent. For those needing seamless, whole-home coverage—think larger homes, thick-walled apartments, or spaces with lots of smart devices—a modern Mesh WiFi system (like Google Nest Wifi or TP-Link Deco) might be worth considering.
Mesh WiFi systems offer several advantages:
- SeamJless Coverage: Mesh setups use multiple access points to provide uniform coverage throughout your home, without the hassle of switching between different network names or SSIDs as you move around.
- Unified Management: With mesh, you can manage your entire network through one simple app or interface, making it easier to monitor and control connected devices.
- Enhanced Performance: Mesh systems often use dedicated backhaul channels, leading to more stable speeds and better performance even at the edges of your home.
- Expandable: Need more coverage? Just add another mesh satellite to extend fast WiFi to every nook and cranny.
In summary, while a WiFi extender is an excellent choice for extending your wireless coverage—especially if you want to get more mileage out of your existing router—those with more demanding needs or larger living spaces might find a mesh system to be a better long-term solution. Think about your specific needs, your home layout, and the number of devices you plan to connect before deciding which setup is right for you.
Can you use a WiFi Extender with a Mesh WiFi system?
This is a question I hear quite often, especially from readers who already have a mesh setup like Google Nest WiFi or TP-Link Deco but want to push their coverage even further. The short answer is: yes, you can use a traditional WiFi range extender alongside a mesh WiFi system.
But there are a few things to keep in mind. While extenders can help fill in stubborn dead zones—perhaps for a smart doorbell, basement media player, or that mysterious corner where your phone seems to lose hope—they don’t offer the same seamless experience as dedicated mesh satellites. Mesh systems are designed so all units “talk” to each other intelligently, giving you smooth transitions as you roam around your house. Plugging in a regular WiFi extender works, but you might notice your devices hang onto a weak signal longer or you end up juggling multiple network names (SSIDs).
For simple needs—like powering up a WiFi-enabled thermostat out in the garage—a basic extender does the trick. If you want whole-home coverage without headaches, though, adding another compatible mesh point or satellite (from the same mesh brand) tends to deliver better results.
So, you can mix and match, but for the smoothest WiFi ride, sticking with accessories designed for your specific mesh setup is usually the way to go.
Choosing the right WiFi extender
Here are some important factors to consider while choosing the right WiFi extender:
- Go for an extender with features that are compatible with your existing older router (network speed, capability of frequency handling, etc.);
- Buy a WiFi extender that has Gigabit Ethernet (GE) ports;
- Go for an extender with an external antenna which offers better coverage area;
- Purchase a duel-band (2.5GHz and 5GHz) extender which gives superior range as compared to a single-band device;
- Music lovers should go for an extender with an audio jack;
When it comes to choosing an extender, the Netgear WiFi Extender is a great choice for users as it provides a simple interface to control the network easily.
Before I go to describe how to setup Netgear WiFi extender let’s first see how the Netgear WiFi extender works.
How does Netgear WiFi extender work?
Netgear WiFi extender is meant to expand the range of WiFi routers in your home network. The extender functions as a bridge capturing the wireless signals from your router using its powerful antennas and rebroadcasting the same after amplification to the areas where the WiFi signal is weak or to the ‘dead spots’ where the signal cannot reach at all. With the Netgear new extender setup you can effectively double your wireless network range.
The universal compatibility of the Netgear WiFi extender makes it completely different from other extenders. The Netgear can work with any standard router including the router you get from your service provider and boost your WiFi signal coming from the router.
When should you choose mesh satellites over a range extender?
While WiFi range extenders can lend a hand in improving signal to isolated or stationary devices—think smart plugs, garage door openers, or any gadget that doesn’t need lightning-fast speeds throughout the entire house—they do have their limits. Range extenders often create a separate network name (SSID) and may sometimes require you to manually switch networks as you move around. Their performance can be adequate for low-bandwidth needs, but for a truly seamless and high-performance experience, they aren’t always the best solution.
If you want uninterrupted roaming from room to room and consistently strong WiFi for things like 4K streaming, large downloads, and gaming across every corner of your home, it’s better to go with matching mesh satellites from the same mesh system as your main router (for example, adding additional Eero, TP-Link Deco, or Google Nest Wifi units to your existing mesh network). Mesh satellites work together to create a unified network that covers your entire home, so your devices stay connected automatically with no speed drops or juggling different network names.
In short, use mesh satellites if you’re aiming for:
- Whole-home coverage without dead zones or ‘signal drop-off’ areas
- No-hassle seamless roaming between rooms or floors
- Stable, high-speed connectivity for all your devices and activities—not just the basics
Save range extenders for smaller jobs or less critical devices, but go with mesh nodes when you want your WiFi network to feel invisible and effortless, no matter where you wander at home.
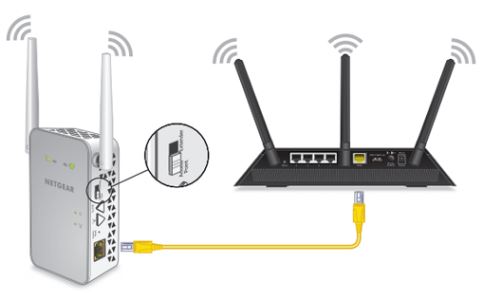
How to setup Netgear WiFi extender?
The Netgear WiFi extender setup can be done by two methods – the manual method and the WPS (WiFi Protected Setup) method.
First of all, ensure that the Netgear WiFi extender is placed in the same room as that of your home router. Now follow the step-by-step guide to setup Netgear extender in your home and get started with it.
Netgear extender setup via manual method
If your router doesn’t have a WPS (WiFi Protected Setup) button—which is common with some models from brands like Linksys, ASUS, or TP-Link—you’ll need to use the manual setup method. WPS offers a quick push-button setup, but don’t worry if it’s not available; the manual approach is straightforward and reliable.
Follow the steps below for setting up Netgear WiFi range extender via manual method:
- Plug in the WiFi range extender into an electrical socket and turn it on;
- Look for the netgear extender access point either from your mobile or PC;
- Connect the Netgear extender to your WiFi device;
- Once connected launch any browser and navigate to the mywifiext.net web page. This will take you to the Netgear new extender setup page;
- Click the NEW EXTENDER SETUP button;
- Create an account and click the NEXT button;
- Select the router network;
- Click the ‘next’ button to see the available router networks;
- Enter the password and click ’continue’
- Select your router network whose WiFi signal you want to extend;
- Click on the ‘next’ button;
- On the next page, it will ask for your preferred network configurations;
- Choose the settings as per your needs (if you do not want to extend both WiFi bands, clear the 2.4 GHz WiFi Networks or the 5 GHz WiFi Networks check box) and click on ‘Finish’;
Now you have completed the Netgear extender setup and you are ready to use the extender with ease.
If you ever notice your router doesn’t have a WPS button, just remember: the manual setup works on virtually any router, regardless of make or model.
Troubleshooting: If the Setup Page Won’t Load
If you’re having trouble getting the extender’s setup page (like mywifiext.net) to open, don’t panic—there are a few simple fixes you can try:
- Double-check that your phone or laptop is connected specifically to the extender’s temporary WiFi network (it’s often called something like NETGEAR_EXT), rather than your usual router’s network.
- If the setup page still doesn’t appear, type the extender’s default IP address directly into your browser’s address bar (for most extenders, it’s typically 192.168.1.250).
- Still having issues? Clear your web browser’s cache or switch to another browser, then try accessing the setup page again.
A quick recap: connect to the extender’s network, use the direct IP if the default address doesn’t work, and don’t forget to refresh your browser or try a different one if you’re hitting any snags. This basic troubleshooting works the same way for just about any brand—Linksys, TP-Link, ASUS, you name it.
Netgear WiFi extender setup via WPS method
The WPS method is the easiest way for the Netgear WiFi extender setup. Here are the steps to follow on how to configure netgear WiFi extender via WPS method
- Power on the extender;
- Press the WPS button on the Netgear extender for some time;
- Press the WPS button on your existing router at home;
- This will turn the LED light green indicating that your router has been configured properly with the Netgear extender;
- Follow the same procedure for the dual-band range extender;
- Lastly, connect to the Netgear extender network – use the same password as that of your router network; connect your devices to the extender’s new network using your WiFi settings. This ensures all your gadgets—phones, laptops, and smart home devices—are linked to the boosted signal for seamless browsing and streaming throughout your space.
- Now that the setting up Netgear WiFi range extender via WPS is complete, you can enjoy high-speed internet from anywhere in your house or workplace;
Setting up a WiFi Range Extender using a mobile app
If you prefer to use your smartphone to set up your WiFi range extender, many modern extenders—including popular models from TP-Link, D-Link, and Linksys—offer easy app-based installation. Here’s a quick walkthrough to get you connected in no time:
- Download the official app for your range extender from the App Store or Google Play (search for brands like TP-Link Tether, D-Link Wi-Fi, or Linksys App).
- Plug in your extender and power it on. Make sure it’s placed in the same room as your main router for the initial setup.
- Open the app, and follow the prompts to add a new device or set up a new extender.
- Connect your phone to the extender’s default WiFi network—this may be listed in the extender’s quick start guide or label.
- The app will guide you through the rest of the process: selecting your main WiFi network, entering your password, and choosing which bands to extend (2.4 GHz or 5 GHz).
- After setup, you can use the app to customize the network name, manage connected devices, and check signal strength.
- Once you’re comfortable that everything is working, unplug the extender and move it to a location about halfway between your router and the area you want to cover.
That’s it! With the app method, you can typically finish setup in just a few minutes, all from the palm of your hand.
Troubleshooting Common WiFi Extender Issues
If your WiFi extender isn’t behaving as expected, don’t panic—most hiccups are easily fixed with a few quick checks. Here are some troubleshooting steps to help you get things back on track:
- Confirm your device is on the extender’s network: Double-check that your phone, laptop, or tablet is connected to the WiFi extender’s network (often labeled something like “TP-Link_Extender” or “Linksys_EXT”) rather than your main router.
- Restart your equipment: Sometimes, a simple power cycle does wonders. Unplug both your extender and main router, wait 30 seconds, and plug them back in.
- Try the direct IP address: If the extender’s setup page isn’t loading, enter its default IP address (commonly 192.168.0.254 or 192.168.1.250, depending on the brand) in your browser address bar.
- Clear your browser cache: Cached data can interfere with setup pages. Try wiping your browser cache or use a different device/browser to access the setup interface.
- Check extender placement: Make sure the extender is positioned where it still receives a solid signal from the router—ideally, about halfway between your router and the WiFi dead zone. Too far from the router, and it can’t work its magic.
- Factory reset if needed: If you’ve made changes that aren’t working, press and hold the reset button (usually on the side or bottom) for 10 seconds to start fresh.
- App support: Many TP-Link, D-Link, and Linksys models offer troubleshooting steps right inside their mobile setup apps, like scanning for optimal placement or checking signal strength.
By following these steps, you can eliminate the most common extender headaches and restore seamless WiFi coverage throughout your space.
When a WiFi Extender Isn’t Enough
WiFi range extenders are a solid solution for expanding your network, especially if you’re just looking to cover a pesky dead zone or two. But sometimes, even after troubleshooting and optimal placement, you might find that the extender just isn’t cutting it—maybe you’re still juggling multiple network names, or your connection drops as you roam around the house.
In these cases, you might want to consider a mesh WiFi system. Here’s why mesh networks can be a game changer, especially in larger homes or offices:
- Uniform, Seamless Coverage: Mesh systems use multiple nodes that communicate with each other, blanketing your home in strong, consistent WiFi without having to switch between different network names.
- Simple Network Management: Most mesh networks let you manage your whole setup through one app or interface, making it a breeze to monitor devices and adjust settings.
- Improved Performance: With dedicated backhaul channels and smart routing, mesh systems keep speeds high and connections reliable—even as you move from room to room or add more devices.
- Expandable Coverage: Need more range? Just add another node or satellite to your mesh system and keep the full-speed coverage going into every corner.
Frequently Asked Questions
When it comes to setting up your WiFi extender, a few questions tend to come up time and again. Here are the answers to the most common queries, so you can get the strongest signal possible without any fuss.
How do I install a WiFi range extender?
Begin by plugging your extender into a power outlet near your main router. For models that support WPS (such as those from TP-Link, D-Link, and Linksys), you can typically press the WPS button on both your router and extender to connect them in seconds. If your router doesn’t have a WPS button, simply connect your device (laptop, tablet, or phone) to the extender’s setup WiFi network, then follow the prompts on the app or browser wizard to complete installation.
What should I do if my router doesn’t support WPS?
No worries—manual setup is universal. Just connect your device to the extender’s default WiFi network (often called something like EXT or _EXTENDER in the name), open the manufacturer’s app or type the setup address from your quick start guide into a web browser, and follow the steps to link the extender to your main WiFi.
Why isn’t the extender’s setup page loading?
Double-check that your device is connected to the extender’s temporary setup network, not your main WiFi. If the browser page doesn’t appear, you can try entering the extender’s default IP address (check your manual, often something like 192.168.0.254) or clear your browser cache and restart the process.
Where’s the best place to put a WiFi extender?
For optimal performance, position your extender about halfway between your main router and the area with a weak signal. You want it to still catch a strong signal from the router, but be close enough to the dead zone to improve coverage. If in doubt, use the signal strength indicator in the extender app or check for a solid connection light.
Can I use a WiFi extender with a mesh system?
You can use a traditional WiFi extender alongside popular mesh setups (like those from TP-Link Deco or Linksys Velop), especially for fixed smart home gadgets in garages or basements. Yes, a WiFi range extender can work with a mesh WiFi system in a pinch—this is particularly handy for low-bandwidth, stationary devices such as a WiFi garage door opener or a smart thermostat tucked away in a far corner. However, for the most seamless experience with devices that move around your home, expanding your mesh with an additional satellite unit is usually the smoother choice for consistent speeds and coverage.
If you’re looking to cover that last stubborn dead zone or bring connectivity to a rarely used outbuilding, mixing in an extender can be a practical solution—just know that the handoff between networks may not be as flawless as staying entirely within your mesh ecosystem.
If you have any other questions about setup, feel free to consult the app or your extender’s support guides—the process is designed to be as user-friendly as possible!
You may also like to read: How to setup a home network – an easy guide
Conclusion
It would be evident from the steps on how to setup Netgear WiFi extender that, for extending your home WiFi network range, both the above methods of Netgear extender setup are quite easy to implement. However, one point needs to be mentioned in this connection for the best result, the WiFi range extender should be placed at the halfway point between the router and the area you want to cover. If you want to maximize the coverage, you can place two WiFi range extenders on either side of your route which would extend the reach of your home WiFi network about three times and improve its performance.
Still, if your needs outgrow what an extender can provide, don’t be afraid to look into mesh WiFi as a more robust and future-proof upgrade. Consider your space, your devices, and how you use your network—then choose the solution that keeps you connected, everywhere you need it.
Akshay Tiwari
Dec 14. 2020
I did not know about rich results. Thank you for this elaborate explanation.
http://myfiexts.net/
Deepak Bhagat
Jan 03. 2021
I was facing the problem, and thanks to your article, it solved my problem, however, I read another article related to this, which can solve the problem as well. Here It is – New WI-FI Range Extender Setup
Mywifiext Setup
Mar 16. 2021
I was facing the problem, and thanks to your article, it solved my problem, however, I read another article related to this, which can solve the problem as well. Here It is – Netgear WiFi Range Extender Setup
rockspace_ext
Dec 22. 2021
Thanks for share the informative blog. Really it helps to setup my extender device.
netgear extender setuo
Dec 12. 2022
Thanks for sharing the inforamtion about netgear extender setup guidelines