Restore from iCloud backup – steps to follow.

How to restore iPhone from iCloud backup?
Here is a simple guide on how to restore iPhone from iCloud backup.
Once configured properly iCloud automatically backs up all your data including messages, apps, Camera Roll photos, purchased music and other media files etc. on your iPhone, iPad or iPod Touch wirelessly and store them on Apple’s server.
You just plug in your device into a power outlet, lock its screen and your device will automatically transfer its backup files to your iCloud account and you can restore from iCloud backup on a new iOS device, or on one you already have. However, with your free iCloud account there is a limit to free storage space which can be used for all your iOS devices, which is 5 GB. However, if you need more iCloud storage, you can buy more from your device.
You may like to read this related post: How to backup iPhone to iCloud or a Computer in easy steps
Why restoring from iCloud backup matters
Restoring your iPhone from an iCloud backup isn’t just a handy trick—it’s an essential safety net for both everyday users and workplaces.
For individuals, regular iCloud backups mean your contacts, photos, messages, and app data are safely tucked away on Apple’s servers. Lost or damaged phone? Restoring from a backup quickly gets you up and running with all your personal info intact—no need to start from scratch or lose those holiday photos.
For businesses and organizations, this process goes a step further. If you’re managing many devices, restoring from iCloud makes it easy to get employees back to work after a device swap, upgrade, or reset. It also helps keep data synchronized and ensures every device remains in compliance with company policies, all while reducing downtime.
So, whether you’re safeguarding your selfies or your spreadsheets, knowing how to restore from iCloud backup is a smart move for both peace of mind and productivity.
How to restore iPhone from iCloud backup
Before you reset your iPhone, first check when your last iCloud backup occurred by going to Settings > (your name) > iCloud > Manage Storage > Backups.
What if your iCloud backup isn’t showing up or isn’t recent?
If you don’t see your latest backup, or the only one listed looks a bit prehistoric (with a backup date from the last century), don’t worry—here’s what you can do:
- On your old iPhone, head to Settings > [your name] > iCloud > iCloud Backup and tap “Back Up Now” to make sure you get the most recent data saved.
- Double-check that you have enough free iCloud storage. If your iCloud is running out of space, backups might fail or not run as scheduled. You might need to delete old backups or consider upgrading your storage plan.
- If you see an older backup and aren’t sure whether to use it, weigh your options: You can either proceed with that backup (but risk missing more recent photos, messages, or other data), or create a new backup and use that one for the restore process.
Once you’ve made sure your freshest backup is available, you’re all set for restoration!
Now, follow the steps below to reset your iPhone and restore it from an iCloud backup:
1. Erase all of its content before you can use the steps to restore your iPhone from iCloud backup. To do this,
Go to Settings > General > Reset > Erase All Content and Settings;
2. Follow the onscreen setup steps until you reach the Apps & Data screen;
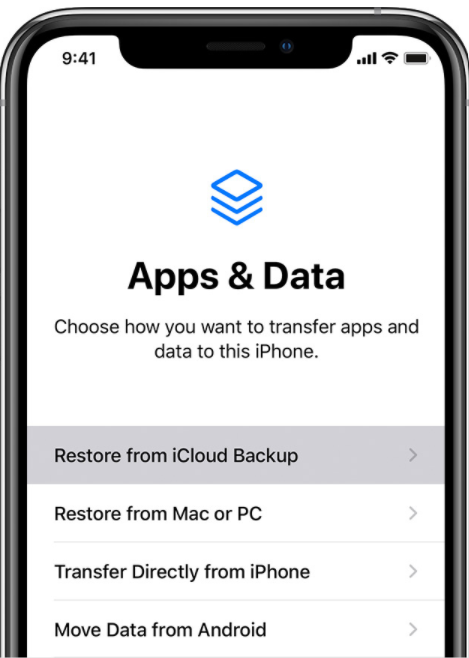
3. Next tap ‘Restore from iCloud Backup’;
4. Sign in to iCloud with your Apple ID;
Make sure you know your Apple ID and password, as you’ll be prompted to enter them during the restore process. If you use more than one Apple ID for purchases, have those credentials handy as well. Additionally, if you have two-factor authentication enabled, be prepared to access your trusted device or phone number to verify your identity.
5. Proceed to Choose backup. Look at the date and size of each and pick the most relevant and latest one;
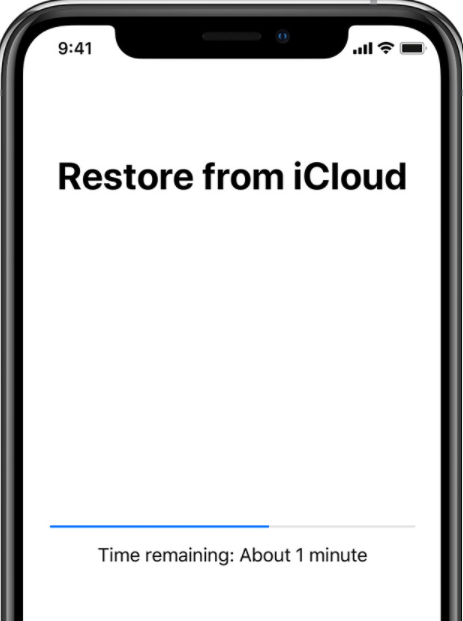
6. Once you select the backup, the transfer starts. If a message says that a newer version of software is required, follow the onscreen steps to update;
7. Wait for a progress bar to appear on your screen and complete. The progress bar shows the time remaining as iCloud restores your iPhone data. Depending on the size of the backup and the network speed, the progress bar might need a few minutes to an hour to complete;
How long does this take?
The time it takes to restore your iPhone from iCloud backup depends on several factors—primarily the size of your backup, the speed of your Wi-Fi connection, and your device’s performance. Smaller backups on fast connections may wrap up in minutes, while larger ones could take several hours. Keep in mind that downloading apps, photos, and media may continue in the background even after the initial setup is finished.
8. Once the setup is finished your device will automatically restart and you can start using your device. Content like your apps, photos, music, and other information will continue to restore in the background for the next several hours or days, depending on the amount of information there is. Try to connect often to Wi-Fi and power to let the process complete;
Can you restore from iCloud backup without erasing your iPhone first?
This is a common question! Unfortunately, Apple does not currently offer a way to restore an iCloud backup onto your iPhone without first wiping all your current data. In other words, to use an iCloud backup, you’ll need to erase your device and set it up as new or during the initial setup process. Once you reach the Apps & Data screen, you’ll see the option to “Restore from iCloud Backup.”
So, if you’re hoping to merge data from your backup with your current content, you’re out of luck—restoring from iCloud always replaces the existing data on your iPhone with the contents of the selected backup. If you need to save anything before resetting, make sure to manually back up important files or sync them to iCloud Drive, Google Drive, Dropbox, or another service.
Best Practices Checklist for a Smooth Restore
For the best possible outcome when restoring your iPhone from an iCloud backup, keep these tips in mind:
- Double-check your backup: Before starting, verify that your most recent iCloud backup exists and note its size and date.
- Stay connected: Make sure your device is on a stable Wi-Fi network and plugged into power as much as possible.
- Erase only if needed: Only erase your device if you’re setting up a new iPhone or need a complete refresh.
- Confirm Apple ID: When prompted, sign in with your correct Apple ID and choose the right backup from the list.
- Don’t rush the process: Keep your device connected until the progress bar and all downloads are complete.
- Post-restore check: After restoring, review your apps, accounts, and any security configurations to ensure everything is in place.
- Document for future reference: If you’re managing multiple devices (like in a family or small business), jot down which device was restored, which backup was used, and the outcome for your own records.
- Set expectations: If you’re helping someone else, let them know about possible downtime, how long restores can take, and network requirements.
Troubleshooting common restore issues
If you run into problems while trying to restore your iPhone from a cloud backup, don’t panic just yet! There are several steps you can take to get back on track:
- Check your Wi-Fi connection: Make sure you have a stable internet connection. Interrupted or slow Wi-Fi can cause issues during restoration.
- Verify your storage space: Double-check that your device has enough free space to accommodate the backup you’re restoring.
- Restart your devices: Sometimes, a simple restart of both your iPhone and your router does the trick.
- Update your software: Make sure your device is running the latest version of iOS. If a backup requires a newer version, update your software before trying again.
- Pause and retry: If the restore process stalls, try pausing and then resuming the download, or start the process over.
- Third-party tools: There are reliable applications like EaseUS MobiMover and iMazing that offer extra flexibility for restoring backups or transferring data if you’re having trouble with the built-in options.
If you’re still stuck after these steps, it’s a good idea to contact technical support or consult your preferred tech forum. Sometimes, a little outside help is just what you need to get things working smoothly again.
What to do if your data is missing after an iCloud restore
If you notice that some of your data is missing after restoring your iPhone from an iCloud backup, don’t worry—there are a few things you can try:
- Check the backup date: Only information saved up to the time and date of that backup will be restored. Anything created after that point, such as new photos, messages, or contacts, won’t be included.
- Look for missing content: If recent items aren’t there, see if they exist in other places—like on another device, in your email attachments, or in cloud services such as Google Drive or Dropbox.
- Manually back up recent data: Before performing another restore, try to manually save any important files or photos using AirDrop, email, or a cloud storage app.
- Try third-party recovery tools: Utilities like Dr.Fone, Tenorshare UltData, or iMazing can help you recover specific data types or extract content from older backups if necessary.
- Contact support: If you still can’t locate your missing data, reach out to Apple Support for guidance—they may be able to help you recover information or offer alternative solutions.
It’s always best to periodically save or export important data separately, especially before making big changes to your device. This can help protect against unexpected losses in the future.
What happens if your iPhone loses Wi-Fi during the restore process?
If your device loses Wi-Fi while restoring from an iCloud backup, don’t worry—your progress isn’t lost. The restore will simply pause until you’re connected to Wi-Fi again. Just reconnect to a stable network, and your iPhone will pick up right where it left off.
For best results, try to keep your iPhone plugged into power and within range of Wi-Fi throughout the process. If your home network is spotty, consider using a portable Wi-Fi hotspot (like those from TP-Link, Netgear, or JioFi). This keeps everything moving without interruption and helps ensure your photos, apps, and other data restore as quickly as possible.
What to do after your restore completes?
Once your iPhone finishes restoring, keep it connected to your computer until all your data and settings have fully synced. This is especially important if you’re using third-party programs like EaseUS MobiMover or AnyTrans to move files or manage content. Give your device enough time to finish the synchronization process to avoid missing photos, contacts, or other important data.
You can safely unplug your device when the sync is done—usually, your transfer tool will let you know when it’s safe to disconnect. If in doubt, a quick glance at the status bar or progress indicator will do the trick. Keeping your iPhone connected that little bit longer ensures a smooth, hassle-free restoration experience.
Post-Restore Checklist
After the restore and sync are complete, take a few extra minutes to make sure everything is running just as it should:
- Stay connected to Wi-Fi: If you had a large backup, connect to Wi-Fi and consider leaving your iPhone plugged in overnight. This ensures that any remaining photos, apps, or messages still downloading from iCloud or other services have time to finish.
- Double-check your settings: Open your Settings app and verify that Face ID or Touch ID is set up properly. Log into your banking apps, email accounts, and VPNs to confirm they’re working as expected.
- Corporate devices: If you’re restoring a work phone, make sure all your company’s policies, device management profiles, and security configurations are active and up-to-date.
- Don’t forget third-party apps: Some apps—especially those that handle sensitive data—might require a fresh login or a quick setup after restoration.
Taking these steps helps catch any snags early and ensures your iPhone is ready to go, just like it was before the restore.
Security and Compliance Considerations When Restoring from iCloud Backup
When you restore your iPhone from an iCloud backup, there are a few important security and compliance factors to keep in mind:
- Protect your credentials: Restoring from iCloud means all your apps, messages, and settings are coming back onto your device. Make sure your Apple ID, passwords, and any two-factor authentication methods are up-to-date and secure. Never share your credentials, even during a restore.
- Corporate and business needs: If you’re setting up a work device, double-check that your VPN profiles, business email accounts, and security applications (such as those from Cisco or Norton) are successfully restored. Missing configurations could affect both device security and compliance with workplace policies.
- Keep audit trails: It’s a good habit—especially for business or shared devices—to note down when the device was restored, which backup was used, and if there were any issues or missing data after restoration. This helps for troubleshooting later and is useful for audit purposes in many organizations.
- Monitor for data loss: After restoring, take a few moments to ensure all sensitive files, business data, and critical apps are fully restored. If you notice anything missing, address it quickly to avoid compliance headaches.
Taking these steps helps maintain both your personal data security and compliance with company IT policies during the restoration process.
You may also like to read: How to turn off find my iPhone from your computer
Frequently asked questions
Before I conclude let me also reply to some of the queries often made by iPhone users.
How do I transfer files from old iPhone to new iPhone without iCloud?
If your iPhone is running iOS 8 or later, you can transfer files from old iPhone to new iPhone without iCloud backup using a good iOS data transfer tool – EaseUS MobiMover.
How do I backup my iPhone without iCloud?
You can use your PC or Mac to back up your iPhone without iCloud. To do this, plug-in your iPhone into your PC or Mac, open iTunes, and sync your files between your PC or Mac and iPhone. iTunes will back up all your photos, messages, call logs, media files not purchased from iTunes, application data, settings, memos, calendar, and bookmarks.
How to restore iPhone from computer backup?
To restore iPhone from computer backup, first open iTunes on the PC or Mac which was used by you to backup your iPhone. Next, connect your iPhone with USB cable. Now, select your device and click ‘Restore Backup’ to choose the backup you’d like to restore. Finally click ‘Restore’
If you see a message saying your device’s software is too old, follow the on-screen steps to update. Check the date of each backup and pick the most relevant one for your needs. When prompted, enter the password if your backup was encrypted. Then just wait for the restore process to complete—your iPhone will restart and all your data should be back in place.
Where to get more help with backup or restore issues?
If you run into any trouble during the backup or restore process, don’t worry—help is at hand. Here are a few avenues you can explore:
- Check troubleshooting guides: Many reputable sites like iMore, How-To Geek, and TechRadar offer easy-to-follow solutions for common problems with iPhone backups and restores.
- Leverage support communities: Online forums such as Reddit’s r/applehelp or the MacRumors forums are filled with fellow users who have tackled (and solved) similar issues.
- Use third-party tools: If standard methods aren’t working, consider apps like EaseUS MobiMover or iMazing, which provide additional features and troubleshooting steps for device backups and restores.
If you describe your specific issue in any of these places, you’ll often receive tailored advice from experts and seasoned users alike. This way, you don’t have to get stuck—there’s always someone who’s been there, fixed that.
What to do if I can’t back up or restore my iPhone with my computer?
Ran into trouble backing up your iPhone or restoring it from your computer? Don’t worry—it happens to the best of us! Here are a few steps you can try before panic-eating all your snacks.
- Check your connections: Make sure your USB cable isn’t loose, frayed, or from your mysterious “spare parts” drawer. Try a different cable or a different USB port on your computer.
- Update your software: Both your computer’s operating system and your backup software (like iTunes or EaseUS Todo Backup) should be up to date. Outdated software can sometimes block a successful backup or restore.
- Restart everything: Yes, the classic “turn it off and on again” trick works wonders. Restart both your iPhone and your computer.
- Check your storage space: Not enough space on your computer or iPhone? Clear out some files or apps to free up room for your backup.
- Disable security software (temporarily): Sometimes, antivirus programs or firewalls block backup processes. Temporarily disable them and see if your problem resolves.
- Try another computer: Still no luck? If possible, try backing up or restoring your iPhone using a different computer.
If you’re still stuck, many third-party utilities like iMazing or Dr.Fone can help you troubleshoot iPhone backups and offers handy restore options as well.
Keep these tips handy—they’re lifesavers when your tech decides to throw a tantrum.
What should I do if prompted for an encrypted backup password during restoration?
If you’re asked for a password while restoring from an encrypted backup, this means the backup was secured with a password for privacy. Simply enter the password you previously set up for this backup to proceed. If you can’t remember setting one, try any passwords you commonly use (sometimes folks use the same as their device PIN or iTunes password).
If you’re stuck, some third-party software like EaseUS MobiMover or iMobie PhoneRescue offer password recovery tools that might help, but be sure to download from reputable sources. Just remember, without the correct password, your backup can’t be restored due to the built-in encryption protections.
What should I do if my device doesn’t show up in iTunes or Finder?
Sometimes, your iPhone, iPad, or iPod touch might not appear in your computer’s device management software—don’t panic! Here are a few troubleshooting steps you can try:
- Check your USB cable and port: Make sure your device is properly connected using an original or certified cable. Try using a different USB port on your computer, or swap out the cable to rule out hardware issues.
- Restart both devices: Turn off your iPhone (or iPad/iPod touch) and your computer, then power them back on. This often resolves minor glitches.
- Update your software: Ensure your computer’s operating system and device management software (like iTunes or similar apps such as EaseUS MobiMover or iMazing) are up to date.
- Trust your device: When you connect your device to your computer, you should see a “Trust This Computer” prompt on your device’s screen. Make sure to tap “Trust.”
- Try a different computer: If possible, plug your device into another computer to see if it’s detected there.
If none of these steps work, it may be worth checking your device driver settings (especially on Windows PCs), or consulting the support resources of your chosen device management tool. This should help you get back on track with your backups or restores without much hassle.
You may also like to read this post: iPhone Backup Location for Mac and Windows – how to find
How can organizations manage backups and restores across device fleets using iCloud?
Keeping tabs on dozens—or hundreds—of iPhones and iPads can feel like herding digital cats, but iCloud makes it easier to corral your backups and restores when you’re managing a whole fleet of devices in a business or school.
Here’s how organizations can stay organized (and avoid disaster) when it comes to large-scale backup and recovery:
- Audit backup status regularly: Assign someone to periodically check that every device is successfully backing up to iCloud (or your chosen service). Many organizations set reminders or use dashboard solutions to make double-checking backups part of their routine.
- Automate with device management tools: Leverage Mobile Device Management (MDM) platforms like Jamf, Kandji, or Hexnode. These tools help automate backup settings, push Wi-Fi configurations (nobody likes manual setup marathons!), and enforce backup schedules so not a single phone slips through the cracks.
- Streamline migration and restores: When rolling out new iPhones or replacing devices, use supervised deployment. This ensures each device gets restored from the correct backup—keeping work apps, settings, and security policies in place without headaches.
- Establish restore protocols: Have a clear policy in place for who is responsible for data restore operations, what steps they should take if a device is lost or reset, and how to validate that critical business data returns safely.
- Security matters: Make sure that all backup and restore operations are done over secure networks and that backup encryption is always enabled (and the passwords for those backups stored safely where your IT folks can find them—otherwise, it’s password scavenger hunt time).
- Train end-users: Don’t assume everyone knows the right steps! Run quick training sessions for employees or students on what to do (and not do) if they’re told to restore their device.
By combining a touch of automation, regular oversight, clear policies, and a dash of user education, organizations can keep their data (and sanity) intact when managing backup and restore operations across the board.
Conclusion
When you first set up your iPhone, iPad or iPod Touch you are offered the option to back up your data to Apple’s iCloud service. As local backups on your Mac or PC can be problematic should you have trouble with your computer, it is considered more dependable from data security point of view to move to the Clouds for data backups.
It would be evident from the steps shown above on how to restore iPhone from iCloud backup that iCloud not only makes it easy for you to restore from iCloud backup whenever necessary, it also makes easier for you to migrate your data from iCloud to a new iOS device. Nevertheless, I would suggest to keep your data also backed up locally via iTunes to your computer so that it can be restored from there if need be.
You may also like to read: How to Recover Deleted Videos from iPhone