How to view iPhone backup files?
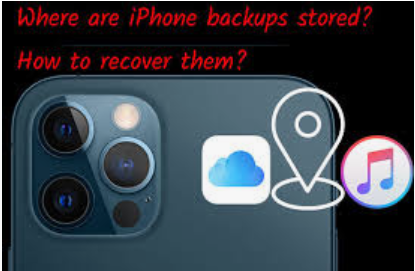
iPhone backup location in PC.
I have come across many iPhone users asking the question- where exactly is the iPhone backup location in PC and how to view iPhone backup files?
This article would help you to locate the place where are iPhone backups stored on Windows and Mac so that you can access the backup files of your device in case of emergency like loss of essential data for any reason.
Before I go to show the iPhone backup location let me first explain what is iPhone backup.
What is iPhone backup?
An individual has no role to play in iPhone file backups on iTunes as these data are automatically backed up by iTunes onto a Mac or Windows system prior to an upgrade of the device or during its synchronization. Each time the user connects his iPhone to the computer to synchronize with iTunes, iTunes takes a backup of the entire data on the iPhone first and then moves on to perform the synchronizing tasks.
But the real problem lies elsewhere. Apple has tried its best to hide from the user’s view the default iPhone backups location. A user, therefore, faces difficulty in accessing the backed-up data in his attempt to restore iPhone from backup in case of loss of essential contents from his device for any reason.
Apple has developed the device such that in general users can rely on iTunes to handle all their iPhone recovery and backup needs. Nevertheless, you may, for various reasons, like losing your important iPhone data while doing an upgrade or becoming a victim of some virus attack, sometimes need to keep your own backup copies for use in such emergency situations to restore your device from the backup. However, to do this it is quite obvious for you to know the exact iPhone backup location where are iPhone backups stored on your PC so that you can extract your lost data from there.
How to create a backup of iOS device?
Creating a backup of your iPhone is a wise step to safeguard your precious data against accidents, sudden loss, or device malfunctions. Thankfully, Apple offers a couple of straightforward methods to ensure your memories and information stay protected.
1. Backing up using iTunes (or Finder on macOS Catalina and later):
- Connect your iPhone to your computer with a USB cable.
- Open iTunes (or Finder if you’re using macOS Catalina or newer).
- Select your device when it appears.
- Click on “Back Up Now” to start the process.
- Wait until the backup completes before disconnecting.
iTunes will back up your contacts, messages, app data, photos, and more — preserving a snapshot you can restore later.
2. Backing up to iCloud:
- On your iPhone, go to Settings.
- Tap your name at the top, then select iCloud.
- Scroll down and tap iCloud Backup.
- Switch on iCloud Backup, then tap “Back Up Now.”
- Make sure your device stays connected to Wi-Fi until the backup finishes.
With iCloud, your backups happen wirelessly and automatically whenever your iPhone is plugged in, locked, and connected to Wi-Fi.
Making regular backups, whether to your computer or to the cloud, ensures that you have a lifeline in case you need to recover important files or set up a new device.
Why Should You Check iPhone Backup Locations and Storage Size?
Now, you might wonder just how much space these iPhone backups consume, and why it’s necessary to keep tabs on where they’re stored. The answer can be surprising—backups can balloon to several gigabytes, especially if you have plenty of photos, videos, messages, and app data. Each time you create a new backup through iTunes (or Finder) on your computer, a comprehensive snapshot of your device is saved. Over time, as more backups accumulate, valuable hard drive space can quickly vanish—sometimes without you even realizing it.
What’s more, iTunes automatically creates a backup every time you connect your iPhone and sync with your computer—unless you’ve switched over to iCloud Backup. This means backup files can quietly build up in the background, eating away at your storage even if you’re not consciously making copies each time. If you’re using a Windows PC or a Mac with limited storage, those backups can add up fast and start to crowd out other important files and programs.
Keeping an eye on your backup folder helps you stay ahead of storage surprises, letting you remove outdated or redundant backups before they become a problem.
It’s smart to periodically check the folder where iPhone backups are kept (on both Windows and Mac). This lets you
- See how much space your backups are taking up,
- Identify and remove outdated or redundant backups,
- Free up precious storage for other important files.
By managing your backup files, you save yourself from running into storage headaches later—and ensure your critical data is easy to locate and restore when you need it most. Keeping your backup location organized can spare you the stress of last-minute file rescues and make any device recovery process smoother.
How to view iPhone backup files?
The best way to find the iPhone backup location to recover lost files is to either use iCloud or iTunes for help.
Backups created using iCloud are available for recovery wirelessly. However, to find backups on iTunes, you need to have your iPhone connected to your computer. Depending upon the operating system in use, there are default locations in your computer where iPhone backups, created by iTunes, are stored. Now you may ask – how to view iPhone backup files created by iTunes?
The backup process is essentially the same for both Windows and Mac and the backed-up files are stored in the following locations in specific folders under different operating systems.
Viewing iCloud Backup Files on a Windows PC
If you’re hoping to peek inside your iCloud backups from a Windows computer, things get a bit trickier—Apple doesn’t offer a straight path to browse these backups like a simple folder. But don’t worry, there are ways to access and review your data with a little help from additional software.
Options for Accessing iCloud Backups
Here’s how you can view what’s stored in your iCloud backup from your Windows PC:
- Use Trusted Backup Tools: Several reliable programs are available that allow you to log into your iCloud account securely and scan for available backups. Once connected, these tools can display the backups saved to your account and let you preview or extract specific items—such as contacts, messages, photos, videos, notes, and more—directly to your computer.
- Follow a Simple Process: Usually, you’ll need to:
a. Download and install your preferred backup viewer.
b. Launch the tool and sign in with your Apple ID when prompted. (Be sure to use a reputable application to protect your privacy and data!)
c. Browse the list of available iCloud backups. You can then select a backup to preview its contents or extract specific files—like images (HEIC, PNG, JPG), videos (MOV, MP4), notes, calendars, contacts (as vCards), and even your messages.
- Security Tip: These tools generally won’t allow you to directly browse iCloud backups in Windows Explorer, but they do simplify the process of getting your data out and onto your PC in readable formats.
While this isn’t quite as straightforward as poking around a regular folder, it’s still an efficient way to recover lost files, migrate data to a new device, or simply keep your digital memories organized.
For extra peace of mind, make sure you only download software from sources you trust, and keep your Apple ID credentials safe throughout the process.
Steps to Locate All iPhone Backups on Your Computer and in iCloud
If you want to find every available iPhone backup—whether stored locally on your computer or in your iCloud account—just follow these simple steps:
On Your Computer (Mac or Windows):
- First, navigate to your system’s default backup folder. On a Mac, open Finder and go to: ~/Library/Application Support/MobileSync/Backup/. On Windows, the backup location will depend on your version (details below).
- You’ll see a list of backup folders, each corresponding to a different backup snapshot your computer has saved from iTunes or Finder.
For iCloud Backups:
- Grab your iPhone and open the Settings app.
- Tap your name at the top of the screen, then select “iCloud.”
- Next, go to “Manage Storage” (or “iCloud Storage”), and tap “Backups.”
- Here, you’ll see all your device backups stored in iCloud, along with details about each backup, such as device name and backup date.
If you’re using a Windows PC and want to locate iTunes-created backups:
- For Windows 10, 8, or 7, open File Explorer and enter:
\Users\[YourUsername]\AppData\Roaming\<mark style=”color: #272B32; border-width: 1px; border-radius: 4px; box-shadow: 0px 1px 3px 0px rgba(0, 0, 0, 0.1), 0px 1px 2px -1px rgba(0, 0, 0, 0.1); background-color: #E9D5FF; border-color: #C084FC;”>Apple Computer</mark>\MobileSync\Backup\ - For older Windows versions, the folder may be under C:\Documents and Settings\[YourUsername]\Application Data\<mark style=”color: #272B32; border-width: 1px; border-radius: 4px; box-shadow: 0px 1px 3px 0px rgba(0, 0, 0, 0.1), 0px 1px 2px -1px rgba(0, 0, 0, 0.1); background-color: #E9D5FF; border-color: #C084FC;”>Apple Computer</mark>\MobileSync\Backup\
Whether you’re looking in the cloud or on your computer, these simple steps will help you zero in on all available backup copies—giving you peace of mind in case you ever need to restore lost data.
Finding the iTunes Backup Folder with the Windows Search Box
If hunting through File Explorer sounds a bit too old school, Windows gives you a shortcut: its built-in search box. Here’s how you can quickly bring your backups out of hiding:
- Click the search bar next to the Start button (on Windows 10/11), or use the search feature via your Start menu for earlier versions.
- Type %appdata% into the search box (including the percent signs) and hit Enter. This will launch the AppData folder.
- Navigate through: Apple Computer > MobileSync > Backup.
Alternatively, you can use %userprofile% in the search bar instead:
- Enter %userprofile% and press Enter.
- Open the Apple folder, then MobileSync, and finally Backup.
Both routes will lead you straight to the folder where iTunes stashes your iPhone backups—perfect for checking storage or grabbing files in a pinch.
Automatically locating and accessing your iPhone backup files
If searching through your computer folders for iPhone backups sounds daunting, there’s good news: you don’t have to go on a digital scavenger hunt. Several handy applications can quickly scan your PC for backup locations, whether they’re tucked away in iTunes folders or stored in iCloud.
Many of these programs offer you:
- Automatic detection of all available iPhone backups, regardless of which Apple software created them.
- The ability to view and save the contents of your backup directly to your computer.
- Compatibility with varied types of backups, so you’re not limited by how or when your backup was made.
Typically, using this kind of tool is as straightforward as:
- Downloading and installing the backup finder application on your computer.
- Opening the program—many will let you sign in to your iCloud account if you’d like to include cloud backups in your search.
- Running an automatic scan, which will quickly compile a list of all backups found locally or in the cloud.
- Once the results appear, simply select a backup to see its contents, or extract specific data (such as photos, messages, contacts, notes, and videos) for safekeeping.
This approach saves you the hassle of manual searches and offers a convenient way to recover important files—even if you’re not sure where your backups are stored or a backup is partially damaged. Whether you’ve switched computers, suffered a mishap during an update, or just want extra peace of mind, finding and viewing your backups has never been simpler.
Accessing iPhone Backups on macOS Catalina and Later
With the introduction of macOS Catalina (10.15) and newer versions, iTunes has been replaced by Finder for managing your iPhone backups. Accessing your backups is quite simple:
- Connect your iPhone to your Mac using a USB cable.
- Open a new Finder window from your Dock or by clicking the Finder icon.
- In the sidebar, locate and select your iPhone under “Locations.”
- Once your device summary appears, click on the “General” tab.
- Here, you’ll find an option labeled “Manage Backups.” Click it to view a list of all your stored device backups.
From this window, you can see, delete, or archive backups as needed. This makes it convenient to manage your backup files without needing iTunes.
Are iPhone Backup Files Human-Readable?
It’s important to note that the files stored in your iPhone backup folders are not intended for direct viewing or editing. These files are encoded in a way that only iTunes or Finder can interpret them properly when restoring your device. If you open them with regular applications, you’ll see unintelligible data rather than your photos or messages. For most users, the backups serve their purpose best when handled through Apple’s supported restore process rather than manual file access.
Why iTunes Uses a Proprietary Backup File Format
You might be wondering why, instead of saving your iPhone’s data as a collection of regular files, iTunes and Finder bundle everything into their own unique backup format. This design is intentional for a few reasons:
- Simplicity for Devices: Your iPhone handles most of the heavy lifting during a backup, packaging up data in a way that’s optimized for quick, reliable transfers to your Mac or PC (or even to iCloud).
- Prevents Accidental Changes: By storing your info in encoded formats instead of standard files and folders, Apple makes it much less likely a user will accidentally delete or corrupt important backup data.
- Easy Encryption: This structure also makes it straightforward to add encryption, so your personal messages, photos, and sensitive info stay protected—just like how encrypted archives work in other backup tools such as Google Backup or Samsung Smart Switch.
Overall, this method is all about balancing user safety, compatibility, and performance, ensuring your backups restore smoothly whenever you need them.
Now, let’s look at where these backups are stored on your Mac and Windows computers:
iPhone backup location
Here are iPhone backup locations where are iPhone backups stored on Mac and Windows
iPhone backup location Mac
In Mac OS X your iPhone files are backed up at the following location:
~/Library/Application Support/MobileSync/Backup/
The (~) symbol signifies your home directory, which is at the same place where all your other personal documents are stored.
If you prefer to locate your iPhone backups using your Mac’s interface, you can do so automatically:
- In Finder (macOS Catalina or later):
Connect your device, select it from the list of Locations, then in the General section click Manage Backups. Right-click a backup and select Show in Finder. - In iTunes (macOS Mojave or earlier):
Open Preferences, go to the Devices tab, control-click the backup you want, and choose Show in Finder.
Keep in mind, these backup files aren’t human-readable—they’re meant for your device, not for browsing through like photos or documents. If you open a backup folder, you’ll notice files with names made up of seemingly random numbers and letters. This is perfectly normal: the files are encoded specifically for iTunes or Finder to interpret during a restore, rather than for manual viewing.
If you need to access the actual content—like reading messages, viewing contacts, or extracting photos—this isn’t possible just by opening the backup files directly. Instead, you’ll need to use specialized software designed for extracting and decoding the information from these backups. Otherwise, the files will remain as unintelligible data when opened with standard applications. For most users, the safest and most effective way to interact with your backups is through Apple’s official restore process.
iPhone backup location Windows
iPhone Backup Location for Windows 10, 8, 7, XP, and Vista:
Windows XP stores all of your iPhone backup files in this location:
C:\Documents and Settings\user\Application Data\Apple Computer\MobileSync\Backup
Windows Vista and Windows 7 back up the iPhone files here:
C:\Users\user\AppData\Roaming\Apple Computer\MobileSync\Backup
Windows 8 and Windows 10 put the iPhone backups in the following directory:
\Users\YOURUSERNAME\AppData\Roaming\Apple Computer\MobileSync\Backup
If your main drive is not C: then you’ll have to change that accordingly and the same goes for ‘User’ also.
Note (For Windows users): The Application Data and AppData directories and their contents (iPhone backups included) are considered ‘hidden’ so you will need to enable ‘Show hidden files’ within Windows Explorer before you will be able to see the files.
Backing Up Multiple Devices: What to Expect
If you’ve backed up more than one device—say, your iPhone and iPad—on the same Mac or PC, each backup is kept in its own separate folder within the main Backup directory. These folders aren’t labeled “iPhone” or “iPad”; instead, each gets a unique string of letters and numbers (the device’s UDID), helping keep different backups organized and avoiding overlap between devices.
No need to worry about backups getting mixed up—your computer will keep them sorted automatically, even if you connect multiple Apple gadgets to the same user account.
Manually Locating iPhone Backups on Your Windows PC
If you’re curious about exactly where different versions of iTunes—or even third-party software—put your iPhone backup files on a Windows computer, here’s a step-by-step guide to help you find them no matter how the backup was created.
For iTunes downloaded from the Microsoft Store or Apple’s official website:
Press Windows + R on your keyboard to bring up the Run dialog.
>If you installed iTunes from the Microsoft Store or use the newer Apple Devices app, enter %USERPROFILE%, click OK, then navigate to:
<mark style=”color: #272B32; border-width: 1px; border-radius: 4px; box-shadow: 0px 1px 3px 0px rgba(0, 0, 0, 0.1), 0px 1px 2px -1px rgba(0, 0, 0, 0.1); background-color: #E9D5FF; border-color: #C084FC;”>Apple</mark> > MobileSync > Backup
>If you installed iTunes directly from Apple’s website, enter %AppData% in the Run box, click OK, and look for:
<mark style=”color: #272B32; border-width: 1px; border-radius: 4px; box-shadow: 0px 1px 3px 0px rgba(0, 0, 0, 0.1), 0px 1px 2px -1px rgba(0, 0, 0, 0.1); background-color: #E9D5FF; border-color: #C084FC;”>Apple Computer</mark> > MobileSync > Backup
For backups from alternative software (without iTunes installed):
- Enter %localappdata% in the Run dialog and explore the Packages directory. Look for a folder that corresponds to your specific backup application, then follow the path:
LocalCache > Roaming > <mark style=”color: #272B32; border-width: 1px; border-radius: 4px; box-shadow: 0px 1px 3px 0px rgba(0, 0, 0, 0.1), 0px 1px 2px -1px rgba(0, 0, 0, 0.1); background-color: #E9D5FF; border-color: #C084FC;”>Apple Computer</mark> > MobileSync > Backup
These steps should reveal all backup folders, regardless of which version of iTunes or backup tool you’ve used. Remember, while you can see these folders and their contents, the files themselves are not meant to be opened or edited manually—they’re only useful when restoring your iPhone through supported apps or processes.
If you, therefore, ever need to restore your device from backup yourself, go to the folders where iPhone backups are stored as mentioned above depending on your operating system, and copy the files to a convenient location easier for you to remember.
It’s worth noting that iTunes backup folders aren’t locked to a particular computer—you can move these backup folders between Windows PCs, or even between Macs and PCs, as long as you maintain the folder structure and don’t modify the files inside. So, if you’re upgrading your computer or just want an extra layer of backup safety, feel free to transfer your backup to an external drive or another computer for safekeeping. Just remember to place it back in the correct directory before attempting a restore, so iTunes or the Apple Devices app can find it without any hiccups.
You may also like to read this post: How to backup your iPhone, iPad, and iPod Touch to iCloud
How can I automatically find iPhone backups on my Windows computer?
If you’d rather not poke around in hidden folders manually, there are easy ways to locate your iPhone backups on Windows with just a few clicks. Several third-party tools are available that help you search for and view your backups automatically, sparing you the hassle of navigating the AppData maze yourself.
Here’s how you can quickly track down your iPhone backup files:
- Download and install a reliable backup explorer tool, such as “iMazing,” “Dr.Fone,” or “Tenorshare UltData”—each of these can scan your Windows system and pinpoint where your iTunes backups are hiding.
- Open the program and let it scan your computer. Most of these utilities will display a list of your iPhone backups—no need to hunt manually.
- Many backup browsers also let you explore the contents of each backup, so you can see messages, contacts, or photos before you decide to restore anything.
With the right software, finding your iTunes backup location is as easy as clicking a few buttons, and you don’t need to enable “Show hidden files” or dig through labyrinthine Windows directories. This makes recovering data, or just checking what’s been saved, much less of a headache.
What Can Damage or Corrupt Your iPhone Backup?
It’s important to note that iPhone backup folders are quite sensitive—tinkering with their contents can quickly spell disaster. There are a few common culprits that can corrupt or render a backup unusable:
- Manually editing, renaming, or deleting any files inside the iPhone backup folder. Even opening and saving a file by accident can break the delicate backup structure.
- Moving backup files to a new location and then back again, especially if the process is interrupted or you miss a file.
- Using unreliable third-party tools to “clean up” or extract data from backups. Not all utilities are created equal, and some may modify files in ways iTunes or similar apps won’t recognize.
- Incomplete backups—if your computer loses power, you run out of disk space, or your USB connection drops mid-backup, the resulting files may not be restorable.
For best results, keep backups just as they are—out of sight, out of mind—unless you’re using trustworthy software designed specifically for managing them. This will maximize your chances of a smooth restore if you ever need it!
Access the default iPhone backup location by third-party tools to restore your device
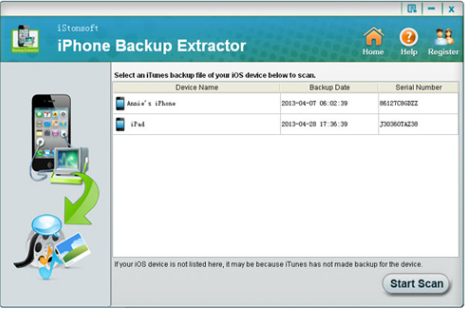
In case you are looking for an alternative way to access iPhone backup in your computer to restore iPhone from backup you can try some of the third-party programs out there on the net. But many of these programs have been found to be not up to the mark as far as my experience goes. Nevertheless, I can recommend one good free iPhone data recovery software called ‘iPhone Backup Extractor’ which I found extremely useful to extract iPhone backup files. The iPhone Backup Extractor will automatically access your iPhone backups on your computer, and you don’t have to take the trouble to use the methods presented above to find the iPhone backup location by yourself.
In fact, this software once saved me from a traumatizing situation by helping to recover deleted photos from my iPhone, which I thought were lost forever. Apart from transferring iPhone data to the computer you can also transfer iPhone data to iTunes and can make backup of your iPhone files with the help of this application. You don’t need to have any technical knowledge to use this software to restore your iPhone data, be it songs, videos, pictures, WhatsApp messages and attachments, documents, files or folders, or anything else in case they are accidentally deleted or corrupted or incorrectly restored.
How to extract files from an iPhone backup using a data recovery tool?
Using iPhone Backup Extractor or similar software is quite straightforward and doesn’t require any technical know-how:
- Launch the program after installation on your PC or Mac.
- It’ll automatically scan all backups on iTunes on your computer and display them on the main interface.
- Choose your iPhone iTunes backup file and hit “Start Scan” to start scanning for files.
- After the scan, all your iPhone file backups on iTunes will be categorized into different folders (such as Messages, Photos, Voicemails, and more).
- Simply click the required folder to browse your backup and find the specific files—contacts, messages, photos, WhatsApp attachments, documents, and more—that you want to recover.
- Select the content you want to extract, then save it to a convenient location on your computer.
With the help of such software, you can even view the contents of your iPhone backups, and retrieve individual files without restoring the entire backup to your device. This makes it easy to recover only what you need—whether it’s a single lost photo or an important message—without overwriting your current data.
So, if you ever find yourself needing to browse, extract, or recover specific data from your iPhone backup, using a dedicated backup extractor tool can really be a lifesaver.
Recovering Voicemails from an iPhone Backup
You might be wondering if it’s possible to retrieve your long-lost voicemails from an old iPhone backup. The answer is yes! With the help of iPhone backup extraction software (like the ones I mentioned above, for example, iPhone Backup Extractor), recovering voicemails is actually quite straightforward and doesn’t require any rocket science.
Here’s how you can do it:
- Open the extraction tool after installation. It will automatically locate your iTunes backups saved on your computer.
- Navigate to the “Voicemails” category once your backup is loaded. Most extraction programs organize your data into easy-to-find folders.
- Browse through your voicemails and select the ones you want to recover.
- Save them to your computer—that’s it!
This method isn’t limited to voicemails either—you can recover messages, photos, videos, and almost any other data stored in your backup. Just remember, if you’re dealing with voicemails or any other information that’s important, keep regular backups handy!
Can third-party software access iCloud backups?
Many people wonder if software like iPhone Backup Extractor or other third-party recovery tools can dig into iCloud backups in addition to those stored on your computer. In most cases, the answer is a bit mixed.
While several reputable third-party programs can directly scan and extract data from local iTunes backups, accessing iCloud backups is a different story. Most data recovery apps don’t have direct access to your iCloud backups unless you provide your Apple ID credentials. Even then, some features may be limited due to Apple’s security restrictions and ever-changing protocols.
If you do want to explore what’s stored in your iCloud backup, a number of recovery apps such as Dr.Fone or iMobie PhoneRescue offer the option to log into iCloud within the software and then try to download and preview specific data—though your success can vary depending on Apple’s current security policies.
In short, while third-party software can often help with iTunes/local backups without much hassle, accessing iCloud backups typically requires extra steps and may not be as straightforward or comprehensive. Always make sure to download such software from trusted providers, and never share your Apple ID details with any questionable apps.
Can third-party software read encrypted iPhone backups?
Now, let’s talk about encrypted backups—a subject that can make even tech-savvy folks scratch their heads. Most reputable third-party utilities, including iPhone Backup Extractor and similar tools like iMazing and Dr.Fone, can in fact read encrypted iPhone backups. But there’s a catch: you’ll need the password that was originally set when you encrypted the backup in iTunes or Finder.
Once you type in the correct password, these programs will unlock your backup and allow you to access your data just as easily as with a standard, non-encrypted backup. If you’ve forgotten your backup password, however, things become trickier; neither Apple nor third-party software can magically retrieve the encrypted data without it. So, always keep your backup password in a safe place—you never know when you’ll need it!
You may also like to read: How to recover deleted videos from iPhone
Transferring Contacts from iTunes Backup to Android
If you ever find yourself needing to move contacts from your old iPhone backup over to your new Android device, don’t worry—it’s absolutely doable (and, happily, doesn’t require you to be a tech genius). Here’s a straightforward way to get your contacts ported across without the usual headaches:
- Extract Your Contacts from the Backup:
First, use an iPhone data recovery tool that supports iTunes backups (such as Dr.Fone, iMobie PhoneRescue, or iMazing). Install your preferred program, open it, and scan your computer for available iTunes backups. Most tools will present your contacts in a browsable list. - Export Contacts as a VCF File:
Once you’ve located your contacts, select the ones you want and export them as a VCF (vCard) file. Almost every Android phone can easily import contacts from this file format—it’s the tech world’s universal contact card. - Transfer VCF to Your Android:
Now, move the VCF file to your Android device. You can do this via email, cloud storage (like Google Drive), or simply by connecting your Android to your computer with a USB cable and copying the file over. - Import on Android:
On your Android device, open the Contacts app, tap the menu (often a three-line or three-dot icon), and look for the “Import/Export” option. Choose to import from a .vcf file, and select the one you just transferred.
Voila! Your contacts should now appear on your Android, just as they were on your iPhone—no fancy footwork or panic required. If you need a step-by-step visual guide, there are plenty of tutorials out there, but the process above should do the trick for most folks. Handy, right?
Frequently asked questions
Before I conclude let me also address some of the questions related to iPhone backup location often asked by people.
Where do I find my iPhone backup?
You can locate and find your iPhone backups stored in iCloud. To find backups in iCloud,
For iOS 10.3
Go to Settings > (your name) > iCloud. Then tap the graph that shows iCloud usage > Manage Storage> Backups;
For iOS 11 or later
Go to Settings > [your name] > iCloud > Manage Storage > Backups.
How do I change my iPhone backup location?
You can change your iPhone backup folder automatically using iPhone Backup Extractor. To do this,
1. Download and install iPhone Backup Extractor;
2. Select ‘Preferences’ from the main menu;
3. Select ‘Backups’ from the Preferences window;
4. Click the ‘Change’ button;
5. Now the process of changing your iTunes default backup folder will start;
How do I access iCloud backup files?
You can access the backup files via the iCloud website. To do this,
1. Sign in to the iCloud website (https://www.icloud.com/) with your Apple ID and password;
2. Backup files would be listed on the website;
3. Click to access the desired files;
How to remove encryption from an iTunes iOS backup?
This is a question that pops up often, especially if you’ve turned on backup encryption in iTunes (or Finder, if you’re on a newer Mac) and later find yourself unable to remember that elusive password. If you need to create unencrypted backups or restore your iPhone without the encryption, here’s what you can do:
Steps to turn off backup encryption
- Connect your iPhone to your computer and launch iTunes (or Finder on macOS Catalina or later).
- Select your device when it appears in iTunes/Finder.
- In the ‘Summary’ tab (or ‘General’ in Finder), look for the ‘Backups’ section.
- You’ll see a checkbox labeled “Encrypt local backup.” Uncheck this box.
- When prompted, enter the password you previously set for encrypted backups.
- Click ‘OK’ to confirm. iTunes/Finder will immediately create a new backup that is unencrypted.
Please note: If you’ve forgotten the backup password, there’s currently no official Apple method to recover encrypted backup data unless you know the password. Some third-party tools claim to help recover lost backup passwords, but results can vary and security is not guaranteed, so proceed with caution.
After removing encryption, all future backups created on this computer will be unencrypted—making it easier to restore your device without being locked out by a forgotten password.
If you’re considering restoring from or deleting an encrypted backup, always double-check you have all your vital data copied elsewhere, just in case.
Restoring your iPhone from a backup
There are plenty of situations where you might need to restore an iPhone from a backup: troubleshooting issues, recovering from data loss, or getting back on your feet after a device mishap. Here’s a quick guide to restoring your iPhone backup from your computer:
- Open i JTunes (or Finder on macOS Catalina or later) on the PC or Mac where you backed up your iPhone.
- Connect your iPhone with a USB cable.
- Select your device when it appears.
- Click “Restore Backup…”
- Choose your desired backup and click “Restore.”
If you run into any issues during this process, Apple’s official support pages and community forums are packed with helpful troubleshooting steps. Sometimes, simply searching for the specific error message you encounter can lead you directly to a fix.
What should I do if I encounter issues when restoring my iPhone backup?
If you ever find yourself stuck or facing an error while trying to restore your iPhone from a backup, don’t panic—this happens more often than you’d think. First, make sure you’re running the latest version of iTunes or Finder (on macOS Catalina and later), as older versions can sometimes create compatibility headaches. If you’re still having trouble:
- Double-check that your USB cable and ports are working properly. Try a different cable or port if necessary.
- Restart both your computer and your iPhone to clear any temporary glitches.
- Ensure there’s enough storage space on your device for the backup to restore.
- Temporarily turn off any antivirus software, as overly protective settings might block the restore process.
If none of these steps resolve the issue, Apple’s official support pages are packed with step-by-step troubleshooting tips for restoring backups. Sometimes, searching for the specific error message you see can also lead you to a quick fix in Apple’s community forums or on trusted tech sites.
Troubleshooting backup issues between different devices or iOS versions
It’s not uncommon to hit a roadblock when moving data between iPhones, especially if the devices have different storage capacities or are running mismatched iOS versions. If your backup isn’t showing up during the transfer process, here’s what you need to know:
- Check your iOS versions: Both devices need to be running the same (or very close) version of iOS for the transfer to proceed smoothly. If your new iPhone is on an older or newer iOS version than the one used for the backup, update it first. Go to Settings > General > Software Update to download and install the latest iOS available.
- Match device capacities: If you’re moving to a device with less storage, make sure your backup doesn’t exceed the available space. You may need to reduce the size of your backup by managing photos, apps, or other large files.
- Update your backup: After updating the iOS, create a fresh backup on your old iPhone. This ensures full compatibility and prevents restore hiccups.
- Try another method: If you’re still stuck, consider using Apple’s Quick Start (for device-to-device transfers using Wi-Fi), or back up to iCloud instead of your computer and restore from there.
In summary, making sure both devices are fully up to date and have compatible storage space is the top way to resolve disappearing backups during transfers. If things still aren’t working, Apple’s support resources and forums are always helpful for specific error codes and persistent issues.
What are some related topics you might find helpful?
While you’re getting acquainted with the ins and outs of backup locations, a few other related subjects often crop up:
- Changing the default iTunes backup folder: Sometimes you want to store your backups on an external drive or a bigger partition. There are guides on safely redirecting your iTunes or Finder backups to a location of your choice—just remember to follow each step carefully to avoid confusion later.
- Backing up your iPhone to an external hard drive: Running out of space on your main disk? It’s entirely possible (and, for many, practical) to back up your iPhone directly to an external storage device. With a few tweaks—think symbolic links or third-party utilities—you can free up space and keep your data portable. If you’re curious about the nitty-gritty, there are plenty of step-by-step guides on changing the iTunes or Finder backup location, and even moving existing backups to an external hard drive. Just tread carefully and double-check instructions, as a misstep can leave iTunes or Finder scratching its head about where those backups are hiding.
- Dealing with a corrupt iPhone backup: Encounter messages about a corrupt backup? Don’t panic. Corrupt backups are a common headache, but there are various troubleshooting approaches to help you either salvage the data or remove the broken backup before trying again.
Exploring these topics can better equip you for smooth sailing when it comes to managing your iPhone data.
You may also like to read: How to restore iPhone from iCloud backup
Conclusion
Now that you know how to find iPhone backups on Mac and Windows and where are iPhone backups stored in your computer, here is a word of caution for every user.
Unless you have knowledge of what you are doing, you should not edit any of the files stored at the iPhone backup location as wrong editing or deleting any of these files could cause irreversible problems in your efforts to restore iPhone from backup.
Restore iPhone from Backup
Oct 16. 2015
Worked for me last night. Thanks.
Lee
May 19. 2022
Is there a way to move the detonation of iPhone backup? My mac has precious little amount of space left on the HD, but I do have attached external HD with a lot of space. Could I configure this somewhere so my iPhone is backed up directly onto an external HD? Thanks.