How do you record a phone conversation on an iPhone?
How to Record Incoming call on iPhone without app?
There are times when you may need to know – how do you record a phone conversation on an iPhone or how to record incoming call on iPhone without app?
Due to privacy-related legal implications, Apple has not provided any native call recorder app for iPhone, nor does it allow third-party apps to access its built-in Phone applications and the microphone directly. While there are many paid and free third-party apps that make it possible to record a phone call from iPhone, there are also ways to do it without using any apps. I have in this post shown the three easy ways, how to record incoming calls on iPhone without app.
iPhone users are often making the query – how do I record a call on iPhone free. As mentioned earlier, Apple has put limitations on third-party app developers to get entry and gain control over the system settings to record and store calls. These apps offer various ways to record phone calls directly on your iOS device, but with certain limitations.
The call recorder apps for iPhone available on both Google Play and the Apple store are either not that effective or most of them come up with a monthly subscription. Because of these limitations, you may sometimes hear iPhone users asking – how do I record a phone call on my iPhone without installing any app? Some users try to use the built-in voice recorder or Voice Memos app for audio recording, but these do not support recording phone calls directly.
Even if you manage to use a call recorder app, there are still limitations on recording capabilities and the quality of the audio recording. Users may also try to save the resulting recording file for later use.
Of course, always remember to inform the other party before recording, as laws vary by country and state.
How the call recorder iPhone works?
Let’s first see how the call recorder iPhone works. In general, the third-party paid or free call recorders for iPhones work more or less in the same way. When you receive a phone call on your device these apps set up a 3-way conference call where participants are – you, the caller at the other end, and the App provider’s recording center. The App provider records the conversation and makes it available to you with a monthly subscription. Some of these apps offer automatic call recording or automatic recording features, allowing users to automatically record incoming and outgoing calls, including outgoing calls, without manual intervention. These apps often highlight their recording capabilities, such as saving the recording file to cloud storage for easy access and backup.
Though it may be easier for you to record phone conversations on an iPhone by installing an app on a chargeable basis, you may still do so without installing any app. Some options, like Rev Call Recorder, are marketed as a free app and are available for download from the Google Play Store or Apple Store, but may only support certain phone numbers. When using these apps, users can download or share the recording file from the app or cloud storage.
What apps are available for recording phone calls on an iPhone?
If you decide that using an app is more convenient than the manual methods, there are several call recording options available for iPhone users. Most of these apps function in clever ways to skirt around Apple’s privacy restrictions.
Generally, these apps work by creating a three-way call between you, your contact, and the app’s own recording service—essentially letting the app “sit in” on the conversation and capture the audio. Here are a few notable call recorder apps available on the App Store:
- Rev Call Recorder: A popular free option that enables users to record both incoming and outgoing calls. It offers unlimited call recordings and storage, and also throws in a paid transcription service if you need text versions of your calls.
- TapeACall: Known for its straightforward interface, TapeACall lets you record calls by merging your conversation with its recording line. It has both free and paid plans depending on how much you need.
- Call Recorder Lite: Provides the core recording feature for free with the option to upgrade for additional functionalities like longer recording time or export options.
- Google Voice: While not a traditional call recorder, Google Voice offers the ability to record incoming calls (but not outgoing) if you’re using a Google Voice number.
Keep in mind that many of these apps have limitations, such as only working with certain regions, requiring a subscription, or only supporting either incoming or outgoing calls. Be sure to check compatibility with your location and whether the app’s method suits your needs.
If you do decide to use a dedicated app, Rev Call Recorder is a popular option that provides several helpful features for iPhone users. With Rev Call Recorder, you can record as many calls as you like without storage restrictions. Not only does it make it easy to save and access your recordings, but it also lets you export or share those files directly from within the app.
Additionally, Rev Call Recorder offers a transcription service for your conversations, although this comes at an extra charge. This can be handy if you need a written record for meetings or personal reference.
Follow the simple steps below on how do you record incoming and outgoing call on iPhone using Rev Call Recorder.
How to record an incoming call on iPhone using Rev Call Recorder
If you prefer a third-party solution and don’t mind installing an app, one popular option is the Rev Call Recorder. Here’s how you can use it to capture your incoming calls:
- First, answer the incoming call as you normally would.
- Next, open the Rev Call Recorder app on your device.
- Within the app, choose the option to start recording your call.
- When prompted, initiate a “merge call” between your current conversation and the app’s recording line. This essentially creates a three-way call where the app acts as the recording participant.
- Once merged, your call is now being recorded. When you’re done, simply hang up as usual—your recording will be available within the app for playback, saving, or sharing.
Remember, the contact at the other end won’t be notified automatically, so make sure you have their consent before recording, as per the legal requirements in your region.
How to record an outgoing call on iPhone using Rev Call Recorder?
If you want to record an outgoing call on your iPhone without relying on the default apps, Rev Call Recorder is a popular third-party solution you might find helpful. Here’s how you can do it step by step:
- First, open the Rev Call Recorder app on your iPhone.
- Start by tapping the option to begin a recorded call, and select that you wish to make an outgoing call.
- Enter the phone number you want to contact.
- The app will guide you to connect your call through their recorder—just follow the prompt.
- After connecting to Rev’s recorder, tap “Add Call” and dial the number of the person you intend to speak with.
- Once the other party answers, merge the two calls. This brings Rev’s recorder, yourself, and the other participant into a 3-way conference call, which enables recording.
- Your conversation will now be recorded in the background. After you finish your call, simply hang up to end both the call and the recording.
Once your call is done, you can conveniently access, listen to, or share the audio file right from within the app, no extra hassle or hidden steps.
This method provides a reliable way to record outgoing calls on your iPhone, sidestepping many of the restrictions Apple places on direct call recording.
How to record incoming call on iPhone without app?
I have come across iPhone users sometimes asking- how do I record a phone call on my iPhone without an app? Find below 3 easy ways, how to record incoming call on iPhone without app:
1. How can you record a call on an iPhone without app using your phone’s screen interface
Preconditions
- For this method to work you will need an iPhone with the operating system iOS 9.0 or later version as earlier versions do not allow the export of recorded audio files from your voicemail;
- Ensure that your voicemail inbox is not full;
- Check if your carrier allows for phone calls to be recorded as this is not allowed by all providers. Also, check if such recording is allowed as per your regional laws;
Before you proceed to record calls on your iPhone, turn off ‘call waiting’ on your device to avoid any possible conflict. To do this,
Go to Settings > Phone > Call waiting and disable the feature.
Here are the steps to follow on how do you record a phone call on an iPhone without app:
Step 1: Dial the designated number from the contact list. Once the call is established, select ‘Add Call’ from your phone’s screen interface;
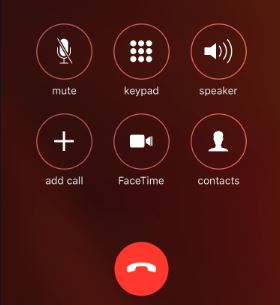
Step 2: After ‘Add Call’ is selected your contact list will be opened. Select your contact number from the address book and dial your number;
Step 3: Tap the green dial button to confirm. This will add your voice box to the conference call;
Step 4: As soon as the voicemail call is established and you hear the beep sound indicating that it is recording the call, select ‘merge calls’ on your iPhone’s screen interface;
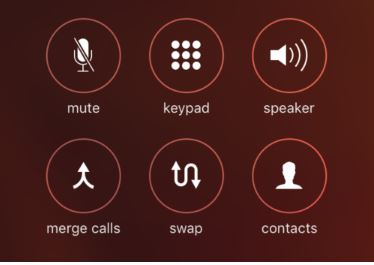
Step 5: This will merge both the calls and the voicemail records of your entire conversation;
Step 6: Once the call is over, tap on the voicemail option on your iPhone menu to access this recording;
Step 7: To save the recorded conversation, open the phone app and select the ‘Voicemail’ feature from the bottom. Then tap on the ‘Share’ button and send the recording to yourself via email or save it to your computer.
Note: If you use the Voice Memos app as a workaround, you need to tap the red record button to start and stop the audio recording. The resulting audio file can be managed or shared as needed.
To share your recording from the Voice Memos app:
- Tap on the recording file you want to share.
- Tap the three dots icon.
- Select Share.
- Choose your preferred method to send or save the file—options include Gmail, WhatsApp, Slack, Facebook Messenger, or any other compatible app.
This lets you easily move your recording to another platform or device whenever necessary.
2. How can you record a call on an iPhone without app using a Web-based service
There is also a web-based service namely, Recordator, which can help you to record a phone call on your iPhone without using any apps. You pay only for the minutes you use and there are no recurring fees for using this service.
Here’s how can you record a phone call on iPhone using this web-based service:
Step 1. Create a free account at Recordator and sign up;
Step 2. Once you have signed up, place a call to their toll-free number, +1-888-829-2045 if you are in the United States (if you are not in the United States, you can use these other methods);
Step 3. Once the call connects to the number, use the ‘add call’ button on your iPhone to call your Recipient. The call recipient will see your number on his/her phone, similar to receiving a regular phone call;
Step 4. When the call connects to your recipient, press the ‘merge calls’ button on your call screen. This creates a three-way conference with your call Recipient, You, and the Service provider. The sound stream received by the service provider is then recorded and saved in your account at Recordator.com;
Step 5. You can listen, download in MP3 format or share online with others, the call recordings, which are available in your Recordator.com account;
Tip: You can also use a second device, such as another phone or a digital voice recorder, to record the call by placing your iPhone on speakerphone. For better sound quality, adjust the microphone position of the second device to clearly capture the conversation.
To get the best results, follow these steps:
- Grab your iPhone and the device you want to use for recording (this could be another phone, tablet, or a dedicated voice recorder).
- Before making your actual call, do a quick test: call a friend, put your iPhone on speaker, and record a sample. Play it back to check the sound quality. You may need to tweak how loudly you speak or move the recording device closer or farther away for optimal clarity.
- Once you’re happy with the setup, initiate your phone call. Place your iPhone on speaker and keep the recording device nearby with its recording app open and ready.
- When everything is in position, press the record button on your second device and start your conversation.
How do external recording devices handle privacy and data security?
When it comes to privacy and data security, most external recording devices take a few standard precautions:
- Local Storage: Typically, your recordings are saved directly onto the device itself or into a companion app on your smartphone, rather than being uploaded somewhere without your knowledge.
- Encryption: If recordings are ever transferred (such as for transcription through services like Otter.ai or Rev), the data is usually encrypted during transmission to help keep your conversations secure.
- User Agreements: Reputable devices and services, such as Olympus and Sony, outline their privacy policies and user agreements, which specify how your data is handled and who can access it.
- Anonymity: Many services take extra steps to anonymize your information when processing recordings for features like transcription or search.
It’s still smart to review any device’s privacy policy before you use it. Always check how your data will be stored, whether it’s shared with third parties, and what choices you have for deleting your recordings permanently.
Don’t forget: Always ask for the other person’s consent before you record a call.
Don’t forget: Always ask for the other person’s consent before you record a call.
Privacy and Security Benefits of Using External Recording Devices
Worried about who might be listening in on your conversations? Here’s where an external recording device saves the day. When you record calls using a dedicated device—like a digital voice recorder or even a spare smartphone—you’re sidestepping cloud-based storage and third-party apps that often come with strings attached (hello, data mining and mystery uploads).
Because the recording happens directly on your device, there’s no automatic sync or upload to the internet unless you choose. This puts you firmly in the driver’s seat:
- Local Storage: Your files live on the device itself, meaning you don’t have to stress about someone else’s servers holding your private recordings.
- No Hidden Listeners: Third-party call recording apps sometimes collect metadata or audio for analysis, but physical recorders just do what they’re told—without sending your info anywhere.
- Manual Control: You decide when and how to move files, whether by cable, SD card, or Bluetooth, giving you the option to keep your recordings offline for maximum security.
- Stronger Data Protection: Since you aren’t uploading sensitive conversations to cloud platforms, there’s a smaller risk of hacking, leaks, or unauthorized access.
Some popular external devices (think Olympus, Sony, Zoom or even that old iPod you forgot about) are designed solely for this purpose, ensuring uncluttered privacy settings. If peace of mind tops your priority list, sticking with these gadgets keeps your recordings as private as your grandma’s secret cookie recipe.
When Should You Consider Using an External Recording Device Instead of an App?
If your aim is to record calls smoothly and reliably—no matter the circumstances—there are specific scenarios where an external recording device outshines both apps and your iPhone’s built-in options. Let’s highlight where these standalone recorders excel:
- Avoid the App Hassles: Apps can crash, stall out when your phone memory is low, or get stopped by incoming notifications. External devices work separately from your phone, so you won’t suddenly lose your recording if your device freezes up mid-call.
- Get Consistently Clear Recordings: Unlike apps that sometimes muffle sound or miss parts of the conversation, external recorders are built with dedicated microphones. These devices are engineered for solid audio capture—even in loud environments—making them a go-to for journalists, researchers, or anyone who needs to pick up every word clearly.
- Keep Your Conversations Private: With an external device, your recordings stay local—no uploading to mysterious cloud servers or worrying about app permissions. If privacy is essential (think sensitive interviews, business pitches, or medical consultations), this peace of mind is a real bonus.
- Stay Productive—Even Offline: Some apps demand an active internet connection to function or transcribe calls. External recorders work whether you’re on a plane, in a remote spot with spotty service, or overseas without a hefty roaming plan. There’s no reliance on Wi-Fi or mobile data for capturing and storing your audio.
- Record Any Call, Any Platform: Apps are often limited to standard voice calls and may not play nicely with services like WhatsApp, Zoom, or Microsoft Teams. External recorders, on the other hand, capture whatever you put through your speaker or headphone jack—be it a traditional phone call, a Zoom meeting, or a catch-up over Messenger. That makes them especially handy if your workday involves bouncing between several communication platforms.
In short: If you frequently handle important or sensitive calls, need top-notch audio, or require ultimate flexibility and reliability, keeping an external recording device in your toolkit is a smart move.
Why External Recorders Outperform Call Recording Apps
If you’ve ever had a crucial call interrupted by an app crash or found your saved recording wasn’t as “saved” as you hoped, you’re not alone. While call recording apps get the job done in a pinch, using an external recording device can make all the difference—especially if you need reliable recordings and crisp audio.
Consistent Reliability, No App Drama
Let’s face it: apps can be temperamental. They might freeze, crash, or stop working if your phone gets low on storage or decides to serve up a barrage of notifications. In contrast, dedicated external recorders work completely independently from your phone. Even if your device runs out of battery or software hiccups occur during the call, the external recorder just keeps on rolling, protecting your conversation from being lost in digital limbo.
Superior Sound, Minus the Muffled Mayhem
Audio quality is where external devices really shine. Unlike most apps (which are limited by your phone’s microphone and background noise), external recorders like Sony’s ICD-TX660 or Olympus’ WS-853 have specialized mics and sound processing that pick up both sides of a call with impressive clarity—even in busy environments. So when you revisit your recording, you’ll actually be able to understand every word instead of wading through static or garbled audio.
If your priority is a reliable, listenable archive of your calls, it’s hard to beat the hardware approach.
Why External Recording Devices Don’t Need Internet
One of the major perks of using an external recording device—like a digital voice recorder or a second phone—is that it operates completely independently of Wi-Fi or mobile data. These gadgets don’t rely on an internet connection to capture and store audio; instead, they save everything locally to internal memory or an SD card.
That means you can make your recording anywhere—whether you’re stuck in an elevator, in a remote cabin with zero bars, or even halfway over the Atlantic in airplane mode. This offline freedom is invaluable, especially for folks who travel frequently or need dependable recording in unpredictable environments. Your audio is saved right on the device, ready to be transferred whenever you’re back within arm’s reach of your laptop or cloud storage.
Don’t forget: Always ask for the other person’s consent before you record a call.
How Long Can an External Recorder Capture Audio?
The maximum continuous recording time for an external recording device really depends on the model and its storage capacity. For example, many popular digital recorders like the Sony ICD-TX660 or Olympus WS-853 can handle anywhere from 20 to over 100 hours of nonstop audio, especially when set to standard or compressed quality settings. If you pop in a large-capacity microSD card, you can often record for even longer stretches without worrying about running out of space.
Of course, you’ll also want to keep an eye on battery life—most dedicated recorders will run anywhere from 10 to 30 hours on a full charge or set of fresh batteries. For marathon sessions (think long interviews or multi-day meetings), it’s a good idea to carry a spare battery or portable charger, just in case.
How Do Medical Practitioners Maintain Patient Confidentiality When Recording Consultations?
For healthcare professionals, protecting patient confidentiality isn’t optional—it’s the law (think HIPAA in the US and similar privacy standards worldwide). When doctors, nurses, or specialists need to record consultations or care instructions, they deploy several strategies to keep sensitive information safe and sound:
- Secure Recording Devices: Many medical practitioners rely on reputable, encrypted voice recorders from brands like Olympus or Sony. These gadgets are designed to store recordings locally and securely, minimizing the risk of unauthorized access or data leaks.
- No Cloud by Default: Sensitive conversations are almost always stored offline—on the device itself or a hospital’s secure server. This avoids unintended uploads to third-party clouds, making sure patient data doesn’t wander where it shouldn’t.
- Physical Safeguards: Devices are often kept in locked cabinets, restricted offices, or on the practitioner’s person, further reducing the chance of unauthorized playbacks or accidental loss.
- Controlled Sharing and Access: Hospitals and clinics implement strict permissions—only authorized staff members can access or transfer recordings. When sharing is necessary (for example, with transcription services like Nuance or Rev), practitioners choose trusted vendors and ensure transmissions are encrypted.
- Regular Deletion and Audit: Outdated or unnecessary files are purged regularly, and many facilities conduct audits to confirm that privacy protocols are being followed to the letter.
In short: Medical professionals use secure hardware, limit who can access recordings, and keep everything firmly offline or within protected health system networks. This way, they comply with privacy laws and honor the trust patients place in them—because your health information should be as private as a closed doctor’s door.
3. How to record incoming call on iPhone without app for free using Google Voice
One of the easiest ways to record incoming calls without any third-party app is by using Google Voice. Google Voice is a free VoIP calling service available in the US and Canada. It provides you with a free US phone number, voicemail inbox, and the ability to make free calls domestically.
While there are many call recording apps on both Google Play and the Apple Store, most of them are not free. Google Voice has a great built-in feature that allows you to record incoming calls and save phone conversations free of any charge.
Here are the simple steps to follow on how to record call on iPhone without app for free, using Google Voice:
Step 1: Set up a Google Voice account using your existing Google account. To do so, go to voice.google.com, log into your Google account, and follow the instructions to choose a Google Voice number;
Step 2: Install and open the Google Voice app on your iPhone, complete the setup with your new Google Voice number, and then go to the app’s main page;
Step 3: Tap on the menu icon in the upper-left corner and then select ‘Settings’ from the sidebar menu;
Step 4: Turn on Incoming Call options under ‘Calls’;
Step 5: When you are on a call, Tap ‘4’ on your iPhone keypad to start recording the phone call. A verbal alert will notify all participants that the recording has started;
Step 6: To stop recording the phone call, press ‘4’ again on your phone’s keypad (Hanging up also ends the recording);
Step 7: After you stop recording, your conversation will be saved in your Google Voice inbox automatically;
Step 8: To listen to the recorded conversations on the Google Voice app just tap the menu button at the top left of the screen and tap ‘Recorded.’ Then choose which call you want to listen to and tap on the play button to play the recording. The saved audio file or recording file can also be downloaded or shared for future reference;
With the release of iOS 18.1, Apple Intelligence introduces new features that allow users to record calls, access call transcription, and transcribe calls directly in the Notes app. This integration makes it easier to review, search, and manage conversations, with enhanced privacy and transcription accuracy for supported iPhone models.
Before you dive in, it’s important to remember that call recording laws vary by location. Always check your local regulations to ensure you’re compliant—some places require all parties to consent, while others only need one. With the right legal information and these new built-in tools, you’ll never miss an important detail from your calls again. Whether you need to revisit discussions for work, keep track of important instructions, or just want a searchable record, these features are designed to help you stay organized, productive, and focused on what matters most.
How to Record Calls Natively on iPhone (iOS 18.1 and later)?
- Open Settings > Apps > Phone > Call Recording
- Toggle Call Recording to ON
- During a call, tap the Record button that appears on the call screen
(Note: Both parties will hear an announcement that recording has begun)
Accessing Your Call Recordings
Once you finish recording, all saved calls can be found in the Notes app under the Call Recordings folder. Simply open the Notes app, navigate to the Call Recordings section, and select the note you want to review. Tap the Play button to listen back or use the share button to send the recording via Messages, Mail, or other apps as needed.
This seamless integration with the Notes app ensures your recordings are organized and easily accessible, making it more convenient than ever to manage your important conversations.
iOS 18 Call Recording vs. External Recording Devices
With iOS 18.1, Apple’s built-in call recording capabilities have closed much of the convenience gap with external devices. The new feature lets you record, transcribe, and manage calls directly from your iPhone—no extra gadgets or tangled wires required. You can even access and search transcriptions within the Notes app, ensuring everything you need stays in one place.
Still, there are times when classic external recorders (like the Olympus WS-853 or Sony ICD-PX470) offer certain perks worth considering. These dedicated devices can provide extended battery life, significant storage, and seamless use with non-iOS devices. For users who routinely need professional-grade sound quality, or want to keep recordings off their primary device for added privacy, external recorders may still hold an edge.
But for most people, iOS 18’s seamless integration, strong privacy controls, and smart transcription deliver everything you need for recording and revisiting important conversations—no extra tech or accessories needed.
Comparing External Recording Devices to Other Call Recording Methods
Not sure whether you should use a separate device or try an app for recording calls? Here’s a quick breakdown of how external recording devices stack up against the more popular alternatives:
1. External Devices (Phone, Tablet, Digital Recorder)
- Pros: No apps or subscriptions; compatible with any phone (great for iPhones where options are limited); generally offers reliable performance.
- Cons: Requires a second device on hand; sound quality can be hit-or-miss depending on background noise and device placement; you must put the call on speaker.
- Best for: Quick one-off recordings, or when you don’t want any apps installed.
2. Built-in and Third-Party Apps
- Pros: Convenient—everything on one device; easy to access and manage audio files; some apps provide automatic transcription and cloud backup.
- Cons: Many require a paid subscription or have usage limits; iPhone users face restrictions unless using services like Google Voice or waiting for new iOS features.
- Best for: Regularly recording calls, organizing files, and when privacy features (like encrypted backups) are important.
3. VoIP Services (like Google Voice, Zoom)
- Pros: Free or low cost; often include built-in recording features with cloud storage; can work across devices.
- Cons: Typically limited to incoming calls (Google Voice, for example); some services provide audible recording notifications to all participants.
- Best for: Those prioritizing easy cloud storage or needing to record business calls.
Each method comes with its own quirks and perks, so the best choice depends on your needs—casual use, advanced organization, or just trying to keep things simple with what’s already on hand.
The best call recording solution for professionals
So, with iPhone’s built-in solutions and the mixed bag of third-party apps, which option truly suits professionals who depend on accurate and searchable call documentation?
For most business users, reliability, audio clarity, privacy, and efficient organization are essential—especially if you handle sensitive conversations, need transcripts, or regularly reference past calls.
Let’s break down the options:
- iPhone’s built-in feature: Convenient, straightforward, and integrated natively (especially with iOS 18). However, it will announce to all parties when recording and offers only basic audio files, lacking organizational tools or advanced search. Perfect for rare, personal use—but not the pro’s choice for heavy workloads.
- Call recording on the iPhone is a tricky affair. The native solutions are limited, and apps have their own issues. Third-party recording apps: There’s a sprawling selection across the App Store, but many require recurring payments, extra permissions, or a constant internet connection. Quality and privacy standards also vary widely, and some apps only support specific kinds of calls (like standard phone vs. WhatsApp or Zoom). You might get basic transcription or organization—but usually at extra cost.
In short, while third-party apps promise convenience, you’re often trading one challenge for another—whether it’s subscription fatigue, inconsistent performance, or juggling which app works for which type of call. For professionals who need reliability and simplicity, these hurdles can turn an already-complicated process into a full-time project.
- External devices (digital recorders, dedicated call recorders): These work independently from your iPhone’s software, so you’re not at risk if your phone battery dies or an app crashes mid-call. Audio quality is typically much higher, and many newer models offer helpful features like automatic transcription, speaker labeling, and the option to save, search, and share conversations securely. Since your recordings aren’t bouncing through third-party servers or cloud storage by default, you gain added privacy and control.
Who benefits most from external devices?
If you’re a journalist, lawyer, consultant, or anyone else whose workflow depends on clear, organized, and accessible records of your conversations, a dedicated recorder or advanced external device is the obvious choice. They’ll reliably capture every word (even in noisy environments), support file management and on-device organization, and typically allow transcription and summary—handy for preparing reports or sharing the key points with your team.
Quick recap:
- Casual or infrequent callers: Native solutions or trusted apps might be enough.
- Power users and professionals: Reliable external recorders or all-in-one transcription devices deliver accuracy, privacy, and streamlined organization—making them worth the investment.
Ultimately, professionals looking to manage call recordings efficiently should look beyond simple iPhone features or basic apps, and instead, invest in tools built for the demands of a busy workflow.
How to record call on iPhone without the other person knowing?
iPhone users sometimes make the query – how to record phone calls on iPhone without them knowing?
Recording phone conversations or a phone call with the consent of at least one of the parties to the conversation is permitted under Federal law. This is called a ‘one-party consent’ law. Under a one-party consent law, you can record phone conversations on your iPhone so long as you are a party to the conversation. Federal law requires the consent of at least one person involved in the conversation for the recording to be legal.
Federal law dictates one-party consent, meaning recording phone calls or conversations is allowed, but only if you are actively participating in the conversation. If you are not part of the conversation but you are recording it, then you are engaging in illegal eavesdropping or wiretapping. Some states, however, require every party’s consent or the other party’s consent before recording a conversation, so it is important to be aware of the specific laws in your jurisdiction.
However, one important thing that needs to be remembered in connection with – how to record a phone call with an iPhone without them knowing is that it is advisable to check your state or local laws in this connection, for further clarification. Always ensure you have obtained proper consent before recording any call to comply with legal and privacy requirements.
Why consent and clarity matter for professionals
For professionals such as lawyers, consultants, and journalists, obtaining clear, high-quality recordings—with the proper consent—is not just a matter of legality, but of workflow efficiency and client trust. Accurate, organized records of calls and meetings are crucial for documentation, preparing reports, and ensuring information is admissible or reference-ready later. Automatic transcription features available in many apps and modern external recorders dramatically reduce the time spent on manual note-taking, letting you focus on the conversation rather than scrambling to keep up.
Will other parties be notified when using an external recording device during calls or meetings?
When you use an external device—such as another smartphone, computer, digital recorder, or even a traditional tape recorder—to record your phone calls or meetings, iPhones and most other smartphones do not send notifications or alerts to the other parties involved. In other words, the people on the call aren’t automatically made aware that a recording is in progress, unlike when you use certain in-app solutions (like Google Voice) that trigger an audible notification to all participants.
However, it’s essential to highlight that, even without automated notifications, you are still bound by local laws regarding consent. In many regions—including several U.S. States and international jurisdictions—you must inform or obtain consent from every party on the call before starting to record, regardless of the method or device you use. Failing to do so could open you up to legal consequences, so always check and follow the rules that apply where you live or work.
Comparing Methods: External Devices vs. Built-in and Third-Party Apps
- External Recording Devices: These work discreetly, with no automatic alerts or notifications to other participants. They’re reliable even when your phone is low on battery or struggling, and they often offer higher audio quality thanks to dual microphones or digital processing. They don’t require an internet connection, making them ideal for offline scenarios. Plus, setup tends to be as simple as pressing a button—no complicated permissions or settings to fuss with.
- Built-in iPhone Recording: The native iOS recording options, such as Voice Memos or in-call recording on certain services, may announce to all parties that a recording has started. These typically deliver basic audio quality, and recordings may be interrupted if you switch apps or receive notifications.
- Third-Party Apps: The recording experience can vary dramatically by app. Some require an active internet connection, others may provide only basic transcription features or limit recordings to specific call types (like regular calls, but not WhatsApp or Zoom). Many third-party apps require navigating complex permission settings, and reliability can be an issue if the app crashes or your phone gets busy.
Key Takeaway:
No matter which method you use, the most important thing is to ensure you comply with all relevant consent laws before hitting record. The technology may make it possible to record without others knowing, but that doesn’t mean it’s always legal—or ethical—to do so. Always prioritize privacy and transparency to avoid trouble down the line.
Legal considerations before recording calls on iPhone
Before you record a call on your iPhone, it’s crucial to understand the legal landscape surrounding recording calls. Call recording laws can differ significantly depending on where you live. In the United States, some states operate under one-party consent rules, meaning only one person involved in the conversation (which can be you) needs to agree to the recording. However, other states require all parties on the call to give their consent before any recording begins. Federal law also mandates that at least one party’s consent is necessary to legally record a call. To avoid any legal issues, always check your local and state recording laws before you start recording. The safest approach is to inform the other party and get their agreement before you record a call—this ensures you’re respecting privacy and staying compliant with all relevant regulations.
How to store and manage your iPhone call recordings?
After you’ve successfully recorded calls on your iPhone, keeping your recordings organized is key. If you’re using the latest call recording feature in iOS 18.1, your recorded calls are automatically saved in the Notes app under the “Call Recordings” folder. You can easily access, play back, and manage your call recordings from this dedicated recordings folder. For added flexibility, you can export recordings to cloud services like Google Drive or Dropbox, or share them via email for backup or collaboration. If you use a third party app for call recording, check the app’s settings to see where your recordings are stored and how you can access them. Many apps offer their own call recordings folder and options to export recordings. To keep things organized, consider labeling your recordings by date, contact, or purpose—this makes it much easier to find specific calls when you need them.
What advanced features are available for organizing and summarizing recorded call content?
When it comes to managing your call recordings, several advanced features can make a big difference in how you organize and review your content. Many apps and platforms now offer built-in tools that automatically generate summaries, distill key discussion points, and even extract action items—all designed to save you time and keep you on track.
For example, if you’re handling business or team meetings, some services offer smart summary functions that highlight the main topics and agreements, so you don’t have to sift through lengthy transcripts. If you’re conducting interviews, specialized layouts can neatly separate questions from answers, making it easier to follow the conversation and pinpoint important quotes. This is especially valuable for professionals who need to ensure the accuracy of details—journalists, for instance, often rely on these features to capture and verify exact quotes for their reports, reducing the risk of misquoting or missing crucial points.
Professionals juggling multiple projects will appreciate features that pull out to-do lists and follow-up actions from your recorded calls. This can help you quickly identify next steps without listening to the entire recording again.
Long or complex conversations aren’t a problem, either—several tools use AI-driven highlights or “essentials” views to present a concise overview of what was discussed. And when it’s time to collaborate or share outcomes, you’ll find options to export summarized notes directly to platforms like Google Drive, Dropbox, or email for smooth integration with your workflow.
Whether you’re a journalist working to ensure accurate reporting or a team leader keeping projects on track, these advanced organizational features can transform how you capture, review, and use your recorded call content.
Transcription and Speaker Separation
Today’s advanced call recording solutions also harness AI to provide high-accuracy transcription services. These systems can transcribe conversations in over 100 languages, making them especially useful for international teams or multilingual interviews. Many transcription tools can even identify and label different speakers, so you know exactly who said what at any moment—helpful for clarity in group discussions or interviews. Timestamps are often included throughout the transcript, allowing you to jump to specific parts of the conversation with ease.
Flexible Templates and Easy Sharing
Depending on your needs, you can choose from ready-made templates tailored for business meetings, interviews, or project catch-ups. These templates can automatically extract key points, action steps, or separate questions from answers, making your notes easier to digest and act on. Once your transcript or summary is ready, you’ll usually have the option to edit, share, and export it to your favorite productivity tools or cloud storage services for safekeeping or collaboration.
In short, modern call recording apps don’t just store your conversations—they help you turn those recordings into actionable, organized, and easily searchable information, making follow-ups and collaboration smoother than ever.
How to inform the other party about call recording?
When you’re about to record a call on an iPhone, it’s not just good manners—it’s often the law—to let the other party know. The simplest way is to announce at the start of the call, “This call is being recorded for [your stated reason].” If you’re using a third party app for call recording, many offer an automated message feature that notifies the other party as soon as the recording begins. Always make sure to obtain the other party’s consent before you proceed, especially if you’re in a state that requires all parties to agree under call recording laws. By being upfront and transparent, you not only comply with recording laws but also build trust with the person on the other end of your call on an iPhone.
You may also like to read: iPhone no sound on calls – fix it in 9 easy steps
Frequently asked questions
Now that I have explained in detail how to record incoming call on iPhone without app let me answer some of the related questions often asked by iPhone users:
How to record a video call on iPhone?
Follow the steps below to record a WhatsApp video call:
1. Initiate the WhatsApp video call;
2. Simply swipe up from the bottom of the screen and access the Control Centre;
3. The screen recording icon will be visible there;
4. Click on the screen recording icon and remember to turn on the microphone option;
5. Your WhatsApp video call will be recorded;
How to record a face-to-face conversation on iPhone?
While the iPhone does not have a built-in recording option for telephone calls, you can record face-to-face conversations using the Voice Memos app, which by default is located in the Utility folder.
Can I record a call on my iPhone secretly?
No, recording phone conversations secretly is a federal crime. Under the federal Wiretap Act, it is illegal for any person to record a phone call or conversation with others unless one of the parties to the conversation has given his prior consent to the recording.
Before you hit “record,” it’s also crucial to check the legal requirements for call recording in your specific state. The U.S. is a patchwork of one-party and all-party consent laws—meaning, in some states, only one participant needs to know about the recording, while others require everyone on the call to agree. If you or the person you’re speaking with are outside the U.S., double-check the legislation in that country as well, since laws can vary widely.
Always make sure you’re clear on the rules before recording any conversation to avoid legal trouble.
Why iPhone does not have call recording?
iPhone does not have a call recording feature because Apple wants to ensure its user’s privacy when it comes to the use of its smartphone. In addition to not having a built-in call record feature, Apple also doesn’t allow apps access to the microphone and the Phone app directly.
Even in regions where call recording is legal, Apple takes a cautious approach. In places where the feature is permitted, built-in recording options can be quite limited. For instance, some phone systems will play an audible announcement to notify all parties that the call is being recorded—and there’s no way to turn this alert off. This is Apple’s way of making sure everyone’s privacy is protected and the law is being followed.
Additionally, the recording tools available are fairly basic. There aren’t advanced features like automatic transcription, highlights, or robust options for organizing your recordings. The focus is simply on recording the conversation, with privacy and legal compliance as top priorities.
How can you tell if someone is recording your call?
There is no way you can know whether the person on the other end is recording your call.
You may also like to read this post: How to record screen on iPhone – a simple guide
Conclusion
Due to privacy-related legal implications, while recording phone calls or conversations, it is advisable that whenever possible, you should make it clear to those around you that you are recording. This puts them on notice that they are being recorded and allows them to object if they desire.
Keep in mind that call recording laws can be quite complex and differ depending on your location. In some states or countries (known as “two-party consent” jurisdictions), everyone involved in the conversation must be informed and agree to being recorded. In others (“one-party consent” areas), only one participant—usually the person recording—needs to be aware. Always check the regulations in your area before pressing record, especially if the other party is in a different state or country. Being proactive about understanding and following these rules protects your privacy and avoids potential legal trouble.
Now that you know how to record incoming call on iPhone without app, if you have tips about how do you record a phone conversation on an iPhone for free or how can you record a phone call on iPhone without app for free, you may please share the same in the comment section below which may help our readers.
Robert
Feb 28. 2022
I learn new information about how to record call on iphone without app , you are doing a great job . Keep it up
chantel
Mar 27. 2022
BRAVO!! BRAVO!! I give this article a 5- star rating
Beautifully written and well researched. You can tell when a writer conducts their own independent research prior to creating an article, instead of being lazy and copying of someone else’s.
Mr. Radharenu, you should definitely consider teaching a writing class in the future, if you haven’t already.
radharenu ganguly
Mar 27. 2022
Hi Chantel,
Thanks for stopping by and making encouraging comments.
Sarah
Aug 01. 2022
I’m really having trouble finding a free recording app for my iPhone in uk….please help, I’m not wanting to be sneaky just being treated terribly by family & authorities!!
radharenu ganguly
Aug 07. 2022
Hi Sarah,
iPadio is a free app that allows you to record your calls on the iPhone. iPadio is easy to set up and use, and allows you to play your recordings back, as well as download, edit, or delete them. You can also share your recordings with another person or people. iPadio is only available on iPhone