Transfer photos from Android to iPhone without Computer.
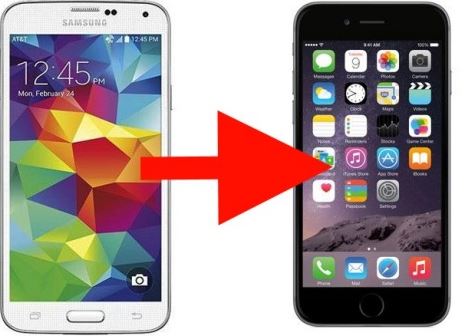
How to transfer photos from Android to iPhone?
In this article, I am going to show simple methods on how to transfer photos from Android to iPhone in easy steps.
Switching from Android to iOS devices is not uncommon among phone users these days. We usually save a lot of pictures and videos on our phones to record many beautiful moments in our lives. Therefore, when you want to make the switch from Android to iPhone the first thing that you may need to know is how can you transfer photos from Android to iPhone.
Find below nine easy methods to transfer photos Android to iPhone, iPad, or iPod touch without any hassle.
Which Method Is Fastest and Most Reliable?
You might be wondering—which option gets your photos over the quickest, and with the least fuss? After comparing all the popular methods, using a dedicated transfer app (like Move to iOS) stands out for both speed and dependability. It’s built specifically to bridge the gap between Android and iPhone, offering a simple setup, easy step-by-step guidance, and no tangled cables required.
If you’re after reliability, Move to iOS makes the process smoother, especially for large batches of photos. Of course, you can also try methods like Google Photos or manual sharing via cloud storage, but they usually take a bit longer and involve more steps. For most, the Move to iOS app delivers the straightest path from Android to iPhone with minimal headaches.
Pros and Cons of Each Photo Transfer Option
Before you commit to a specific method, let’s break down the advantages and downsides of each way to move your photos—because no two options are quite the same.
1. Move to iOS App
Pros:
- Built for switching: Designed specifically for transferring content between Android and iPhone.
- Easy process: Step-by-step guidance reduces confusion.
- Fast for bulk transfers: Ideal if you have a huge photo library.
Cons:
- Setup-only: Can only be used when you’re first setting up the new iPhone. Not available once your iPhone is already configured and in use.
2. Google Photos
Pros:
- Cloud access: Photos automatically available on any device where you sign in, no cables needed.
- No duplicates: Seamlessly syncs only new photos.
- Good for ongoing transfers: Ideal if you want to keep both phones in sync over time.
Cons:
- Storage limit: Free account comes with limited space (15GB), which fills up quickly with high-res pics.
- Internet required: Needs a solid Wi-Fi connection for large uploads and downloads.
3. Cloud Storage (Dropbox, OneDrive, etc.)
Pros:
- Flexible access: Store and organize your photos, then grab them from any device.
- Bypass device restrictions: Works anytime, even if your iPhone is already set up.
Cons:
- Extra steps: Requires uploading, then re-downloading or moving files to your Camera Roll.
- Often limited free storage: Most services will eventually nudge you towards a paid plan if you’ve got lots of photos.
4. Manual Transfer via Computer
Pros:
- Full backup control: Transfer just the photos you want, avoid unnecessary duplicates, and organize everything on your desktop first.
- No extra apps or subscriptions.
Cons:
- Takes more time: You’ll be tethered to your computer and sorting files yourself.
- Not wireless: Requires a USB cable and some patience.
5. Email
Pros:
- Super simple: Perfect for sending a few photos quickly without any special apps.
- Universal: Works with any email address, no setup required.
Cons:
- File size limits: Email attachments are capped, so you won’t be transferring albums this way—just a handful of photos at a time.
- Can be cumbersome: Not practical if you’ve got hundreds (or thousands) to send over.
Choose the method that best matches your situation and comfort level—whether you want everything moved at once or prefer a more hands-on approach.
Other Tried-and-True Methods
If Move to iOS isn’t an option (maybe you’re already past the initial setup, or you want to keep things cloud-based), here are some other foolproof alternatives:
1. Google Photos
- How it works: Upload your photos to your Google Photos account on Android, then sign in with the same account on your iPhone. Your images will magically appear—no cables, no drama.
- Best for: Anyone who already backs up their photos to Google Photos, or wants to keep their images accessible on both devices.
2. Cloud Storage (Dropbox, OneDrive, etc.)
- How it works: Upload photos from your Android phone to your favorite cloud service. Then, simply download them to your iPhone using the corresponding app.
- Best for: Folks who use cloud storage for files and want to keep things organized.
3. Send Anywhere / SHAREit
- How it works: Install the app on both devices, select your photos, and follow the on-screen instructions to beam them over. These apps use Wi-Fi Direct, so transfers are quick and don’t eat into your data.
- Best for: Quick, cable-free sharing when you’re not keen on cloud uploads.
4. Email
- How it works: Attach photos to an email on your Android device and send them to yourself. Open the email on your iPhone and save the images.
- Best for: Transferring a handful of photos without any extra apps.
Accessing vs. Downloading Photos: What’s the Difference?
Now, you might wonder—do you need to actually download your photos to your iPhone, or is it just as easy to view them in an app? Here’s the scoop:
- If you just want access: Once your photos are uploaded to the cloud (like Google Photos), you can simply sign in on your iPhone and browse your images instantly. No need to fill up your phone’s storage—your whole photo library stays available, on-demand, as long as you have an internet connection.
- If you want local copies: Prefer to keep certain photos right on your iPhone? Most photo apps let you save images directly to your Camera Roll. Just tap the photo, then look for the “Download” or “Save” option (often hidden under a menu or three-dot button). This brings the selected images onto your device, ready for offline viewing or editing.
So, if you’re aiming for maximum storage efficiency, cloud-only access might be all you need. But for photos you want handy no matter where you are (even offline), downloading them directly is the way to go.
Direct Email from Photos or Files
For those quick one-off transfers, sending photos straight from your Android’s Photos or Files app via email is as easy as pie:
- Open your Photos or Files app and pick the images you want to send.
- Tap the share icon (usually looks like three dots or lines connected by an arrow).
- Select your preferred email app from the share menu.
- Enter an email address you can access on your iPhone.
- Hit send—and just like that, the photos are on their way!
Once the email arrives, open it on your iPhone and save the images right to your Camera Roll. This method is best if you’re only moving a handful of photos and don’t want to mess with extra apps or logins.
Direct Transfer Apps (e.g., LocalSend, Send Anywhere, SHAREit)
If you’d rather skip the cloud and send your pics directly from one device to the other, dedicated file transfer apps are a lifesaver—especially when you’ve got a mountain of photos to move.
How it works:
- Download the same transfer app (like LocalSend, Send Anywhere, or SHAREit) on both your Android and iPhone.
- Open the app on each device—no complicated setup needed.
- On your Android, pick your photos (these apps often let you choose hundreds, even thousands, at once).
- The app will look for nearby devices; select your iPhone from the list that pops up (don’t worry if you don’t see the word “iPhone”—just match the device name shown in the app).
- Accept the transfer on your iPhone when prompted, and voilà—the photos will land right in your Photos app, ready to browse.
Best for:
- Folks who want to move a big batch of photos in one go, without fussing with cloud storage or email.
- Anyone hopping between Wi-Fi networks (these apps use Wi-Fi Direct, so your transfers stay local and don’t touch your data plan).
Tips:
- Make sure both devices are on the same Wi-Fi network—some apps require this for blazing-fast transfer speeds.
- Double-check that you give the app permission to access your photos and files on both phones; otherwise, your transfer will stall before it even starts.
With these handy transfer tools, you’re just a few taps away from getting all your snapshots onto your new device, no cables (or patience-testing) required.
Transferring Photos With iCloud Photos
Looking for an Apple-approved way to bridge that Android-to-iPhone gap? While there’s no flashy iCloud app on Android, you can still sneak your photos over using the iCloud Photos website.
How to get it done:
- On your Android, open your favorite browser and head to iCloud.com. Sign in with your Apple ID (the same one you’ll use on your iPhone).
- Tap the Photos section once you’re in.
- Look for the upload icon (usually a little cloud with an arrow). Tap it, pick your photos from your Android gallery, and start uploading.
Once they’re uploaded, flip over to your iPhone, open the Photos app, and voilà—your images should be hanging out in the Recents album, ready for immediate nostalgia trips. This method is ideal if you want a cloud-based transfer and don’t mind a few extra taps on each device.
A Quick Note on Bluetooth
While it might seem like the obvious choice, Bluetooth doesn’t work for photo transfers between Android and iPhone—Apple simply doesn’t support it for this purpose. So, skip the Bluetooth settings and try one of the options above for a frustration-free experience.
No matter which method you pick, transferring your memories doesn’t have to be a chore. From dedicated transfer apps to trusted cloud services, there’s a solution for every situation—and every level of tech comfort.
Pro Tips for Accepting and Saving Photos on Your iPhone
So you’ve fired off your photo transfer and your iPhone is ready for action—here’s how to make sure those precious pics land safely:
- When the transfer app on your iPhone prompts you, hit “Accept” to start downloading the images from your Android device. Your new photos will automatically find their way into your Photos app, ready for instant browsing.
- Prefer keeping things in the cloud? You can always view your freshly transferred photos straight from apps like Google Photos—no need to save duplicates unless you crave a local backup.
- Want to save a specific photo permanently to your device? Simply tap on the image, look for the “more options” menu (usually three dots or lines), and select “Download” to drop a copy right into your Photos app.
With these quick moves, you’ll have every memory safely stashed on your iPhone—easy as pie, no digging through menus required.
Transferring Photos with Google Drive
If you’re a fan of the cloud, Google Drive is a solid pick for shuttling your snapshots from Android to iPhone—no cables, no fuss. Here’s how you can do it, step by step:
On your Android device:
>Open the Google Drive app.
>Tap the big plus sign (usually hanging out in the corner) and choose “Upload.”
>Browse to your photos (you’ll usually spot an “Images” option up top for quick access).
>Press and hold to select the pics you want to move—you can pick as many as you’d like.
>Tap “Select” or “Done,” then hit “Upload.” Pro tip: If your Drive is a bit of a jungle, create a new folder to keep your photos wrangled and easy to find later.
Once the upload finishes, your photos are safely lounging in the cloud.
On your iPhone:
>Install the Google Drive app (if it’s not already on your home screen).
>Sign in with the same Google account you used on Android.
>Navigate to the folder where you tucked away your photos.
>To actually save a photo to your iPhone, tap the three-dot menu next to an image and select “Download.” Boom—your photo joins the rest in your Camera Roll.
This method’s a lifesaver if you want access from multiple devices or you’re already living that cloud storage life. Plus, it’s a lot less messy than emailing batches to yourself.
Method 1: How to transfer photos from Android to iPhone using a free app
You can use a free app called, ‘Move to iOS’ to transfer photos Android to iPhone wirelessly. Here’s how to transfer photos from Android to iPhone using the ‘Move to iOS’ app:
1. Make sure that WiFi is turned on, on your Android device;
2. Download the ‘Move to iOS’ app on your Android from the Google Play store;
3. Power on your iPhone and Android device;
4. While you set up your new iPhone, look for the ‘Apps & Data’ screen (the ‘Apps and Data’ screen only appears in the initial setup of an iPhone). If you already finished setup, here is how to get Apps and Data Screen;
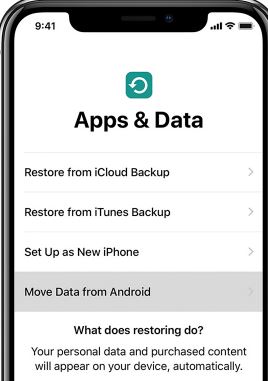
5. Next tap ‘Move Data from Android’ on the Apps and Data screen;
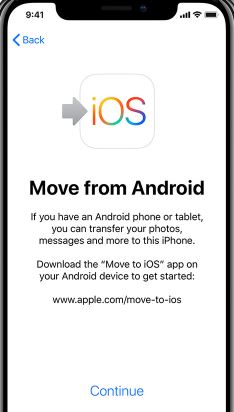
6. Open the ‘Move to iOS’ app on your Android device and tap Continue;
(Read the terms and conditions that appear. To continue, tap ‘Agree’ and then tap ‘Next’ in the top-right corner of the Find Your Code screen)
7. On your iPhone, tap Continue on the screen called ‘Move from Android’;
8. Then wait for a ten-digit or six-digit code to appear. (If your Android device shows an alert that you have a weak internet connection, you can ignore the alert);
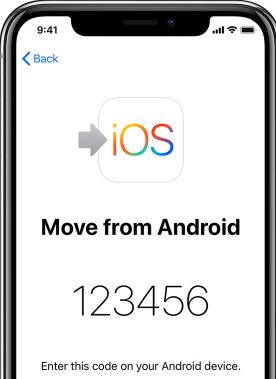
9. Enter the code on your Android phone and wait for the ‘Transfer Data’ screen to appear;
10. On your Android device, select the photos and videos that you want to transfer and tap ‘Next’. Then, even if your Android indicates that the process is complete, leave both devices alone until the loading bar finishes on your iPhone. The whole process of Android to iPhone photo transfer can take a while, depending on how many photos you’re going to transfer;
11. After the loading bar finishes on your iPhone, tap ‘Done’ on your Android device. Then tap ‘Continue’ on your new iPhone and follow the onscreen steps to finish setup for your iOS device;
12. Make sure that all of your selected photos and videos have been transferred from the Android device to your new iPhone. Ensure that you leave both devices alone until the transfer finishes. If you use the phone or get a phone call on your Android before the transfer finishes, your photos won’t transfer and you are to try the transfer process again.
Important: The ‘Move to iOS’ app is designed specifically for those switching from Android to iPhone, and it provides a straightforward way to transfer all your content—including photos, videos, contacts, and even text messages—to your new device. However, this method only works during the initial setup of a brand new iPhone. If you’ve already completed setup and have started using your iPhone, you’ll need to explore alternative options mentioned in this guide.
Note: The ‘Move to iOS’ app can also be used to transfer text messages from Android to iPhone besides moving photos from Android to iPhone.
Method 2: How to transfer photos from Android to iPhone without Computer
Bluetooth is an excellent option to transfer photos Android to iPhone without computer. You can move photos from Android to iPhone via Bluetooth without taking the help of a third-party app.
Follow the steps below on how to transfer pictures from Android to iPhone without Computer via Bluetooth:
1. Turn On the Bluetooth on both devices and pair them (make sure to keep both devices close to each other);
2. On your Android device go to File Manager and select the photo that you want to transfer to the iPhone;
3. Next, select the ‘Share’ icon and scroll down and tap the ‘Bluetooth’ option;
4. Choose your iPhone from the list of available devices to which you want to send the file;
5. Now the selected photo will be transferred to your iPhone in a few moments;
Method 3: How to transfer photos from Android to iPhone using Send Anywhere
If Bluetooth isn’t fast enough for your taste—or your photo folder is about as packed as Times Square on New Year’s Eve—Send Anywhere offers a speedy alternative to get your photos from Android to iPhone, no computer or cables required.
Here’s how you can use Send Anywhere to make the transfer a breeze:
- Begin by installing the free “Send Anywhere” app on both your Android and iPhone. You’ll find it in Google Play on your Android and the App Store on your iPhone.
- Open the app on your Android and select the photos you want to share. No need to open another gallery app—everything’s organized within Send Anywhere.
- After making your selection, tap the “Send” button. The app will display either a QR code or a six-digit key.
- Now, switch over to your iPhone, launch the Send Anywhere app, and tap “Receive.”
- You can either scan the QR code using the iPhone’s camera or manually enter the six-digit code shown on your Android.
Within seconds, your photos will zip wirelessly from your Android right to your iPhone—no cords, no fuss, no waiting around for a progress bar to crawl along. This method is particularly handy if you have lots of photos or you’re not keen on syncing with a computer.
Once your photos have landed safely on your iPhone, you’re ready to move on to the next batch or simply enjoy your new library.
Method 4: How to Transfer Photos from Android to iPhone Using AirDroid Personal
If you’d prefer a simple, wireless approach that skips the need for cables or a computer, AirDroid Personal is a handy option for moving photos from Android to iPhone. It’s free, works over WiFi or your local network, and makes sharing files straightforward between devices.
Here’s what you need to do:
- Install the App: Download and install AirDroid Personal on both your Android device and your iPhone.
- Create an Account: Open the app on both phones, and sign in using your email, Google, or Facebook account. If you don’t have one, it just takes a minute to set up.
- Grant Permissions: When prompted, allow the app to access your device’s photos and files. This step is important to ensure a smooth transfer.
- Connect Devices: On your Android, go to the “My Devices” section and add your iPhone. Both devices should be connected to the same WiFi network for best results. Follow the on-screen prompts to complete pairing.
- Send Photos: Once your devices are linked, open the conversation with your iPhone in the app. Choose the “attach” or photo icon, select your images from the Android gallery, and tap send.
- Receive on iPhone: Accept the transfer on your iPhone and save the received photos to your device.
And that’s it—your photos should now be waiting for you on your iPhone, no cables required.
Method 5: How to transfer pictures from Android to iPhone using iTunes
Here’s how to send pictures from Android to iPhone using iTunes,
> First, copy the photos from Android to PC;
> Next, transfer the photos from the PC to your iPhone using iTunes;
Follow the steps below on how to transfer photos from Android to iPhone using iTunes :
1. Connect your Android phone/tablet to your computer;
2. To locate your photos and videos open “My Computer” and double-click on the Android Phone/Tablet. On most devices, you can find these files in DCIM > Camera;
3. Navigate to the DCIM folder. It contains the photos you took on the device (On a Mac, install Android File Transfer, open it, then go to DCIM > Camera);
4. Choose the photos and videos that you want to move and drag them to a folder on your computer;
5. Disconnect your Android phone;
6. Connect your iPhone to the computer via a USB cable;
7. Open iTunes on your computer and sync your Photos to your iPhone (make sure to have the latest version of iTunes installed);
8. That’s it. To find your selected photos and videos on your iPhone, go to Photos > Albums;
Method 6: How to transfer photos from Android to iPhone using Email
If you prefer a quick and cable-free solution, you can also email your photos to yourself and then access them on your iPhone. This method is handy when moving just a handful of images.
Here’s a step-by-step guide:
- Open the email app on your Android phone and start composing a new email addressed to your own email address.
- Tap the attachment (paperclip) icon, browse for your desired photos, and add them to your email.
- Once you’ve attached the photos, send the email.
- Now, switch to your iPhone and open the same email account.
- Find your newly sent message, open it, and download the attached photos directly to your iPhone.
To break it down further, most Android users rely on apps like Gmail, Outlook, or Yahoo Mail, but the basic process remains the same:
- Open your preferred email app and tap Compose to start a new message.
- Enter the email address you’ll access from your iPhone (it can be the same account or another one you use).
- Tap the Attachment or paperclip icon—usually at the top or bottom of the screen.
- Choose your photos from the gallery (sometimes labeled as Photos or Files depending on where your images are stored).
- Tap and hold to select multiple images if needed, confirm your choices, and hit Send.
Once the email is sent, simply open the corresponding mail app on your iPhone, locate the message, and save the attached photos straight to your device.
Note: This method is best for transferring a small number of pictures since most email providers have size limits for attachments. For sending a few favorite snapshots, though, it’s quick, simple, and doesn’t require extra cables or software.
Method 7: How to transfer photos from Android to iPhone using Dropbox
Cloud services like Dropbox make it easy to move photos from your Android to your iPhone without needing a computer or cables. The process is simple and convenient if both of your devices have internet access.
Follow these steps to transfer your photos:
- Install Dropbox on both your Android and iPhone, and sign in with the same account on each device.
- On your Android, open the Dropbox app. Tap the “+” button and select the photos you want to upload from your device.
- Wait for the upload to finish; your photos are now safely stored on Dropbox’s cloud.
- Switch over to your iPhone, open the Dropbox app, and navigate to the folder where you saved your photos.
- From here, you can view your photos or save them directly to your iPhone’s camera roll by selecting the photo and using the “Save to device” option.
Using Dropbox keeps your files organized in the cloud and lets you transfer pictures at your own pace, without USB cables or third-party transfer apps.
Method 8: How to transfer photos from Android to iPhone using iCloud Photos
If you prefer keeping everything in sync with Apple’s native cloud service, you can use iCloud Photos to move your images from Android to iPhone—even without a dedicated Android app. Here’s how you can do it:
- On your Android device, open your web browser and head over to iCloud.com.
- Sign in with the Apple ID that you’ll use on your iPhone.
- Once logged in, tap “Photos” to access your iCloud Photos library.
- Tap the upload icon (usually a little cloud with an arrow), then select the pictures you want to transfer from your Android device.
- Wait for the upload to complete. You’ll see the new photos show up in your iCloud Photos library online.
Now, grab your iPhone and open the Photos app. Make sure you’re signed into the same Apple ID and that iCloud Photos is enabled (check this under Settings > [your name] > iCloud > Photos).
That’s it—your newly uploaded images should appear in your iPhone’s Photos app, ready and waiting in your Recents album, all without any cables in sight.
Method 9: How to transfer photos from Android to iPhone using the ‘CopyTrans Photo’ app
Here’s how to send photos from Android to iPhone using the CopyTrans Photo app:
1. First, copy the photos from Android to your Computer as shown above following the steps up to ‘4’
2. Next, download CopyTrans Photo on your PC and install the program:
(If you need help installing the program, please refer to the installation guide)
3. Launch the program and connect the iPhone to your PC. The ‘CopyTrans Photo program’ displays photos from both the iPhone and the PC. Select the folder (from the far right side) where you saved the Android photos (step 4 above);
4. Create a new photo album on your iPhone by clicking on the green ‘photos’ symbol;
5. Name the new album and click OK;
6. Select the Android photos on your PC and drag and drop them to the iPhone side;
7. Click on the “Apply changes” button to save the Android photos on the iPhone photo album;
8. That’s it. Now you can see your selected photos and videos on your iPhone album;
Method 10: How to transfer photos from Android to iPhone using SHAREit
If you’re looking for a quick and wireless way to transfer photos from your Android device to your iPhone, the SHAREit app is an excellent option. This app allows you to send not only photos but also videos, documents, and even music files between devices with ease.
Follow these steps to move your pictures using SHAREit:
- Begin by installing the SHAREit app on both your Android phone and your iPhone.
- Open SHAREit on both devices.
- On your Android device, tap “Send” and select the photos you want to transfer.
- After you’ve selected the images, tap “Next,” then choose “Connect to iOS/WP” on the Android. The app will generate a Wi-Fi hotspot with a name and password.
- On your iPhone, go to your Wi-Fi settings and connect to this hotspot using the displayed credentials.
- Return to the SHAREit app on your iPhone, select “Receive,” and the photo transfer will begin automatically.
Within moments, your selected photos should appear in your iPhone’s gallery, making this process both fast and convenient.
You may also like to read: What is Applinker? The power of Applinker app explained
Frequently asked questions
Now that I have explained the best ways, to send picture from Android to iPhone let me also reply to some related questions often asked by Android phone users.
How to transfer photos from Samsung to iPhone?
Step 1. Connect your Samsung Galaxy to your computer and set the device to MTP mode from the USB notification;
Step 2. Open the phone’s storage and drag the photos from Samsung to a local folder on the computer; (On Mac, you need to install ‘Android File Transfer’ to find out the photos stored in your Samsung phone)
Step 3. Connect your iPhone to your computer and run iTunes;
Step 4. On the iTunes main screen, tap on the device button > Photos > Sync Photos > Choose folder;
Step 5. Select the folder that contains the photos you have transferred to the computer > tap on Sync;
How do I transfer photos from Android to iPad?
Follow the steps below to transfer photos from Android to iPad using a computer:
Step 1. Connect your Android to your computer and find the photos (on most devices, you can find the photos in DCIM > Camera);
Step 2. Choose the photos that you want to transfer and drag them to a folder on your computer;
Step 3. Now disconnect your Android and connect your iPad to the computer;
Step 4. Sync your photos to your iPad;
Step 5. You can find the photos on your iPad in Photos > Albums;
Can you transfer photos from Android to iPhone via Bluetooth?
Yes, Bluetooth is a very good option to transfer photos from Android to iPhone as already shown in the post. This is because you don’t have to download a third-party app to transfer photos and videos using Bluetooth.
How can I transfer photos from Android to iPhone wirelessly?
1. Connect both your Android phone and your iPhone to the same WiFi network;
2. Launch the web browser on your Android phone to communicate with your iPhone file manager and share data between them;
3. Run the File Manager on your iPhone and tap on the ‘More’ button;
4. Choose WiFi Transfer from the pop-up menu;
5. Slide the toggle to ‘on’ in the WiFi Transfer screen and get the iPhone file wireless transfer address;
6. Now get access to all kinds of files and folders from the iPhone file manager on your Android device;
What apps can I use to transfer photos from Android to iPhone wirelessly?
If you want to move photos from Android to iPhone free, you can try these two free apps – ‘Move to iOS’ and ‘Mobile Manager software’. Google Photos app is another good software to move photos from an Android to iPhone.
Using ‘Move to iOS’ to Transfer Photos
Apple’s official ‘Move to iOS’ app is a convenient way to transfer content—including photos—from your Android device to a new iPhone. Just remember, this method works only when setting up a brand new iPhone (not one already in use). Here’s how to use it:
- Download and Install:
Get the ‘Move to iOS’ app from the Google Play Store on your Android phone. - Connect Both Devices:
Plug both your Android and iPhone into a power source and connect them to the same Wi-Fi network. - Start iPhone Setup:
Turn on your new iPhone and go through the setup steps until you reach the “Apps & Data” screen. - Choose ‘Move Data from Android’:
On your iPhone, tap Move Data from Android. - Open the App on Android:
Open ‘Move to iOS’ on your Android, tap Continue, and follow the prompts until you reach the screen asking for a code. - Pair Both Devices:
On your iPhone, tap Continue to get a code. Enter this code on your Android phone. - Select and Transfer:
Once the devices connect, select the data types you want to transfer (including photos), then tap Next. - Finish Up:
Wait for the transfer to complete, then finish setting up your iPhone. Your photos will be available in the Photos app.
Alternatively, if you’ve already set up your iPhone or prefer a different method, Google Photos offers a simple, wireless solution for moving your pictures without needing a computer.
How to Transfer Photos from Android to iPhone Using Google Photos
Google Photos makes it easy to transfer your pictures without a computer. Here’s how you can do it:
- Install and Open Google Photos on Your Android:
Launch the app and sign in with your Gmail account. - Enable Backup & Sync:
Go to the app’s Settings and turn on the “Backup & Sync” option. Your photos will start uploading to your Google account’s cloud storage. - Access Photos on iPhone:
Download and open Google Photos on your iPhone, then log in with the same Gmail account. - Sync Photos to iPhone:
In the app’s Settings on your iPhone, turn on “Backup & Sync” as well. All the photos you uploaded from your Android will now be accessible on your iPhone.
This method is especially helpful if you want to move a large number of photos and prefer a wireless, hassle-free transfer.
Limitations of Transferring Photos with Google Photos
While Google Photos makes transferring your pictures from Android to iPhone a breeze, it’s good to keep a couple of limitations in mind before moving your entire gallery this way:
- Storage space is limited: Google Photos currently offers 15GB of free storage, which is shared across your Google account (including Drive and Gmail). If you have lots of high-resolution photos or videos, you may run out of space sooner than you think.
- Paid upgrade required for extra storage: Once you hit the free limit, you’ll need to subscribe to a paid plan to continue uploading more photos.
- Internet connection needed: Uploading and syncing large photo libraries can consume data and take time, especially with a slower WiFi connection.
- Compression for larger files: In some cases, photos and videos may be compressed to save space, which could slightly reduce image quality, especially if you opt for the “Storage saver” setting instead of “Original quality.”
As long as you keep these points in mind, Google Photos remains a very handy option for most users looking for an easy, wireless transfer.
Important Note About Syncing Photos to an iPhone That Already Has Pictures
Before you sync new photos to your iPhone using iTunes or similar tools, keep this in mind: if your iPhone already has photos synced from a different computer or folder, adding new ones this way will remove those previously synced photos. Don’t worry—any pictures you took directly with your iPhone camera aren’t affected.
So, double-check what’s on your phone and make sure you’ve backed up anything important before starting the sync. This way, you won’t unexpectedly lose precious memories in the process.
You may also like to read this related post: How to Transfer Photos from iPhone to iPhone
Conclusion
Though there are other ways to move pictures from Android to iPhone, I have given here the four simplest methods on how to transfer photos from Android to iPhone wirelessly or without a computer which you can use without any hassle.
However, one thing needs to be mentioned here, before you decide to transfer photos from Android to iPhone without computer or wirelessly, make sure that the pictures and videos you’re moving, including what’s on your external Micro SD card, don’t exceed the available space on your iOS device.
A Quick Heads-Up About Existing iPhone Photos
If your iPhone already contains photos—especially those that were synced from other photo libraries or folders using a computer or iTunes—be aware that syncing new photos can sometimes remove those previously synced images. Photos originally taken with your iPhone’s camera won’t be affected, but any that arrived via sync from another source may be deleted in the process.
So, before you start, double-check your available storage and carefully consider whether you might lose any existing photos during the transfer. It’s always a good idea to back up important pictures elsewhere first, just in case.
Fiona Manonn
Jun 16. 2021
Yes, it has a good reason because iPhone is giving excellent feature and excellent feature apps that work well. The iPhone is one of the mobile devices that doesn’t follow others and it is providing the better mobile service in all ages people. And people using iPhone with joyous. I am an iPhone lover and I am using iPhone 5 which is strong and nice to look at. I love iPhone.
Drex Mucheri
Jan 20. 2023
It worked peferctly
No clouse