What is AirDrop on iPhone?
How to use AirDrop on iPhone?
Here in this post I am going to show how to use AirDrop on iPhone. But before that let me first describe what is AirDrop on iPhone and how does AirDrop work.
What is Airdrop on iPhone?
Most of the iPhone users have overlooked the presence of this Apple’s cool feature, AirDrop, on their iPhone. Now, what is AirDrop on iPhone?
Apple AirDrop is a native feature in iOS and Mac OS X that lets users share and receive data from one Apple device to another on the same WiFi network. AirDrop on your iPhone enables instant transfer of files i.e. photos, videos, documents, contacts and more over WiFi and Bluetooth, to other iOS devices that are nearby i.e. up to about 30 feet apart, without using mail or a mass storage device. This file transfer feature is faster and involves less hassle than sending files via Messages or Mail. You can use AirDrop on your iPhone to transfer almost anything that you like. There is no restriction on the size of the file which AirDrop will accommodate.
AirDrop feature is available on all iOS devices running iOS 7 and later. It is supported on iPhone 5 or later, iPad 4 or later, iPad mini, or iPod Touch fifth generation or later. It is also supported on Macs with OS X Lion or newer versions of OS X, although Macs released earlier than 2010 may not be supported.
Now that you know what is AirDrop on iPhone let me explain how does AirDrop work and how to use AirDrop on iPhone.
How does AirDrop work?
Here is a brief explanation on how does AirDrop work to share and receive files from one Apple device to another:
AirDrop uses Bluetooth Low Energy (BLE) and P2P (Peer-to-Peer) WiFi technology to send files and information to nearby devices by establishing a low-power, low-bandwidth network between the devices. When using AirDrop on iPhone for sharing an item, the device emits an AirDrop signal over Bluetooth Low Energy. Other devices that are in close proximity, and have AirDrop turned on detect the signal and respond.
Although this feature can theoretically work entirely via Bluetooth and you can share photos without WiFi, but in practice, this would be very slow and at times may not work. Therefore, a much faster P2P WiFi network is created between the two nearby devices to transmit the actual file. All recent Apple WiFi chip-sets can quickly switch between the two networks. AirDrop uses this to make sure that transmitting a file doesn’t disrupt your connection to the Internet. The sending and receiving devices create a firewall around the connection so that the files/data can be sent encrypted.
How to use AirDrop on iPhone to share and receive data?
Before using the Airdrop feature first you are to turn on Airdrop. Now, how to turn on AirDrop?
On an iOS device, you can turn on AirDrop through Settings or via the Control Center. To turn on through Settings,
Go to Settings > General > AirDrop. Then choose either “Contacts Only,” which lets only people you know, send you things, or “Everyone,” which will allow anyone using AirDrop on iPhone to find you and send you the materials.
To do the same via Control Center find below how to turn on AirDrop and set the options through Control Center
How to turn on AirDrop via Control Center?
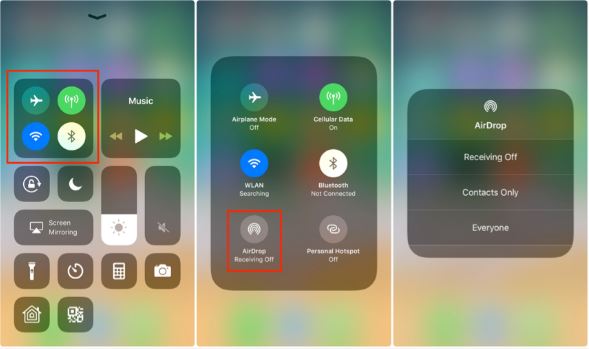
1. On iPhone X or later, swipe down from the upper-right corner of the screen to open Control Center. On iPhone 8 or earlier, swipe up from the bottom of the screen;
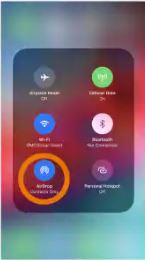
2. Once the control panel is opened press firmly or touch and hold the network settings card in the upper-left corner. This will expand to show a menu that includes the AirDrop button;
3. Tap the AirDrop button to see the AirDrop options;
Now, you can choose one of the following three available options:
- Receiving Off: To turn AirDrop off i.e. if you don’t want to receive AirDrop requests;
- Contacts Only: To receive AirDrops from your contacts only i.e. only your contacts can see your device;
- Everyone: To receive AirDrops from anyone nearby i.e. all nearby iOS devices using AirDrop can see your device;
Note: If you see “Receiving Off” and can’t seem to change it, go to “Settings,” then “General,” and finally “Restrictions,” and ensure the AirDrop feature is toggled ‘on’.
Before you give up on AirDrop, double-check a few easy-to-miss requirements that can throw a wrench in the works:
- Devices must be nearby: Both devices need to be within about 30 feet (9 meters) of each other.
- Wi-Fi and Bluetooth: Make sure both Wi-Fi and Bluetooth are turned on for both devices—even if you’re not actually connected to a Wi-Fi network.
- Personal Hotspot: If either device has a Personal Hotspot enabled, turn it off. AirDrop won’t work with Hotspot running.
- VPN: Using a VPN? Try disconnecting. VPNs can sometimes interfere with AirDrop connections.
- Compatibility: AirDrop works on iPhones and iPads running iOS 7 or newer, and Macs running OS X Yosemite or later. It’s not available for Android or Windows devices, though similar features (like Samsung’s Quick Share) exist elsewhere.
AirDrop lets you quickly share photos, files, contacts, links, and more between Apple devices, with no real limit to the file size—just be aware that larger files will naturally take longer to transfer.
If you’ve tried these steps and still can’t get AirDrop working, don’t worry—you’re not alone. Sometimes a stubborn setting or an overlooked detail can trip things up. If you need more help, consider reaching out to a tech expert or checking your device’s support resources for personalized troubleshooting.
How to turn on AirDrop on a Mac
If you’re using a Mac and want to join in on the AirDrop fun, you can enable the feature in a couple of different ways:
Via Control Center (macOS Big Sur or later):
- Click the Control Center icon in the menu bar (it looks like two toggle switches).
- Find and click on “AirDrop.”
- Toggle AirDrop on and choose your discovery setting—either “Contacts Only” for a bit more privacy or “Everyone” for broad sharing.
Via Finder:
- Open a Finder window.
- In the sidebar, click “AirDrop.”
- At the bottom of the window, you’ll see a setting for “Allow me to be discovered by.” Click it and select either “Contacts Only” or “Everyone” depending on your preference.
That’s it—your Mac is ready to send and receive files with AirDrop just like your iPhone or iPad.
How AirDrop Settings Automatically Adjust Over Time?
A quick note if you’re sharing files in iOS 16.2 and up: when you set your device to “Everyone,” it only stays that way for 10 minutes. After that, your device gives your privacy a little boost by automatically switching your setting. If you’re logged into your Apple account, it’ll flip back to “Contacts Only”; if you’re not signed in, it’ll turn AirDrop receiving off altogether. This helps keep your device from being visible to just anyone nearby for longer than you might intend.
How to use AirDrop on iPhone?
Before I go to explain how to use AirDrop on iPhone to share and receive data with other iOS devices, make it sure that,
1. The person to whom you are sending data is within the Bluetooth and WiFi range;
2. Both you and the person to whom you are sending data have turned on WiFi and Bluetooth and also turned off Personal Hotspots if they are ‘on’;
3. The person to whom you’re sending data has his AirDrop set to receive from ‘Contacts Only’, if you are in his Contact list. In such case he needs to have your email address or mobile number in your contact card for AirDrop to work;
4. If you’re not in the receiver’s Contact list, he is to set his AirDrop receiving setting to ‘Everyone’ in order to receive the files;
Note: AirDrop is set to share with ‘Contacts Only’ by default. You can choose to use AirDrop to share with everyone, or turn off the feature entirely at any time to control who can see your device and send you content in AirDrop.
How do you AirDrop on iPhone to share files?
With Airdrop turned on, you can use it to share and receive files from any iPhone or iPad app that supports it. When you want to share something, you should first make sure AirDrop is active on both devices and WiFi and Bluetooth are turned on. Set your iPhone to be discovered by ‘Contacts Only’ or ‘Everyone’ as the case may be.
Follow the steps below to share and receive files using AirDrop on iPhone:
How to use AirDrop on iPhone?
Using AirDrop to Share Files from iPhone XS, Earlier iPhones, iPad, or iPod Touch
Sharing files using AirDrop on your iPhone XS, older iPhone models, iPad, or iPod Touch is quick and straightforward once everything is set up. Here’s what you need to do:
- Open the app where your file, photo, or contact is located—for instance, open Photos for pictures, or Contacts for sending a contact card.
- Select the item you’d like to share.
- Tap on the Share icon (that’s the square with the upward-facing arrow).
- In the menu that pops up, look for the AirDrop section. Your nearby AirDrop contacts will appear here.
- Tap on the name or profile image of the person you want to send the file to. If you notice a red badge with a number, tap it to see all available recipients—handy when you’re in a room full of iPhone users!
Once the recipient accepts, your file will transfer securely and almost instantly thanks to AirDrop’s direct device-to-device connection.
How to use AirDrop to share files from iPhone 11 or later
If you’re using an iPhone 11 or a newer model, Apple has made sharing files with AirDrop even smoother thanks to the “point and share” feature. Here’s how to get started:
- Open the file you wish to send—this could be a photo, a webpage, a contact, or any compatible file.
- Tap the Share icon (the familiar square with an arrow pointing upward).
- In the sharing options, select the AirDrop button.
- Now for the nifty part: If the recipient also has an iPhone 11 or later, simply point your iPhone towards theirs. Their device should appear automatically at the top of your screen.
- Tap the recipient’s profile picture or name when it pops up.
Tip: If you see a red badge number on someone’s icon, that indicates there are multiple AirDrop users nearby with matching names. Tapping on the icon will let you choose the right recipient from the list.
With these steps, sharing from your iPhone 11 or later is as quick as a flick of the wrist and a tap of the screen.
AirDrop iPhone as a sender:
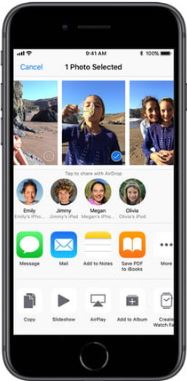
Step 1. Navigate to the file you want to share. This can be Photos, Contacts, and more. If you want to share a photos, you’ll need to open the Photos app where you have saved the pictures and videos on your phone;
Step 2. Once you have selected the photo or file, tap on the Share icon at the bottom of your device’s display screen. The ‘Share’ icon looks like a square with an arrow pointing upwards;
Step 3. A page will open with various sharing options (Message, Mail, etc). Above that row you’ll initially see the AirDrop icon, but after a few seconds this should be replaced by icons representing persons and devices you can share with (iPhone, iPad or Mac, for example);
Step 4. Tap on the icon of the persons you want to share with and your photo or file will be shared with them, as long as they accept the transfer;
Step 5. You can send as many files or photos as you like and send them to multiple contacts at the same time;
Step 6. Once accepted, you will see the word ‘Sent’ under the person’s device in your AirDrop row;
Selecting from Multiple Nearby AirDrop Recipients
If there are several people nearby who can receive your AirDrop, you’ll notice a red badge with a number displayed on the profile picture in the AirDrop section. Simply tap this icon, and a list of all available recipients will appear. From there, select the specific person or device you’d like to share your file with. This helps ensure your photos and files are sent to the correct contact, especially in a crowded place.
AirDrop iPhone as a receiver:
Step 1. An alert will appear on your iPhone asking if you wish to ‘Accept’ or ‘Decline’, when someone attempts to share file with you;
Step 2. When you choose ‘Accept’ the file will start to download on your device;
Note: If you are airdropping between your own devices you won’t see the alert whether you wish to accept or decline, as long as both devices are signed into the same Apple ID;
How to AirDrop Files from Mac to iPhone
Using AirDrop to send files from your Mac to your iPhone is just as simple as between two iOS devices—no tangled cables or fussing with email attachments required.
Here’s what you need to do:
- Ensure Both Devices Are Ready: Make sure both your Mac and your iPhone have Bluetooth and WiFi turned on. Also, confirm that AirDrop is enabled and that your iPhone is set to receive from ‘Contacts Only’ (if your Mac is signed in with the same Apple ID or they share contact information) or ‘Everyone’ depending on your privacy preferences.
- Find the File You Want to Share: Open Finder on your Mac and navigate to the file—this could be a photo, document, or even a video.
- Use AirDrop in Finder: With the file located, right-click on it (or use the Control key and click), then choose ‘Share’ and select ‘AirDrop’ from the menu. You’ll see nearby AirDrop-compatible devices appear, including your iPhone.
- Drag and Drop (Alternative Method): Alternatively, open a new Finder window and select ‘AirDrop’ in the sidebar. Once your iPhone appears as an available device, simply drag the file onto your iPhone’s icon.
- Finish the Transfer: A prompt will pop up on your iPhone asking you to accept the file. Tap ‘Accept’, and the file will be delivered right to your device—for photos and videos, look in the Photos app; for other types, check the appropriate app or Files. For most apps, go to the app that the AirDrop was sent from to find the shared content. For example, if someone sent you a photo, go to your Photos app to see it. App links open in the App Store, so you can download or purchase the app.That’s it—simple, wireless sharing between your Mac and iPhone with just a few clicks.
How to AirDrop Files from iPhone to Mac
Now, if you wish to transfer a file from your iPhone to your Mac using AirDrop, the process is also quite straightforward. Here’s what you need to do:
- First, make sure your Mac is nearby, has WiFi and Bluetooth enabled, and is set to allow AirDrop. On the Mac, open a Finder window, select “AirDrop” from the sidebar, and set your visibility to ‘Contacts Only’ or ‘Everyone’ depending on your preference.
- On your iPhone, find the file you want to send—be it a photo, document, or contact—then tap on the Share icon at the bottom of the screen.
- In the sharing options, look for AirDrop. You’ll see icons for available devices, including your Mac (often showing your Mac’s name and user photo).
- Tap on your Mac’s icon. Accept the incoming file on your Mac when prompted. The file will be received and saved in your Mac’s Downloads folder by default.
For most content, you’ll find the received file in the appropriate location on your Mac. Photos and videos land in the Downloads folder, while other file types—like PDFs or documents—will also show up there unless the app receiving the file handles it differently. If you’re sharing an app link or a web link, it will open in your default browser or prompt you to download the app, just as you’d expect.
Using AirDrop between iPhone and Mac saves time and cables, keeping your workflow seamless across Apple devices.
How to Cancel an AirDrop Transfer in Progress
It happens to the best of us—a file is sent via AirDrop and you realize it’s the wrong one, or perhaps you just changed your mind. Not to worry! If your AirDrop transfer is currently underway (you’ll notice a circular progress indicator as the file sends), simply tap that circle. This will immediately stop the transfer in its tracks, preventing the recipient from receiving the file.
If you accidentally cancel the transfer, all is not lost. You can always go back, select your file again, and start the AirDrop process just as before—no harm done. This quick-cancel feature is especially handy when sharing sensitive files, or if you spot that you’re about to send vacation photos to your boss instead of your best friend!
Conclusion
Those who have heard about AirDrop on iPhone probably think it to be an unnecessary feature. Though it has been around for quite sometime, many Apple users are not conversant with this iPhone feature i.e. what is AirDrop on iPhone, how does AirDrop work etc. However, on going through the post, it should be clear now that AirDrop iPhone is a very useful feature, and once you start to use it, you won’t ever go back.
From the description of how to use AirDrop on iPhone it is clear that using this feature is very easy and you don’t have to worry about the type of file you’re sending. You can share just about anything you want from your device, including photos, videos, links, web pages, documents, screenshots, messages, and other forms of media in a matter of moments. In short, using AirDrop on iPhone is easier, safer, and more flexible than other sharing methods.
You may also like to read: How to Transfer Photos from iPhone to iPhone in 4 easy ways