Steps to backup iPhone to iCloud and Computer.
How to backup iPhone to iCloud and Computer?
iPhone users are often searching on the Web for how to backup iPhone to iCloud or how to backup iPhone to Computer. Here in this post, I am going to show how you can backup your iPhone to both iCloud and Computer in easy steps.
Backing up your Apple device can give you peace of mind in knowing that when you backup the device all your data are safe. If you backup iPhone to PC or iCloud, in case something goes wrong during updating your operating system or due to some software glitches, you can restore your iOS device to the state you had it the last time you made a backup. It’s, therefore, a good idea to make sure you always backup iPhone to PC or iCloud before you embark upon an update. These backed-up data can also be used later if your device is lost or damaged or you can move all the data to a new device if you ever replace the same.
Difference between iCloud backup and Computer backup
Before I go to show how to backup iPhone to iCloud or a computer let me first describe the difference between iCloud backup and Computer backup which would help you to decide which backup method is best for you.
What is iCloud backup
This backup method stores backups in iCloud, offers up to 2TB of storage (your first 5GB are free), always encrypts your backups, and lets you create and use backups from anywhere with WiFi.
Now, how to backup your iPhone to iCloud? You can make a backup of your device using iCloud with a WiFi network connection and for this, you need not connect your device to a computer or even be at home. iCloud backups include nearly all data and settings stored on your device except the following major items:
- Data that’s already stored in the cloud (data sent online to an off-site server);
- Data stored in other cloud services, like Gmail and Exchange mail;
- Apple Mail data;
- Apple Pay information and settings;
- Face ID or Touch ID settings;
- iCloud Music Library and App Store content (If it’s still available in the iTunes, App, or iBooks Store, you can tap to re-download your already purchased content.);
iCloud backup is a great solution for users who don’t frequently connect their device to their computer as it only requires a WiFi connection and USB power to automatically backup, such as during the night when the device is charging.
However, limited free storage (5 GB) is the biggest downside of iCloud backup. Since all current iOS devices have capacities greater than 5 GB, it’s easy to fill up that free storage space. Moreover, that 5 GB free storage is per iCloud account, not per device so users with multiple iOS devices will find the free space gets used up quickly.
You may also like to read: Pros and Cons of Cloud Computing
What is Computer backup
This backup method stores backups on your Mac or PC, storage depends on your Mac or PC’s available space, offers encrypted backups (off by default), and lets you create and use backups from your Mac or PC.
A computer backup of your device includes almost all of your device’s data and settings except the following major items:
- Content from the App Stores and iTunes or PDFs downloaded directly to Apple Books;
- Content synced from Finder or iTunes, like imported MP3s or CDs, videos, books, and photos;
- Data already stored in iCloud, like iCloud Photos, iMessages, and text (SMS) and multimedia (MMS) messages;
- Face ID or Touch ID settings;
- Apple Pay information and settings;
- Apple Mail data;
- Activity, Health, and Keychain data;
Plus point of a computer backup is that as the hard drive of a computer has a lot of space available, an entire phone backup can be stored on the computer without running out of space or having to purchase additional storage. Also, backups are fast, as it is relying not on the internet connection but just USB transfer speeds.
However, negative point is that computer backups require the availability of your computer for plugging in and synchronizing your device. If you’re traveling or away from your computer for days at a time, it can mean a long time gap between backups.
Let me now show you how to backup iPhone to iCloud, step by step.
How to backup iPhone to iCloud
You can backup iPhone to iCloud both automatically and manually.
Follow the steps below on how to backup your iPhone to iCloud automatically:
1. Connect your iPhone to a power source;
2. Connect your device to a WiFi network;
3. Go to Settings > [your name] > iCloud > iCloud Backup;
4. Make sure that your iPhone’s screen is locked;
5. Check that you have enough available space in iCloud for the backup. When you sign in to iCloud, you get 5GB of iCloud storage for free. If you need more iCloud storage to complete the backup, follow the onscreen steps to buy more storage;
6. iCloud backups occur automatically once your device is plugged into a power source with the screen locked and connected to a Wi-Fi network;
There is also an option to backup manually when you’re on the road and haven’t backed up in a while or when you’ve been working away from a power source (Apple says if you don’t backup your device for 180 days or more, the company will delete your device’s iCloud backup files).
Follow the steps below on how to backup your iPhone to iCloud manually:
1. Connect your iPhone to a Wi-Fi network;
2. Go to Settings > [your name] and tap iCloud;
3. Tap iCloud Backup;
4. Under Backup turn iCloud Backup ‘on’ if it is ‘off’;
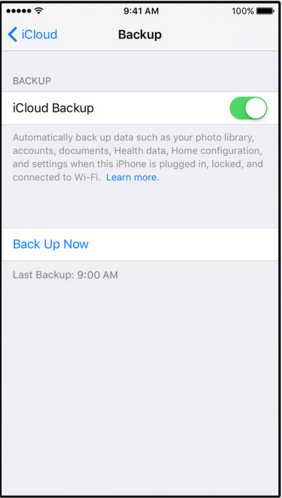
5. Tap the ‘Back Up Now’ tab. Make sure you remain connected to your Wi-Fi network until the backup process is completed;
6. To check the progress and completion of the backup,
Go to Settings > [your name] > iCloud > iCloud Backup. Under ‘Back Up Now’ you’ll see the date and time of your last backup;
If you don’t have enough iCloud storage to backup, a message will come up that you can’t backup because there’s not enough storage available. Here are some tips if you’re low on iCloud storage:
- Upgrade your iCloud storage plan by following the onscreen steps to buy more storage;
- Make a smaller backup. You can backup fewer apps or delete unwanted photos and videos;
- Delete older backups that you don’t need;
Let me now show the steps to backup iPhone to computer.
You may also like to read: iPhone Backup Location for Mac and Windows – how to find
How to backup iPhone to computer?
Here’re the steps to follow for how to backup iPhone to PC:
1. Connect the iPhone to your computer via a USB cable;
2. If a message asks for your device passcode or to Trust This Computer, follow the onscreen steps;
3. After you connect your iPhone to your computer, you can locate it and access its settings. See this page for help locating your device. If your computer doesn’t recognize your device, get help here;
4. Backup account passwords and health data;
5. Next, select your device and click ‘Back Up Now’ to begin the backup process;
6. The backup process might take a while, but once it’s finished, you’ll have a complete backup of your device on your computer;
7. When the process ends, to verify if the backup is completed successfully, you can see on the device screen the date and time the backup was created ;
Note: Make sure iCloud is turned off on your device. You can’t create backups using iTunes when iCloud is enabled. Go to Settings > [your name] > iCloud > Storage & Backup and turn off the iCloud backup switch;
Now, if your device is lost, damaged, or replaced, you’ll have all of the data, that was stored on that device, stored on your computer. You’ll be able to plug in a new device and restore all of that data onto it.
You may also like to read: Transfer music from iPhone to iTunes free – a step-by-step guide
Frequently asked questions
To conclude let me also address some of the related questions often asked by iPhone users.
How do I backup iPhone to iCloud manually?
To backup iPhone with iCloud manually follow the steps below:
1. Go to Settings > [your name] > iCloud > iCloud Backup.
2. Turn on ‘iCloud Backup’ (iCloud backs up your iPhone automatically when the device is on Wi-Fi and connected to power after being locked);
3. To backup manually tap ‘Back Up Now’;
How to backup iPhone to iCloud on computer?
You can back up iPhone using iCloud or your computer.
How to backup iPhone without iCloud?
You can backup your iPhone without iCloud, using iTunes. Here’s how to backup iPhone without iCloud
1. Connect your iPhone to your PC or Mac;
2. Next open iTunes, and sync your iPhone with your PC or Mac;
3. iTunes will backup all your photos, images, and media files not purchased from iTunes, and all messages, call logs, application data, settings, memos, calendars, and bookmarks.
Where are iPhone backups stored?
iPhone Backup Location for Windows and Mac OS:
In Mac OS your iPhone files are backed up at the following location:
~/Library/Application Support/MobileSync/Backup/
The (~) symbol signifies your home directory, which is in the same place where all your other personal documents are stored.
Windows 8 and Windows 10 put the iPhone backups in the following directory:
\Users\YOURUSERNAME\AppData\Roaming\Apple Computer\MobileSync\Backup
You may also like to read: How to restore iPhone from iCloud backup
Conclusion
Now that you know how to backup iPhone to iCloud and how to backup iPhone to Computer it is very useful to know how to adjust what gets backed up in the future if you’re using both a computer and iCloud for backing up your device. For example, in order to save space you can disable photos in your iCloud backup when you have backed up a lot of photos through a computer. To do this follow the following steps in the case of iPhone:
1. Select ‘Storage’ from the iCloud Settings menu and go for ‘Manage Storage’;
2. Tap your iPhone’s backup;
3. Scroll through the list of items backed up, and toggle anything off that you don’t want to be backed up to your iCloud storage;
4. Select “Turn Off & Delete” from the menu that appears. This will erase the data that is currently backed up and keep that content from backing up in the future. This will not delete any data from your iPhone, so there’s nothing to worry about;