How to insert signature line in Word document?

How to create an Electronic Signature in Word?
How can I create electronic signature in Word document without printout is a query you may often hear from computer users. Today in this post I will show how to create an electronic signature in Word or how to draw a signature in Word in simple steps, without printing the document.
It is never a problem to make digital signature in Word or Worksheet in MS Office when the document page is printed. However, to create a signature in Word without printing the document requires a little workaround. This is because to create a signature in Word without a printout first you are to insert signature line in Word document where exactly you will put your digital signature.
Before I show how to make an e-signature in Word document, let’s first look into what an electronic signature is.
What is an electronic signature?
Electronic signature or e-signature refers to data in electronic form. An electronic signature is a digital mark or symbol that is used to sign electronic documents, making them legally binding. Electronic signatures are commonly used to approve, consent, or authenticate documents in a digital format.
An electronic signature could be considered a virtual representation of a pen-and-paper signature. It is handy and popular feature of Microsoft Office. An electronic signature is intended to provide a secure method for the signatory to provide a smooth transaction. It is used to demonstrate the authenticity of a message or document. Digitally signing a document helps maintain document integrity by ensuring that any changes to the document after signing can be detected.
When you create electronic signature in Word it gives the recipient of the document assurance that the content was created by a known sender (authentication), that the sender cannot deny any association with the signed content (non-repudiation), and that the content has not been changed or tampered with in transit (integrity). Now let’s see how to create an electronic signature in Word document.
To make an electronic signature in Word you need to know where to place the signature. Therefore, to add digital signature to Word document first, you are to insert a signature line in Word document where the signer would put his signature. Now let’s see how to generate electronic signature Word document by inserting a signature line.
Benefits of Electronic Signatures
Electronic signatures in Word documents bring a host of advantages to both individuals and organizations. By allowing users to sign documents digitally, the entire signing process becomes faster and more efficient—eliminating the need for printing, scanning, or mailing paper copies. This not only saves time but also reduces costs associated with traditional document handling.
Security is another key benefit. Electronic signatures help verify the identity of the signer and protect the integrity of signed documents, making it much harder for unauthorized changes to go unnoticed. In addition, electronic signatures are legally binding in most regions, providing peace of mind that your signed documents are recognized by law.
Flexibility and Integration
You’re not limited to just what Word itself offers—many electronic signature tools, such as DocuSign and Adobe Sign, integrate smoothly with Word. These platforms let you upload documents directly, embed your signature, and sometimes even customize your signing experience—all without leaving your workflow. Advanced features like encryption, audit trails, and secure authentication measures further ensure the integrity and legality of your signed documents.
Apps explicitly designed to sign documents add even more layers of protection. For instance, each time you sign a document, a certificate is instantly created that includes a timestamp and the date of completion. This not only strengthens the security and authenticity of your signature, but also provides a verifiable record for your files—giving you added peace of mind with every signed document.
While the built-in tools in Word are great for quickly adding simple signature images or handling basic digital signing, sometimes you might need more robust capabilities. If your workflow calls for features like real-time tracking, centralized storage, and seamless integration with your existing apps, these third-party solutions can help elevate your signing process. Not only do they add convenience, but the extra layers of security and compliance can give you peace of mind when handling sensitive agreements.
It’s important to consider your specific needs when choosing your e-signature approach. Word’s native tools are convenient for everyday documents and straightforward approvals, but if you require features such as tracking, notifications, long-term storage, or deeper analytics, a dedicated signature platform may offer a more comprehensive solution. With these advanced tools, you also gain insights to help streamline your workflow and support your business growth.
Ultimately, it’s about choosing the option that best fits your needs—whether that’s sticking with Word’s straightforward features or leveraging more powerful, integrated signature platforms to streamline and safeguard your document workflows.
Streamlined Document Management
Using electronic signatures in Word also streamlines document management, making it easier to track, store, and retrieve signed documents. This digital approach supports remote work and collaboration, allowing multiple parties to sign documents from anywhere in the world.
In summary, electronic signatures enhance productivity, reduce paperwork, and ensure that your Word documents remain secure and authentic throughout the signing process. Whether you’re managing contracts, approvals, or official forms, the right e-signature solution can help you work smarter and with greater confidence.
Word Format vs. PDF Format for Electronic Signatures
When deciding between Word and PDF formats for documents with electronic signatures, it’s important to weigh their respective strengths and limitations.
Advantages of Word Format:
- Easy Editing and Collaboration: Word documents are great when you need to collaborate or revise the content before finalizing. You can make updates seamlessly, which is especially helpful for working drafts or documents needing multiple rounds of input.
- Track Changes: Microsoft Word’s built-in tools allow contributors to suggest edits and view revision history, ensuring everyone stays on the same page.
Disadvantages of Word Format:
- Security Concerns: Because Word files are easily editable, there’s a greater risk that someone might make unauthorized changes, even after a document has been signed.
- Formatting Issues: If the receiver uses a different word processor or version, formatting can sometimes appear skewed, which may undermine the professionalism of your document.
Advantages of PDF Format:
- Consistency and Professionalism: PDF files preserve the layout, fonts, and appearance of your document across all devices and platforms. What you send is exactly what the recipient will see and print.
- Enhanced Security: PDFs are generally harder to edit without leaving a trace, making them a more secure choice for finalized, signed agreements.
- Legal Recognition: PDF signatures are widely accepted for official and legal documents, as software like Adobe Acrobat embeds secure encryption.
Disadvantages of PDF Format:
- Limited Editing After Signing: Once you’ve signed and saved a PDF, making further changes can be complicated. Any modifications typically require special tools and may invalidate the signature.
- Less Flexibility for Collaboration: PDFs are not designed for ongoing collaborative editing; comments and markups are possible but not as dynamic as in Word.
In summary:
Choose Word format for drafts and collaborative projects where flexibility is needed. Opt for PDF when you need a polished, secure document ready to be shared or submitted for legal purposes. Both formats support electronic signatures, but your selection should depend on how much security and finality you require versus ease of editing and review.
How Third-Party Apps Enhance Compatibility and Transferability
Third-party electronic signature apps—like DocuSign, Adobe Sign, and HelloSign—bring several advantages when it comes to working smoothly across devices and converting documents between formats. Unlike Microsoft Word, which may have varying features on different platforms (Windows, Mac, iOS, or Android), these apps are designed for consistency. You can start signing a document on your desktop, review the details on your tablet, and finalize the signature on your phone—without losing any features or security along the way.
Uniform Experience Across Devices
Most reputable e-signature solutions offer dedicated apps or web platforms that are fully compatible with multiple operating systems. This means whether you’re using a PC at the office or a mobile device on the go, you get the same streamlined signing process and feature set. That uniformity is particularly useful for teams and clients working remotely or in diverse digital environments.
Seamless Format Conversion
Need to send a signed file in PDF format, even if the original was created in Word? Third-party apps typically allow you to upload a document in one format (like .docx), apply your signature, and export it as a PDF—or vice versa. This flexibility ensures that your document looks professional and retains its security, no matter how you need to share or archive it.
Added Security and Traceability
Another benefit is that many of these tools automatically generate a certificate of completion each time a document is signed. This certificate often includes details like timestamps, signatory information, and a unique document identifier, adding an extra layer of authenticity and helping maintain compliance with legal and organizational requirements.
In short, if you work across multiple devices, frequently need to convert file formats, or require robust security features, third-party electronic signature apps offer a smoother, safer, and more versatile experience than relying on Word’s built-in tools alone.
Legal Considerations by Country
It’s important to note that while electronic signatures are widely recognized and legally binding in many regions—including the USA, UK, Canada, Ireland, and much of the European Union—acceptance can vary. Most developed countries have established regulations like the U.S. ESIGN Act or the EU’s eIDAS, ensuring that electronic signatures hold the same legal weight as handwritten ones for most transactions.
However, some countries impose stricter requirements or don’t recognize electronic signatures for certain document types. For example, in places like North Korea, Nepal, Afghanistan, and Fiji, electronic signatures may not be legally valid or widely accepted for official documents. Always check local regulations before sending signed files internationally, especially when working with sensitive legal, financial, or government paperwork.
Understanding the landscape not only helps ensure compliance but also avoids unpleasant surprises when closing deals across borders.
How to insert signature line in Word
To make digital signature in Word first, you are to insert signature line in Word. Find below how to add a signature line in Word document where the signer would put his digital signature:
How to add a signature line in Word (these steps are relevant to the MS Office 2007 Word document)
Step 1: In the Microsoft Office Word in which to make digital signature, place your pointer where you want to insert signature line in Word document;
Step 2: Click the Insert tab and in the Text, section click Signature Line and then click Microsoft Office Signature Line from the list;
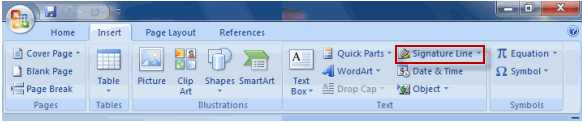
Step 3: Wait for the Signature Setup dialog box to appear;
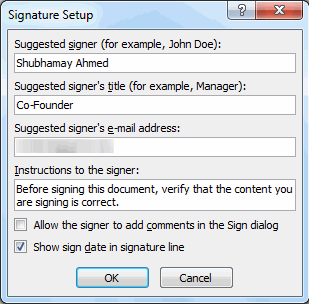
Step 4: In the Signature Setup box, type a name in the Suggested Signed box. Also, add a title in the Suggested signer’s title box;
Step 5: Click ‘OK’
Step 6: A signature line now appears with a cross and a line to signify where the signer would insert signature in Word ;

Step 7: To insert additional signature lines, repeat steps 1 through 6.
Step 8: Now send the document to the intended signer i.e. who will put his electronic signature in Word;
These steps complete the signature line process in Word.
How to add a digital signature in Word using an add-in
If you prefer to add a digital signature in Word with the help of a third-party tool, Microsoft Office supports add-ins you can install directly from the Microsoft Store. Here’s how to get started:
Step 1: Open your Word document, then navigate to the Insert tab and select Get Add-ins (or Store, depending on your version).
Step 2: In the add-in window, browse or search for a reputable electronic signature provider, such as DocuSign, Adobe Sign, or similar. Click Add or Get It Now to install the add-in to Word.
Step 3: Once installed, you’ll notice a new tab or sidebar for the chosen add-in. Click this to launch the plugin panel inside Word.
Step 4: Sign in to your account within the add-in panel, or create one if you’re a new user. Follow the on-screen prompts to connect your account.
Step 5: After logging in, you’ll typically see options like sign the document yourself or send for signature. Choose the desired action.
Step 6: Insert your electronic signature by following the app’s steps, or assign signature spots for others as needed. The add-in will guide you through the finalization, whether you’re signing or collecting others’ signatures.
Step 7: Once all signatures are completed, you can usually download or save a certified copy of your signed document directly from Word, often including a signature certificate for added peace of mind.
This approach streamlines the process—no printing, scanning, or switching between apps required.
How to create an electronic signature in Word (steps for the intended signer)
If you are the signatory then follow the steps below about how to make electronic signature in Word:
1. To make digital signature in Word, you’ll need to follow the above instructions and insert a signature line or signature field first. Make sure to position the insertion point where you want the signature block or signature field to appear;;
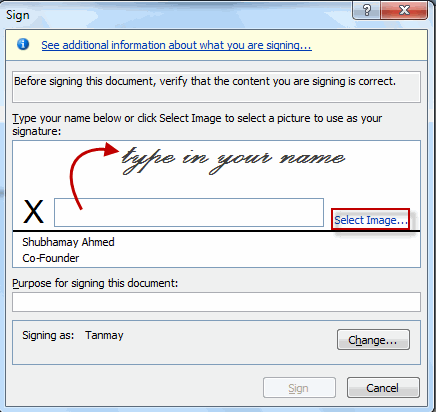
2. Double-click next to ‘X’ or right-click on the signature line;
3. A Sign box will appear next to ‘X’;
4. Type your name in the box to add a printed version of your signature as typewritten text Or upload a digital image of your handwritten signature you might have stored on your computer by clicking ‘Select image‘;
(The digital image of your signature can be created easily by scanning your signature and then saving the file as a separate file in a common file format such as PNG or JPG. This makes it easy to insert into any word file)
5. After inserting the signature image, you can use the Picture Tools Format tab to crop, resize, or edit the inserted picture before finalizing your signature. If you wish to adjust the image further, simply click on it to activate the Format tab. From here, you can use the Crop tool to trim any excess background or whitespace around your signature for a cleaner look. Once you’ve made your adjustments, right-click the image and select Save as Picture if you’d like to save this refined signature as a separate file for future use. This can be especially handy if you plan to insert your signature into other documents later on.
6. When you are ready to insert electronic signature in Word, click the Sign button to complete the process.
Tip: For documents requiring multiple signatures, you can insert additional signature fields or signature lines for each signer. If you need to send a signature request or manage multiple signatures, consider using an add in to streamline the process in your word file.
Once the process is properly followed, creating an electronic signature Word shall be completed. Now, Word will confirm that the signature has been added.

After you create e-signature in Word, it will become read-only to prevent modifications to its content. You can, however, edit the digital signature in a Word document whenever you need to;
Save Your Signature and Details as a Reusable Block in Word
Want to avoid re-creating your signature (plus all your credentials) every time you send a document? You can easily save a signature block—including your handwritten signature image and typed info like your job title or phone number—as a reusable building block in Word.
Here’s how to do it:
- First, type out any text you’d like to accompany your signature—think phone numbers, job titles, or email addresses—directly below the inserted signature image.
- With both your signature picture and the accompanying text selected, head to the Insert tab, then choose Quick Parts (in the Text or Explore group, depending on your version).
- Select Save Selection to Quick Part Gallery… A new dialog box will pop up.
- Give your signature block a clear name (for example, “Default Signature”) and choose AutoText under the Gallery dropdown.
- Click OK to save.
Next time you need to insert your signature block:
- Place your cursor at the desired spot.
- Navigate back to Insert > Quick Parts > AutoText, and select the name you just saved.
No more copy-and-paste hassles—your full signature block is ready to drop in with just a couple of clicks.
Using Invisible Digital Signatures in Word
Invisible digital signatures provide a discreet yet powerful way to sign documents in Word. Unlike visible signatures, these do not appear on the document itself but are embedded within the file’s metadata, ensuring the document’s authenticity and integrity without altering its appearance.
To add an invisible digital signature, open your Word document and go to the “File” tab. Select “Info,” then click on “Protect Document” and choose “Add a Digital Signature.” Follow the prompts to select your digital certificate and complete the signing process. This method is especially valuable for scenarios like OFR submissions, where a visible signature is not required but a secure, tamper-evident record of the signing process is essential.
Invisible digital signatures help maintain the professional layout of your word documents while providing robust security. They ensure that any changes made after signing will invalidate the signature, alerting recipients to potential tampering. By using invisible digital signatures, you can confidently sign documents and protect their integrity without affecting their design or readability.
Security Considerations for Electronic Signatures
When adding an electronic signature to Word documents, security should always be a top priority. One of the most effective ways to secure your signed documents is by using digital certificates, which authenticate the signer’s identity and encrypt the signature for added protection. This ensures that only authorized individuals can sign and that the signature cannot be forged or altered.
It’s also important to safeguard your Word documents by enabling password protection and storing them in secure locations, such as encrypted drives or trusted cloud services. Using reputable electronic signature software that adheres to industry security standards further enhances the reliability and legal standing of your signatures.
Be mindful of potential risks, such as phishing attempts or malware, which can compromise the security of your electronic signatures. Always verify the source of signature requests and keep your software up to date. By following these best practices, you can ensure that your electronic signatures in Word are both secure and legally binding, protecting the integrity of your signed documents.
How to remove an electronic signature in Word document or worksheet?
Here are the steps to follow to remove an electronic signature in Word document:
1. Open the Office document that contains the e-signature you want to remove;
2. Click the Microsoft Office Button, point to Prepare, and then click View Signatures;
3. In the Signatures task pane, point to the signature that you want to remove, click the arrow that appears on the right, and then click the ‘Remove Signature’ option;
4. When you are asked if you want to remove the signature permanently, click ‘yes’;
5. You can edit your electronic signature in Word by clicking the ‘Signature Setup’ option;
Troubleshooting Common Issues with Electronic Signatures in Word
While electronic signatures in Word are generally straightforward, users may occasionally encounter issues during the signing process. If you’re unable to insert a digital signature, first check that your digital certificate is properly installed and that the signature line is correctly set up in the document. Sometimes, permissions or document restrictions can prevent signing—ensure that you have the necessary rights to sign the document.
If the signature line appears but cannot be signed, review the document’s settings to confirm that it is not marked as final or restricted from editing. For issues with the visibility of digital signatures, verify that the signature is properly embedded and that you are using compatible software to view the document.
Should you encounter problems with the signing process, such as error messages or missing options, updating your version of Word or repairing your Office installation can often resolve these issues. By addressing these common challenges, you can maintain a smooth workflow and ensure that your electronic signatures in Word documents are applied correctly and securely.
Frequently asked questions
Now that I have explained how to do electronic signature in Word document, before I conclude, let me also give short replies to some of the questions often asked by people about how to draw signature in Word document.
How do I write my signature on a Word document?
1. Write your signature on a piece of paper;
2. Scan the page and save it on your computer in a common image file format;
3. Open the signature image file, Right-click the image, and click Save as Picture;
4. To add the signature to a document, click Insert > Pictures;
How to make electronic signature in Word?
Follow the steps below on how to do an electronic signature in Word:
i. First add a signature line where you will sign the document. To do this, open the Microsoft Word document and place the cursor (pointer) in the location where the signer will sign;
ii. Next, select the ‘Insert tab’ and then click ‘Signature Line’;
iii. Then click the ‘Microsoft Office Signature Line’ option. A Signature Setup dialog box will appear;
iv. Enter your information in the text fields and click OK. A signature line will appear;
v. Finally, to draw a signature in Word document right-click on the signature line. A Sign box will appear next to ‘X’. Type your name in the Sign box Or upload a digital image of your written signature stored on your computer by clicking ‘Select image’. Then click ‘Sign’;
How to insert signature line in Word?
To insert signature line in Word document, select the ‘Insert tab’, click ‘Signature Line’ and then select the ‘Microsoft Office Signature Line’ option from the list. A Signature Setup dialog box will appear. Fill out the required fields in the setup box and click ‘OK’. Now, the signature line in Word would appear.
How do you add a signature to a Word document on a Mac?
Follow the steps below to add a signature to a Word document on a Mac:
1. Open the document where you want to put your signature;
2. Move the cursor to the place on the document where you want to insert your signature;
3. Next, click the ‘Media’ button in the toolbar, select the location of your stored signature image, and select the image;
4. Click Insert.
If you don’t already have a saved image of your signature, you can easily create one using the built-in tools on your Mac:
- Open either Pages or Microsoft Word and create a blank document.
- Sign your name on a piece of white paper, then take a clear photo or scan it using your Mac, iPhone, or iPad.
- Save the image as a PDF or a standard image file (like .jpg or .png).
- If you want a cleaner version, use Preview to open your PDF or image, crop it as needed, and save.
Alternatively, you can use Preview’s Sign tool to digitally draw your signature. Simply open a blank PDF in Preview, click the Markup icon, and use the Sign tool to create and save your signature. Then, use [CMD + Shift + 4] to take a screenshot of the signature area—this lets you save it as an image.
Once your signature is ready, just insert it into your Word document using the steps above. You can resize and reposition the image so it fits perfectly where you want your signature to appear.
Adding a Signature Line in Word for Mac
While Word for Mac doesn’t offer built-in digital certificate signature tools like the Windows version, inserting a signature image is a straightforward and effective solution. If you’d like to add a signature line, simply underline a blank space or use the “Shapes” menu to draw a line where your signature should go.
For a quick method:
- Place your cursor where you want the signature line.
- Hold down the underscore key () to create an underlined blank space.
- Adjust the length to accommodate your signature, just as you would on a printed form.
Or, go to Insert > Shapes, select the straight line, and draw a line where your signature will appear.
This way, you can easily add a professional-looking signature or signature line to any Word document on your Mac—no special software or plugins required.
You might also like to read this post – How to recover unsaved Word document
Conclusion
The above facility to insert signatures in Word or Excel worksheets in Microsoft Office has been introduced in the 2007 MS Office system, which made it possible to use a paperless signing process for important documents.
If you follow the steps shown in the post correctly about how to create an electronic signature in Word document it will be easier for you to assure the recipient about the authenticity of a message or document.
Unlike signatures on paper, digital signatures can provide a record of exactly what was signed, which can be used in the future to verify the signature. When the signer adds a visible representation of his or her signature to the document, an electronic signature is added simultaneously to authenticate the identity of the signer. However, this feature of creating digital signatures can only be used in Word and Excel workbooks.
It’s important to note, though, that there’s a distinction between electronic signatures and digital signatures:
- Electronic signatures are simply virtual marks—such as a handwritten signature image or typed name—added to a document to indicate agreement or approval.
- Digital signatures, on the other hand, are much more secure and involve encryption, a digital certificate, and often specialized software. To use digital signatures, you must first obtain a digital certificate from a trusted certificate authority. Both the sender and the recipient may need these certificates, which are used to confirm the authenticity of the signature and can include details like timestamps.
Depending on the software and the method you use, electronic signatures may also come with added security features, such as certificates with timestamps, to further ensure the integrity and authenticity of your document.
Why the Signature Line Matters?
There’s a very real possibility that your recipient might return a document unsigned if they don’t see a designated signature line. In other words, no signature is truly complete without a signature line—it acts as an unmistakable prompt for action and reassures both parties about where the signature belongs. Including a clear signature line not only guides the signer but also helps maintain document integrity.
Another point that needs to be noted in connection with drawing signatures in Word is that any editing is not allowed after the signature line. Therefore, to create electronic signature in Word document make sure to insert signature line in Word at the very end of the document.