How to get videos from iPhone to computer?
How to send videos from iPhone to computer?
There are several ways by which you can transfer videos from iPhone to computer. Here in this article, I am going to show 3 simple ways on how to send videos from iPhone to computer to free up space on your iPhone.Besides, it is also a method to back up the videos on your iPhone.
By recording high-definition videos on your iPhone you can quickly run out of storage space on your device, especially in the case of 16GB iPhones. In such a case, you may not have enough space to save further videos on your iPhone unless you transfer some big videos from your iPhone to your PC or Mac. Apart from freeing up storage space, you may also need to know how to get videos from iPhone to computer for sharing with your family or for backing up.
Adjusting Your iPhone’s Photo and Video Formats for Smoother Transfers
If you’ve ever tried moving photos or videos from your iPhone to your computer and run into strange file types that just won’t open smoothly—don’t worry, there’s an easy fix. Tweaking your iPhone’s camera settings can make your files much more cooperative, especially if you’ll be sharing them with friends or transferring to different devices (like your trusty Dell laptop or the family HP).
Here’s how to set things up for maximum compatibility:
- Head to your iPhone’s Settings app.
- Scroll down and tap on “Camera.”
- Choose “Formats.”
- Select “Most Compatible.”
From now on, your iPhone will save photos as standard JPEGs and videos as H.264 files. These are much friendlier with Windows computers, Android devices, or even older versions of editing software like Adobe Photoshop or VLC Media Player. No more “file not supported” headaches!
With your photos and videos ready to play nice, let’s dive into the best ways to actually send them over to your Mac.
How to send videos from iPhone to Mac
If you’re using a Mac, you have several handy, built-in options to transfer videos—no fancy cables or software subscriptions needed. Here are some effective ways to move your iPhone videos over to your Mac, whether you’re all-in on Apple’s cloud or just want an old-fashioned direct transfer.
AirDrop
AirDrop might be the easiest way to zap videos from your iPhone to your Mac. Simply make sure both devices have Wi-Fi and Bluetooth turned on. Then:
- On your Mac, open AirDrop in Finder and set it to be discoverable by “Everyone” or “Contacts Only” (as you prefer).
- On your iPhone, select the video, tap the Share button, and choose your Mac from the AirDrop options.
- Approve the transfer on your Mac, and voilà—your video lands in your Downloads folder.
Photos App
The Photos app on your Mac also makes importing videos a breeze.
- Connect your iPhone to your Mac using a USB cable.
- Unlock your iPhone and tap “Trust” if it’s your first time connecting these devices.
- On your Mac, open the Photos app. Your iPhone should appear in the sidebar under “Devices.”
- Select your device, pick the videos you want, and click “Import Selected.”
Image Capture
Prefer something a little more direct? Image Capture, which comes pre-installed on every Mac, lets you transfer videos (and photos) straight to a folder you choose.
- Connect your iPhone to your Mac and open the Image Capture app (find it via Spotlight search).
- Select your iPhone in the list, then browse your camera roll right there.
- Choose the videos you want and click “Import” (or “Import All” if you’re feeling generous).
iCloud Photos
If you’re already using iCloud Photos, your videos can automatically appear on your Mac without you lifting a finger.
- On your iPhone, head to Settings > [your Apple ID] > iCloud > Photos, and switch on “Sync this iPhone.”
- On your Mac, open the Photos app and make sure iCloud Photos is enabled in Preferences.
- Any new videos you add on your iPhone will now magically appear on your Mac—no cables needed.
Use whichever method suits your workflow best—sometimes AirDrop is speedy for one-off videos, while iCloud keeps everything always in sync. Whatever you pick, you’ll free up iPhone space and keep your precious videos safe.
Here are 3 simple ways to get videos from iPhone to computer:
1. How to send videos from iPhone to computer using Windows Photos
You can use Windows Photos to directly transfer videos from your iPhone to your computer.
Step 1: Connect your iPhone to the PC using a USB cable and make your iPhone trust your computer;
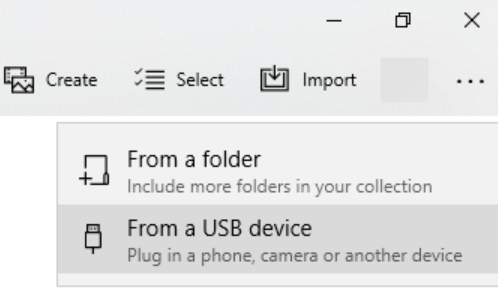
Step 2: Open the Photos app on your computer and then go to Import > From a USB Device. Photos app will automatically search for the videos and photos on your iPhone;
Step 3: Select the videos you want to transfer to your computer and then select a location to save them. By default, the videos will be saved to the ‘My Pictures’ folder on your computer;
Step 4: Next, click on the “Import” button;
Step 5: Once you click on this option your photos will start transferring from iPhone to PC;
Why to choose the right USB cable for transferring your videos?
If you’re having trouble transferring your videos, the culprit could be your USB cable. Not all USB cables are created equal—some are designed for charging only, while others support both charging and data transfer. For example, a cable included with your iPhone or a certified Lightning-to-USB cable from reputable brands like Anker or Belkin typically supports data transfer.
On the other hand, spare generic cables (especially the cheaper ones found at the local corner shop) may only charge your device and won’t transfer files. So, if your computer isn’t recognizing your iPhone or the transfer isn’t working, try swapping the cable for an official or high-quality data cable. This simple switch often solves most connection problems when moving photos and videos between your iPhone and your computer.
How to make sure your videos and photos play nicely with Windows
Ever transferred a video from your iPhone to your PC only to discover it refuses to open, or plays back with weird glitches? That’s usually because iPhones by default save photos as HEIC and videos as HEVC—formats that Windows doesn’t always love out of the box.
Good news: there’s a quick fix.
Hop into your iPhone’s Settings, scroll down to Camera, and tap on Formats. Here, pick “Most Compatible.” This way, all future photos and videos will be saved as good old JPEG and H.264—formats Windows understands without needing any fancy codecs or extra software.
Pro tip: After making this change, anything new you shoot will save in the more universal formats. Already-have HEIC or HEVC files? You can use free tools like iMazing HEIC Converter or third-party apps from Anker and Belkin to convert them to JPEG or MP4 before transferring to your computer.
With this tweak, your photos and videos will transfer over to Windows with zero drama—ready to open, edit, or share right away.
How to send videos from iPhone to Mac using the Photos app
If you’re using a Mac, transferring videos from your iPhone is just as straightforward thanks to the built-in Photos app. Here’s how you can do it:
- Connect your iPhone to your Mac using a USB cable. Make sure your iPhone is unlocked and tap “Trust” if prompted—this allows your Mac to access your device.
- The Photos app may launch automatically. If it doesn’t, open it manually from your Applications folder.
- In the Photos app, you’ll see your iPhone listed in the sidebar. Click on it, and you should see all the photos and videos available for import.
- Select the videos you want to move over. You can pick individual files or click “Import All New Items” if you’d like to transfer everything.
- Choose where you want to save them, then click “Import Selected” or “Import All New Items.” Your videos will be imported in their original quality and filed neatly by the Photos app.
And that’s it—your videos are now safely backed up on your Mac, ready for editing, sharing, or simply freeing up space on your iPhone.
2. How to send videos from iPhone to computer using File Explorer
Follow the steps below to get videos from iPhone to Windows computer using File Explorer. This is simple and you also don’t need to use any third-party software.
1. Connect your iPhone to your computer via a USB cable and make your iPhone trust your computer;
2. Open ‘This PC’ to find your iPhone;
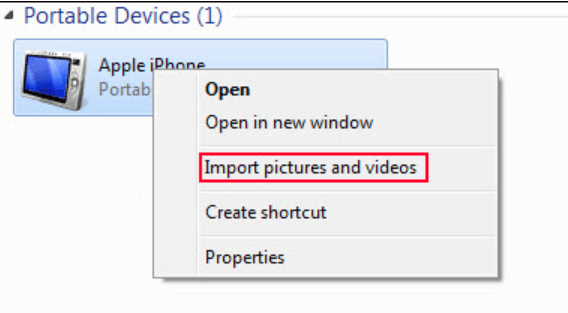
3. Right-click on your iPhone and then select ‘Import pictures and videos’;
4. Select Review, organize, and group items to import or Import all new items now according to your situation;
5. Click Next.
6. Choose the videos you want to import to your PC and then click ‘Import’ to start the video import process.
Copy and Paste Videos from iPhone to PC
You can also go to This PC > your iPhone > Internal Storage > DCIM to directly copy and paste your needed videos to a folder on your computer.

3. How to get videos from iPhone to computer using iCloud Photos
You can use this method to transfer small videos from your iPhone to your computer.
Every iPhone comes with 5GB of free cloud storage space in Apple’s iCloud. If you require more space you’ll need to pay a small monthly fee for storage ($0.99/month for 50 GB or $2.99/month for 200 GB). This storage space can be used to back up photos and videos among other things.
iCloud is always helpful when you are looking to transfer photos, videos, or other types of content between your devices, including iPhone, iPad, iPod Touch, Mac, and PC.
With Apple’s iCloud Photos feature, you can access your videos and photos from your iPhone, iPad, iPod touch, Mac, Apple TV, on iCloud.com, and your PC.
How iCloud Photos Works
iCloud Photos keeps your photos and videos safe, up to date, and available automatically across all your devices. Once enabled, there’s no need to manually import media from one device to another—your original, full-resolution photos and videos are uploaded and securely stored in the cloud. You have the flexibility to keep these full-resolution originals on each device or, if you’re short on space, use device-optimized versions that take up less room while still letting you view and share your memories with ease.
No matter which device you’re using, your media library syncs seamlessly, so you’ll always have access to your latest shots—whether you’re sitting at your desktop, scrolling on your phone, or logging in from a browser. This makes iCloud Photos a convenient choice for anyone juggling multiple devices or just looking for an effortless way to keep videos and photos organized and accessible.
To transfer videos from your iPhone to your PC or Mac computer, follow the steps below.
Make sure you are using the same Apple ID on your devices, your devices are connected to Wi-Fi, and there is enough iCloud space to save the videos. Then follow the options below to move videos from iPhone to PC using iCloud Photos.
Step 1. Sign in to iCloud using your existing Apple ID and password;
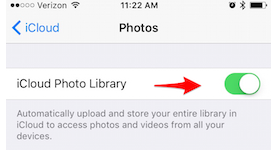
Step 2: On your iPhone, go to Settings > your Apple ID > iCloud > Photos;
Step 3: Turn on ‘iCloud Photo Library’.
Step 4: Download iCloud for Windows on your computer and sign in with your Apple ID & password;
(If you’re using a Mac, log in to iCloud on your computer. Open System Preferences on your Mac and open iCloud.)
Alternatively, if you prefer a more direct approach, you can use the Apple Devices app, available from the Microsoft Store. Here’s how:
- Install the Apple Devices app from the Microsoft Store on your PC.
- Connect your iPhone or iPad to your PC using a USB cable.
- If prompted, unlock your iPhone or iPad with your passcode.
- When you see a prompt on your device asking if you trust this computer, tap Trust or Allow to continue.
- For importing photos and videos, Microsoft’s Photos app can help—just follow their import instructions for smooth transfers.
Once you’re signed in and set up, you’re ready to move on to the next steps for transferring your videos.
Step 5: Click ‘Options’ next to ‘Photos’ in the iCloud window;
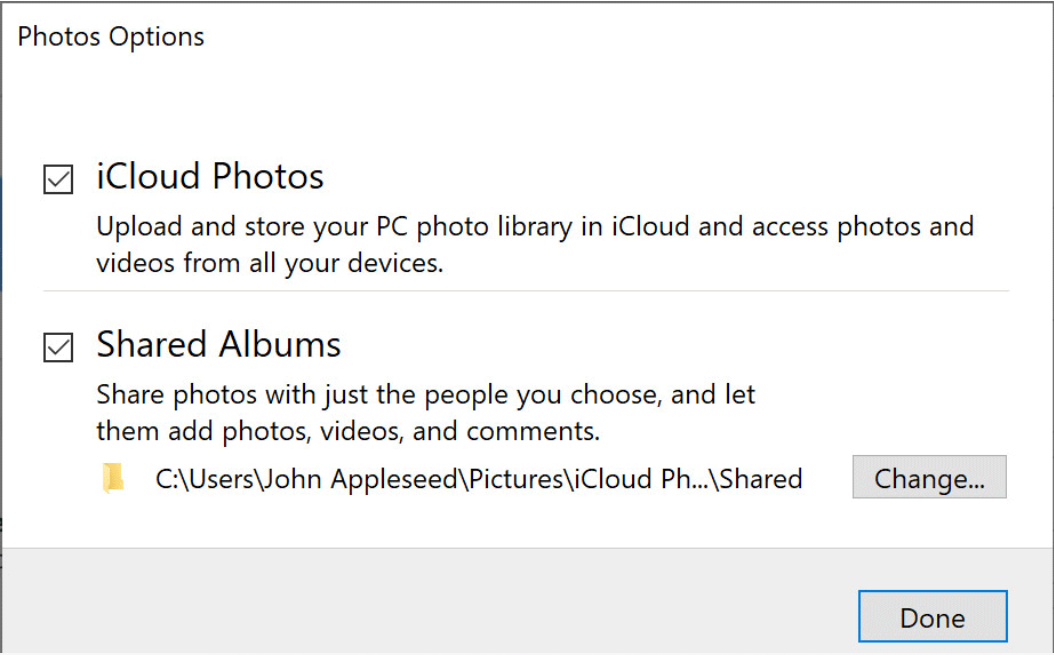
Step 6: Click ‘Done’;
Step 7: Click Apply.
Step 8: Now, you can go to This PC > iCloud Photos > Download to see all the newly added videos from your iPhone.
If the video you want to move to your PC has a large size you can try the following method. Syncronize your iPhone videos to iCloud Drive and then download the videos to your computer via iCloud. Follow the steps below:
1. Unlock your iPhone;
2. Go to Settings > your Apple ID > iCloud;
3. Scroll down to find ‘iCloud Drive’ and make sure it is enabled;

4. Find and select the videos you want to transfer to your computer and tap the share icon at the bottom-left corner of the screen;
5. Go to Save to Files > iCloud Drive and then select or create a folder to save the videos;
6. Now, open your web browser on your computer and then go to iCloud.com;
7. Sign in with your Apple ID and password;
8. Click ‘iCloud Drive’ to continue;

9. Open the folder you used to save your iPhone videos;
10. Select the videos you want to download and then click the download icon to download them to your computer;
![]()
What if I use cloud photo storage—how do I get original, full-resolution photos onto my PC?
If you’re using cloud photo storage on your iPhone or iPad, you’ll want to make sure the original, high-quality versions of your photos are stored on your device before transferring them to your computer. Otherwise, you might end up with only lower-resolution previews.
Here’s what to do:
- On your iPhone or iPad, open your photo storage settings and check for an option to “Download and Keep Originals.” Enable this setting to ensure your device downloads the full-resolution files from the cloud.
- Wait until your device finishes downloading the originals (this might take a little while, especially if you have lots of photos or videos).
- Once you have the originals on your device, follow the steps outlined above to import them to your PC as usual.
This will ensure you’re not missing out on image or video quality—so whether you’re importing hundreds of vacation pics or a handful of HD videos, you’ll always have the highest resolution copies saved on your computer.
How to transfer videos from iPhone to Mac using AirDrop
If you prefer a wireless method to move videos between your iPhone and a Mac, AirDrop is your built-in solution. No cables, no third-party apps—just a straightforward way to share files over Bluetooth and Wi-Fi.
Here’s how to use AirDrop to send videos from your iPhone to your Mac:
1. Prepare AirDrop on your Mac:
>Open Finder and select “AirDrop” from the sidebar.
>At the bottom, set visibility to “Everyone” or “Contacts Only,” making sure your Mac is discoverable.
2. Select your video on your iPhone:
>Find the video in the Photos app that you’d like to transfer.
>Tap the Share icon (a square with an upward arrow).
3. Send via AirDrop:
>In the sharing options, tap “AirDrop.”
>From the list of available devices, choose your Mac.
4. Accept the transfer on your Mac:
>When prompted, click “Accept” on your Mac.
>The video will be saved to your Downloads folder by default.
AirDrop is especially handy for quickly moving short clips or a handful of videos. Both devices should have Bluetooth and Wi-Fi enabled, and be within about 30 feet of each other for the best results.
Using Image Capture to Transfer Videos from iPhone to Mac
If you’re a Mac user, Apple’s built-in Image Capture app offers a fast and fuss-free way to transfer videos from your iPhone to your computer—no need for extra downloads or complicated software.
Here’s how you can use Image Capture for your transfers:
- Connect your iPhone to your Mac
Plug your iPhone into your Mac using a USB cable. If prompted, tap “Allow” or “Trust This Computer” on your iPhone. - Open Image Capture
On your Mac, launch the Image Capture application. You can find it quickly by searching with Spotlight (press Command + Space, then type “Image Capture”). - Select your device
Your iPhone should appear in the left sidebar of Image Capture. Click on it to view the media stored on your phone. - Choose your videos
Browse through the listed files and select the videos you want to import. Hold down the Command key to pick multiple files at once. - Import to your chosen location
At the bottom of the window, you can select where you’d like the videos to be saved—choose a folder that’s easy to find. Once set, click “Import” or “Import All” to start transferring.
With these steps done, your selected videos will appear in the chosen folder on your Mac, ready to be edited, shared, or archived as you wish.
If you need to transfer even larger video files or prefer wireless solutions, keep reading for other handy options.
You may also like to read: Transfer photos from android to iPhone
Frequently asked questions
Before I conclude let me also address some of the queries often made by iPhone users related to how to send videos from iPhone to computer.
Why can’t I transfer video from iPhone to computer?
To transfer videos, unlock your iPhone then if prompted, tap ‘Trust This Computer’ on your iPhone.
Before you get started, make sure your phone is turned on and unlocked—your computer won’t recognize your device if it’s still locked. Use a USB cable capable of transferring files to connect your iPhone to your computer. If you see a prompt on your phone asking whether to trust the computer, tap “Trust” to continue.
Or else, go to My Computer > Right-click your iPhone > Click Import pictures and videos.
If you don’t immediately see an import window pop up, simply open your Photos app and look for your iPhone listed in the sidebar—click its name to bring up all the photos and videos available for transfer. This ensures you can view, select, and import your files even if the automatic prompt doesn’t appear.
What to do if my iPhone won’t connect to my computer for file transfer?
Occasionally, you might run into issues when trying to connect your iPhone to your computer for transferring videos or photos. Not to worry—here are some simple steps to get things working again:
- Try a different USB cable. Not all USB cables are created equal; some are only for charging and won’t support file transfers. Switch to a certified cable (like an official Apple Lightning cable or a high-quality third-party option from brands like Anker or Belkin) and see if that helps.
- Inspect your ports. Gently clean both the Lightning port on your iPhone and the USB port on your computer. Sometimes, a bit of lint or dust is all it takes to disrupt the connection.
- Restart both devices. Sounds cliché, but a quick restart of your iPhone and computer might resolve any lurking connection hiccups.
- Trust the computer. Remember to unlock your iPhone and tap “Trust This Computer” when prompted; otherwise, transfers won’t be allowed.
- Update your software. Make sure your iPhone’s iOS and your computer’s operating system are up to date. Outdated software can sometimes cause compatibility issues.
- Try another USB port or computer. On rare occasions, the culprit is a faulty USB port or a quirky driver on your computer. Test with a different port or another computer if possible.
Still having issues? If so, reviewing the support guides for your particular device brand can offer device-specific steps.
How do I transfer video from iPhone to computer without USB?
To transfer video from iPhone to computer without USB you can use the Air Transfer app. To do this,
1. Connect your iPhone and the PC to the same WiFi network;
2. Launch the Air Transfer app on your iPhone and tap the “+” icon to import videos to the app for transfer to the computer.
How do I transfer video from iPhone to computer without iTunes?
You can transfer Videos from iPhone to computer without iTunes via iCloud if you have backed up iPhone data to iCloud.
How to Safely Disconnect After Transferring Videos?
Once your videos have finished transferring, it’s important to disconnect your iPhone safely to avoid any data corruption or annoying error messages next time you plug it in. Here’s a quick rundown:
- On your computer, look for a small eject icon next to your device in the file explorer (on Windows, it’s in “This PC;” on Mac, check the Finder sidebar).
- Click the eject icon and wait for a message saying it’s safe to remove your device.
- Only then, unplug your USB cable from your iPhone.
If you’re using third-party transfer tools (like EaseUS, AnyTrans, or Dr.Fone), always close the app before unplugging—just to be extra cautious.
You may also like to read: Transfer music from iPhone to iTunes free – a step-by-step guide
Conclusion
Now that I have shown how to send videos from iPhone to computer, you can free up storage space on your iPhone or back up your precious videos on your computer easily. Out of the 3 ways on how to get videos from iPhone to computer described above you need to choose the one that fits you best.
If you want to use free iPhone data transfer software, I can recommend a useful tool namely ‘MobiMover’, which is designed to transfer photos, videos, music, contacts, messages, and so on between iOS devices or between iOS devices and computers. With MobiMover, you can easily get videos off iPhone to PC in Windows 10/8.1/8/7 and vice versa.