How to get videos from iPhone to computer?
How to send videos from iPhone to computer?
There are several ways by which you can transfer videos from iPhone to computer. Here in this article, I am going to show 3 simple ways on how to send videos from iPhone to computer to free up space on your iPhone.Besides, it is also a method to back up the videos on your iPhone.
By recording high-definition videos on your iPhone you can quickly run out of storage space on your device, especially in the case of 16GB iPhones. In such a case, you may not have enough space to save further videos on your iPhone unless you transfer some big videos from your iPhone to your PC or Mac. Apart from freeing up storage space, you may also need to know how to get videos from iPhone to computer for sharing with your family or for backing up.
Why transfer iPhone videos to your computer for editing?
You might wonder: with so many handy apps, why not just edit your videos right on your iPhone? While your phone is great for quick tweaks and sharing on the go, editing on your PC or Mac often gives you far more flexibility and control over your finished product.
Here’s why you might prefer shifting those files to your computer before editing:
- Larger screen, better precision: Editing on a computer’s bigger display makes it easier to see small details, trim clips accurately, and work with complex timelines.
- More powerful tools: Desktop editing software—like Adobe Premiere, DaVinci Resolve, or even iMovie for Mac users—offers a wider range of features than most smartphone apps. Think advanced transitions, color grading, and audio editing.
- Storage and speed: Computers usually have more storage and faster processors, making them better suited for handling large video files and high-resolution footage without lag.
In short, if you’re aiming for high-quality results or working with lots of footage, moving your videos to your computer before editing can make the process smoother—and your finished project more polished.
Adjusting Your iPhone’s Photo and Video Formats for Smoother Transfers
If you’ve ever tried moving photos or videos from your iPhone to your computer and run into strange file types that just won’t open smoothly—don’t worry, there’s an easy fix. Tweaking your iPhone’s camera settings can make your files much more cooperative, especially if you’ll be sharing them with friends or transferring to different devices (like your trusty Dell laptop or the family HP).
Here’s how to set things up for maximum compatibility:
- Head to your iPhone’s Settings app.
- Scroll down and tap on “Camera.”
- Choose “Formats.”
- Select “Most Compatible.”
From now on, your iPhone will save photos as standard JPEGs and videos as H.264 files. These are much friendlier with Windows computers, Android devices, or even older versions of editing software like Adobe Photoshop or VLC Media Player. No more “file not supported” headaches!
With your photos and videos ready to play nice, let’s dive into the best ways to actually send them over to your Mac.
How to send videos from iPhone to Mac
If you’re using a Mac, you have several handy, built-in options to transfer videos—no fancy cables or software subscriptions needed. Here are some effective ways to move your iPhone videos over to your Mac, whether you’re all-in on Apple’s cloud or just want an old-fashioned direct transfer.
AirDrop
AirDrop might be the easiest way to zap videos from your iPhone to your Mac. Simply make sure both devices have Wi-Fi and Bluetooth turned on. Then:
- On your Mac, open AirDrop in Finder and set it to be discoverable by “Everyone” or “Contacts Only” (as you prefer).
- On your iPhone, select the video, tap the Share button, and choose your Mac from the AirDrop options.
- Approve the transfer on your Mac, and voilà—your video lands in your Downloads folder.
Are Wireless Transfer Tools Free to Use?
Wondering if you’ll need your credit card—or yet another new account—to try wireless transfers? Good news: many popular wireless transfer tools don’t require you to pay for basic features, nor will they force you to jump through registration hoops. Simple solutions like Snapdrop, SHAREit, or even Apple’s own AirDrop let you move videos and photos between your devices at no extra cost and without setting up user accounts.
Of course, some third-party apps dangle “premium” features for a small fee, or ask you to create an account for extra cloud storage. For most folks, though, sending videos wirelessly between iPhone and computer can be done quickly, securely, and without opening your wallet—or remembering yet another password.
Protecting Your Videos During Wireless Transfers
Security-conscious about your precious memories? You’re not alone! When sending videos wirelessly from your iPhone to your computer, privacy is absolutely key. Here are a few simple ways to keep everything locked down and stress-free:
- Stick to Trusted Tools: Apple’s AirDrop, for example, uses encrypted connections, ensuring your videos aren’t intercepted mid-flight. Similarly, options like Snapdrop and SHAREit also prioritize security (but always download apps from their legitimate sources).
- Double-Check Your Network: Only use secure, private Wi-Fi networks—avoid public hotspots whenever possible, since open networks can be vulnerable to digital prying eyes.
- Update Devices Regularly: Make sure both your iPhone and computer have up-to-date software. Security patches keep hackers at bay and your videos right where they belong.
- Control Sharing Settings: Set your AirDrop or wireless transfer tools to be discoverable by “Contacts Only” instead of “Everyone.” This small tweak goes a long way in preventing random strangers from popping up in your transfer list.
In short, send with confidence—wireless transfers today are both convenient and secure, as long as you stick to reputable apps and keep your settings locked down.
Photos App
The Photos app on your Mac also makes importing videos a breeze.
- Connect your iPhone to your Mac using a USB cable.
- Unlock your iPhone and tap “Trust” if it’s your first time connecting these devices.
- On your Mac, open the Photos app. Your iPhone should appear in the sidebar under “Devices.”
- Select your device, pick the videos you want, and click “Import Selected.”
Image Capture
Prefer something a little more direct? Image Capture, which comes pre-installed on every Mac, lets you transfer videos (and photos) straight to a folder you choose.
- Connect your iPhone to your Mac and open the Image Capture app (find it via Spotlight search).
- Select your iPhone in the list, then browse your camera roll right there.
- Choose the videos you want and click “Import” (or “Import All” if you’re feeling generous).
iCloud Photos
If you’re already using iCloud Photos, your videos can automatically appear on your Mac without you lifting a finger.
- On your iPhone, head to Settings > [your Apple ID] > iCloud > Photos, and switch on “Sync this iPhone.”
- On your Mac, open the Photos app and make sure iCloud Photos is enabled in Preferences.
- Any new videos you add on your iPhone will now magically appear on your Mac—no cables needed.
Use whichever method suits your workflow best—sometimes AirDrop is speedy for one-off videos, while iCloud keeps everything always in sync. Whatever you pick, you’ll free up iPhone space and keep your precious videos safe.
Here are 3 simple ways to get videos from iPhone to computer:
1. How to send videos from iPhone to computer using Windows Photos
You can use Windows Photos to directly transfer videos from your iPhone to your computer.
Step 1: Connect your iPhone to the PC using a USB cable and make your iPhone trust your computer;
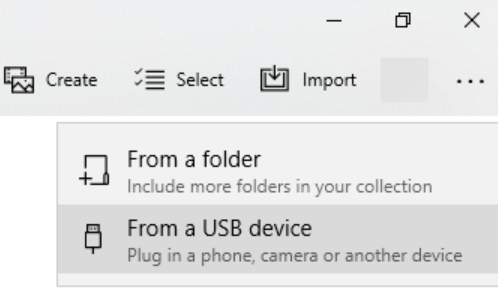
Step 2: Open the Photos app on your computer and then go to Import > From a USB Device. Photos app will automatically search for the videos and photos on your iPhone;
Step 3: Select the videos you want to transfer to your computer and then select a location to save them. By default, the videos will be saved to the ‘My Pictures’ folder on your computer;
Step 4: Next, click on the “Import” button;
Step 5: Once you click on this option your photos will start transferring from iPhone to PC;
Supported Windows Versions for Photos App Transfers
Keep in mind, the Photos app video transfer method is available on Windows 8 and Windows 10 (and newer). If your computer is running Windows 7 or an earlier version, the built-in Photos app won’t be an option—you’ll need to use a different method to get your videos onto your PC.
Why to choose the right USB cable for transferring your videos?
If you’re having trouble transferring your videos, the culprit could be your USB cable. Not all USB cables are created equal—some are designed for charging only, while others support both charging and data transfer. For example, a cable included with your iPhone or a certified Lightning-to-USB cable from reputable brands like Anker or Belkin typically supports data transfer.
On the other hand, spare generic cables (especially the cheaper ones found at the local corner shop) may only charge your device and won’t transfer files. So, if your computer isn’t recognizing your iPhone or the transfer isn’t working, try swapping the cable for an official or high-quality data cable. This simple switch often solves most connection problems when moving photos and videos between your iPhone and your computer.
How to transfer videos from iPhone to PC using the Windows Photos app
If you’re using Windows 10, you can also move videos from your iPhone to your computer with the built-in Photos app. It’s handy, but there are a few quirks to keep in mind:
- Connect your iPhone to your PC with a USB cable, and unlock your device.
- Open the Start menu, search for the Photos app, and launch it.
- In the top-right corner of the app, click Import > From a connected device.
- Select the videos you want to transfer, then hit Import.
- Your imported videos will show up in your Pictures folder.
A quick heads up: The Microsoft Photos app doesn’t always make it easy to pick and choose specific videos, and it won’t keep your albums intact. Some users also find that the app occasionally refuses to show or open transferred photos and videos. If that happens, don’t panic—try another method or a different app.
How to make sure your videos and photos play nicely with Windows
Ever transferred a video from your iPhone to your PC only to discover it refuses to open, or plays back with weird glitches? That’s usually because iPhones by default save photos as HEIC and videos as HEVC—formats that Windows doesn’t always love out of the box.
If you’re thinking, “No problem, I’ll just use the Microsoft Photos App to view them,” you might be in for a surprise. As many users have discovered, the Photos App isn’t always as convenient as it should be. Sometimes, it simply won’t show your photos and videos at all, or refuses to open them after transfer—leaving you staring at a blank screen instead of your memories.
Good news: there’s a quick fix.
Hop into your iPhone’s Settings, scroll down to Camera, and tap on Formats. Here, pick “Most Compatible.” This way, all future photos and videos will be saved as good old JPEG and H.264—formats Windows understands without needing any fancy codecs or extra software.
Pro tip: After making this change, anything new you shoot will save in the more universal formats. Already-have HEIC or HEVC files? You can use free tools like iMazing HEIC Converter or third-party apps from Anker and Belkin to convert them to JPEG or MP4 before transferring to your computer.
With this tweak, your photos and videos will transfer over to Windows with zero drama—ready to open, edit, or share right away.
How to send videos from iPhone to Mac using the Photos app
If you’re using a Mac, transferring videos from your iPhone is just as straightforward thanks to the built-in Photos app. Here’s how you can do it:
- Connect your iPhone to your Mac using a USB cable. Make sure your iPhone is unlocked and tap “Trust” if prompted—this allows your Mac to access your device.
- The Photos app may launch automatically. If it doesn’t, open it manually from your Applications folder.
- In the Photos app, you’ll see your iPhone listed in the sidebar. Click on it, and you should see all the photos and videos available for import.
- Select the videos you want to move over. You can pick individual files or click “Import All New Items” if you’d like to transfer everything.
- Choose where you want to save them, then click “Import Selected” or “Import All New Items.” Your videos will be imported in their original quality and filed neatly by the Photos app.
And that’s it—your videos are now safely backed up on your Mac, ready for editing, sharing, or simply freeing up space on your iPhone.
How to transfer iPhone videos to your PC using iTunes
While iTunes isn’t most people’s first choice these days—especially since direct file transfers or cloud sync have gotten much simpler—there is still a way to pull selected videos off your iPhone using iTunes and file sharing apps. Just be aware: This method’s a bit of a throwback and not as user-friendly as the newer options. Plus, you’ll want to back up everything before you begin, just to play it safe.
Here’s how to do it:
- First, make sure you’ve got the latest version of iTunes installed on your PC.
- Plug your iPhone into your computer with a USB cable, and unlock your device if prompted.
- Open iTunes, then spot your device’s icon in the top left and click it.
- In the left sidebar, find and select “File Sharing.”
- Choose a file-sharing app from the list—this shows you which apps on your iPhone let you move files (like videos) back and forth.
- In that app’s documents section, look for your videos, select them, and drag them into a folder on your computer.
- After the transfer’s finished, you can find your videos in the folder you designated.
One important heads-up: This method only works for videos created or saved within certain apps (think VLC, Documents, or other file managers that support file sharing). Your Camera Roll videos won’t show up here—you’ll need to use the Photos app or File Explorer for those.
Why (or why not) use iTunes?
The iTunes route is best if you’re dealing with videos stored in third-party apps and need an old-school file transfer. However, it’s not the smoothest option and comes with the real risk of data loss if you’re not careful—so be sure you’ve got copies before you hit “delete” on your iPhone.
If iTunes feels a little too retro (or risky), don’t worry—there are easier ways to go, like File Explorer or cloud services, which we’ll cover next.
2. How to send videos from iPhone to computer using File Explorer
Follow the steps below to get videos from iPhone to Windows computer using File Explorer. This is simple and you also don’t need to use any third-party software.
1. Connect your iPhone to your computer via a USB cable and make your iPhone trust your computer;
2. Open ‘This PC’ to find your iPhone;
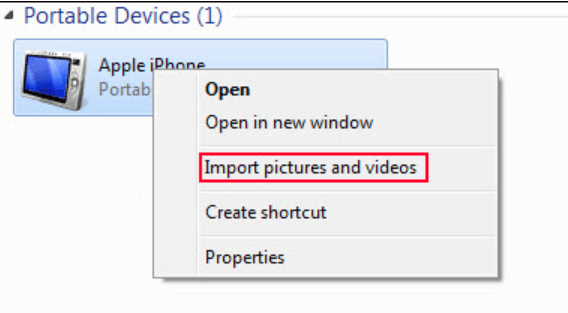
3. Right-click on your iPhone and then select ‘Import pictures and videos’;
4. Select Review, organize, and group items to import or Import all new items now according to your situation;
5. Click Next.
6. Choose the videos you want to import to your PC and then click ‘Import’ to start the video import process.
A Few Quirks to Watch Out for with File Explorer
While File Explorer makes it easy to move videos from your iPhone to your Windows computer—no extra software needed—it does have its own set of quirks. The biggest hurdle? File Explorer tends to lump everything together inside cryptically named folders, with no helpful sorting between photos and videos. This means you might find yourself scrolling through endless files (think: a digital scavenger hunt) just to spot the video you actually want.
So, if you have lots of media on your iPhone, be prepared to spend a little extra time hunting through those DCIM subfolders. It’s not the fastest method, but with a bit of patience, you’ll get your videos across.
Copy and Paste Videos from iPhone to PC
You can also go to This PC > your iPhone > Internal Storage > DCIM to directly copy and paste your needed videos to a folder on your computer.

3. How to get videos from iPhone to computer using iCloud Photos
You can use this method to transfer small videos from your iPhone to your computer.
Every iPhone comes with 5GB of free cloud storage space in Apple’s iCloud. If you require more space you’ll need to pay a small monthly fee for storage ($0.99/month for 50 GB or $2.99/month for 200 GB). This storage space can be used to back up photos and videos among other things.
iCloud is always helpful when you are looking to transfer photos, videos, or other types of content between your devices, including iPhone, iPad, iPod Touch, Mac, and PC.
With Apple’s iCloud Photos feature, you can access your videos and photos from your iPhone, iPad, iPod touch, Mac, Apple TV, on iCloud.com, and your PC.
How iCloud Photos Works
iCloud Photos keeps your photos and videos safe, up to date, and available automatically across all your devices. Once enabled, there’s no need to manually import media from one device to another—your original, full-resolution photos and videos are uploaded and securely stored in the cloud. You have the flexibility to keep these full-resolution originals on each device or, if you’re short on space, use device-optimized versions that take up less room while still letting you view and share your memories with ease.
No matter which device you’re using, your media library syncs seamlessly, so you’ll always have access to your latest shots—whether you’re sitting at your desktop, scrolling on your phone, or logging in from a browser. This makes iCloud Photos a convenient choice for anyone juggling multiple devices or just looking for an effortless way to keep videos and photos organized and accessible.
To transfer videos from your iPhone to your PC or Mac computer, follow the steps below.
Make sure you are using the same Apple ID on your devices, your devices are connected to Wi-Fi, and there is enough iCloud space to save the videos. Then follow the options below to move videos from iPhone to PC using iCloud Photos.
Step 1. Sign in to iCloud using your existing Apple ID and password;
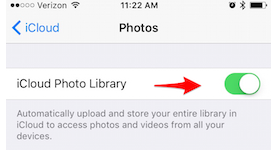
Step 2: On your iPhone, go to Settings > your Apple ID > iCloud > Photos;
Step 3: Turn on ‘iCloud Photo Library’.
Step 4: Download iCloud for Windows on your computer and sign in with your Apple ID & password;
(If you’re using a Mac, log in to iCloud on your computer. Open System Preferences on your Mac and open iCloud.)
Alternatively, if you prefer a more direct approach, you can use the Apple Devices app, available from the Microsoft Store. Here’s how:
- Install the Apple Devices app from the Microsoft Store on your PC.
- Connect your iPhone or iPad to your PC using a USB cable.
- If prompted, unlock your iPhone or iPad with your passcode.
- When you see a prompt on your device asking if you trust this computer, tap Trust or Allow to continue.
- For importing photos and videos, Microsoft’s Photos app can help—just follow their import instructions for smooth transfers.
Once you’re signed in and set up, you’re ready to move on to the next steps for transferring your videos.
Step 5: Click ‘Options’ next to ‘Photos’ in the iCloud window;
Step 6: Click ‘Done’;
Step 7: Click Apply.
Step 8: Now, you can go to This PC > iCloud Photos > Download to see all the newly added videos from your iPhone.
If the video you want to move to your PC has a large size you can try the following method. Syncronize your iPhone videos to iCloud Drive and then download the videos to your computer via iCloud. Follow the steps below:
1. Unlock your iPhone;
2. Go to Settings > your Apple ID > iCloud;
3. Scroll down to find ‘iCloud Drive’ and make sure it is enabled;

4. Find and select the videos you want to transfer to your computer and tap the share icon at the bottom-left corner of the screen;
5. Go to Save to Files > iCloud Drive and then select or create a folder to save the videos;
6. Now, open your web browser on your computer and then go to iCloud.com;
7. Sign in with your Apple ID and password;
8. Click ‘iCloud Drive’ to continue;

9. Open the folder you used to save your iPhone videos;
10. Select the videos you want to download and then click the download icon to download them to your computer;
![]()
Using Third-Party Cloud Storage Apps: Pros and Cons
Another way to transfer videos from your iPhone to your PC is by using popular cloud storage apps such as Dropbox, OneDrive, Google Drive, or Mega. These services can be especially useful if you’re already using them for other files, or if you want your videos to be available across multiple devices without having to mess with cables.
Advantages:
- Automatic uploads: Once you’ve enabled camera backup in the app, your new videos typically upload in the background as soon as they’re recorded, giving you a backup in case your phone goes missing or gets damaged.
- Easy access from anywhere: You can install the corresponding desktop app on your PC (or simply use the web interface), which lets you access your videos from practically any device. Sharing with friends or family is also straightforward.
- No cables or manual transfers required: Everything syncs over the internet, so there’s no need to connect your devices physically.
Potential downsides:
- App limitations on iOS: Unlike iCloud Photos, most third-party storage apps on iOS may require you to open them regularly to keep the background uploads running—otherwise, the system may pause them automatically to save battery power.
- Storage space: Free accounts typically come with limited storage, so you may need to upgrade or clear out space as your video library grows.
- Dependence on internet speed: The initial upload of large video files can take some time if you’re on a slower connection.
Cloud storage apps are a convenient way to keep your videos safe and accessible on all your devices, but a bit of regular management may be needed to keep everything syncing smoothly.
What if I use cloud photo storage—how do I get original, full-resolution photos onto my PC?
If you’re using cloud photo storage on your iPhone or iPad, you’ll want to make sure the original, high-quality versions of your photos are stored on your device before transferring them to your computer. Otherwise, you might end up with only lower-resolution previews.
Here’s what to do:
- On your iPhone or iPad, open your photo storage settings and check for an option to “Download and Keep Originals.” Enable this setting to ensure your device downloads the full-resolution files from the cloud.
- Wait until your device finishes downloading the originals (this might take a little while, especially if you have lots of photos or videos).
- Once you have the originals on your device, follow the steps outlined above to import them to your PC as usual.
This will ensure you’re not missing out on image or video quality—so whether you’re importing hundreds of vacation pics or a handful of HD videos, you’ll always have the highest resolution copies saved on your computer.
Free Up Space: Deleting Videos from Your iPhone
Once you’ve safely transferred your videos to your computer or cloud storage, it’s smart to free up precious space on your iPhone. Here’s a quick guide to deleting videos without losing important memories:
- Open the Photos app on your iPhone and tap “Albums.”
- Scroll down and select “Videos” to see all your recorded clips in one place.
- Tap “Select” in the upper right corner and pick the videos you wish to remove.
- Tap the trash can icon and confirm your decision by selecting “Delete Videos.”
Note: Deleted videos move to the “Recently Deleted” album, where they’ll hang around for 30 days before disappearing for good. If you want that storage space back right away, head into the “Recently Deleted” album, tap “Select,” and then choose “Delete All” to permanently erase those videos.
This process ensures your videos are backed up elsewhere and your iPhone has room for new adventures.
How to transfer videos from iPhone to Mac using AirDrop
If you prefer a wireless method to move videos between your iPhone and a Mac, AirDrop is your built-in solution. No cables, no third-party apps—just a straightforward way to share files over Bluetooth and Wi-Fi.
Here’s how to use AirDrop to send videos from your iPhone to your Mac:
1. Prepare AirDrop on your Mac:
>Open Finder and select “AirDrop” from the sidebar.
>At the bottom, set visibility to “Everyone” or “Contacts Only,” making sure your Mac is discoverable.
2. Select your video on your iPhone:
>Find the video in the Photos app that you’d like to transfer.
>Tap the Share icon (a square with an upward arrow).
3. Send via AirDrop:
>In the sharing options, tap “AirDrop.”
>From the list of available devices, choose your Mac.
4. Accept the transfer on your Mac:
>When prompted, click “Accept” on your Mac.
>The video will be saved to your Downloads folder by default.
AirDrop is especially handy for quickly moving short clips or a handful of videos. Both devices should have Bluetooth and Wi-Fi enabled, and be within about 30 feet of each other for the best results.
Using Image Capture to Transfer Videos from iPhone to Mac
If you’re a Mac user, Apple’s built-in Image Capture app offers a fast and fuss-free way to transfer videos from your iPhone to your computer—no need for extra downloads or complicated software.
Here’s how you can use Image Capture for your transfers:
- Connect your iPhone to your Mac
Plug your iPhone into your Mac using a USB cable. If prompted, tap “Allow” or “Trust This Computer” on your iPhone. - Open Image Capture
On your Mac, launch the Image Capture application. You can find it quickly by searching with Spotlight (press Command + Space, then type “Image Capture”). - Select your device
Your iPhone should appear in the left sidebar of Image Capture. Click on it to view the media stored on your phone. - Choose your videos
Browse through the listed files and select the videos you want to import. Hold down the Command key to pick multiple files at once. - Import to your chosen location
At the bottom of the window, you can select where you’d like the videos to be saved—choose a folder that’s easy to find. Once set, click “Import” or “Import All” to start transferring.
With these steps done, your selected videos will appear in the chosen folder on your Mac, ready to be edited, shared, or archived as you wish.
If you need to transfer even larger video files or prefer wireless solutions, keep reading for other handy options.
You may also like to read: Transfer photos from android to iPhone
How to Transfer Videos from iPhone to PC with a Third-Party App
Prefer not to use iTunes or iCloud for moving your videos to your computer? No problem—there are plenty of third-party apps that can simplify the process, letting you get your videos onto your PC in just a few steps. Here’s how you can do it:
- Choose and install a third-party transfer tool
Popular options include iMazing, AnyTrans, and TouchCopy. Download your chosen app from its official website and follow the installation instructions. - Connect your iPhone to your PC
Use a USB cable to connect your iPhone. Unlock your device and, if asked, tap “Trust” to allow your computer access. - Launch the transfer app
Open the application on your PC. Most of these tools will automatically detect your iPhone and display its contents, often organizing your files by media type. - Select your videos
Find the section that lists your iPhone videos. You can usually browse by album or just filter for videos. Select one, several, or all the videos you want to transfer. (Holding down “Ctrl” lets you pick multiple files.) - Pick a destination on your PC
Choose or create a folder on your computer where you want your videos to be saved. These apps typically let you browse your PC’s folders and pick the spot that’s easiest to find later. - Start the transfer
Click the app’s “Export” or “Transfer” button (wording will vary), and your selected videos will be copied from your iPhone to your PC.
Using a third-party app can be especially handy if you want to organize your videos during transfer or you’re looking for extra features, like converting video formats or exporting metadata. Just make sure you download software from reputable sources to keep your files and device safe.
The Risks and Limitations of Using iTunes for Video Transfers
Now, you might be wondering about iTunes—Apple’s long-standing (and sometimes polarizing) software for managing iPhones on PCs. While it is possible to use iTunes to transfer your videos, it’s not exactly the most straightforward or risk-free route. Here’s what you should consider before reaching for that download button:
- It’s Easy to Accidentally Lose Data:
Unlike using simple drag-and-drop or third-party transfer tools, iTunes can sometimes overwrite or erase existing content during syncs if you’re not careful. One errant click, and you could lose precious photos or videos that weren’t included in your iTunes library or backup. - Limited File Access:
iTunes doesn’t provide full access to your camera roll or all video files. You’re often restricted to only sharing videos via specific apps that support File Sharing. So, if your videos are stored in your Photos app, getting them out can be more complicated than you’d expect. - Clunky and Time-Consuming:
The process involves multiple steps—installing iTunes, connecting your device, clicking through various menus, hunting for the right folder, and saving files manually. Compared to dedicated transfer apps or even native Windows options, iTunes generally feels like a throwback to an earlier, more complicated digital era. - Potential Compatibility Issues:
Sometimes, an outdated version of iTunes or a different Windows version can cause hiccups with device recognition or file transfers. Upgrading or troubleshooting can steal plenty of your time—and patience.
For many users, these limitations outweigh the benefits, especially now that quicker and safer alternatives like iMazing, AnyTrans, and TouchCopy are readily available. If you still choose iTunes, just make sure to back up your data first and double-check that you’re not syncing away anything important.
Frequently asked questions
Before I conclude let me also address some of the queries often made by iPhone users related to how to send videos from iPhone to computer.
Why can’t I transfer video from iPhone to computer?
To transfer videos, unlock your iPhone then if prompted, tap ‘Trust This Computer’ on your iPhone.
Before you get started, make sure your phone is turned on and unlocked—your computer won’t recognize your device if it’s still locked. Use a USB cable capable of transferring files to connect your iPhone to your computer. If you see a prompt on your phone asking whether to trust the computer, tap “Trust” to continue.
Or else, go to My Computer > Right-click your iPhone > Click Import pictures and videos.
If you don’t immediately see an import window pop up, simply open your Photos app and look for your iPhone listed in the sidebar—click its name to bring up all the photos and videos available for transfer. This ensures you can view, select, and import your files even if the automatic prompt doesn’t appear.
What to do if my iPhone won’t connect to my computer for file transfer?
Occasionally, you might run into issues when trying to connect your iPhone to your computer for transferring videos or photos. Not to worry—here are some simple steps to get things working again:
- Try a different USB cable. Not all USB cables are created equal; some are only for charging and won’t support file transfers. Switch to a certified cable (like an official Apple Lightning cable or a high-quality third-party option from brands like Anker or Belkin) and see if that helps.
- Inspect your ports. Gently clean both the Lightning port on your iPhone and the USB port on your computer. Sometimes, a bit of lint or dust is all it takes to disrupt the connection.
- Restart both devices. Sounds cliché, but a quick restart of your iPhone and computer might resolve any lurking connection hiccups.
- Trust the computer. Remember to unlock your iPhone and tap “Trust This Computer” when prompted; otherwise, transfers won’t be allowed.
- Update your software. Make sure your iPhone’s iOS and your computer’s operating system are up to date. Outdated software can sometimes cause compatibility issues.
- Try another USB port or computer. On rare occasions, the culprit is a faulty USB port or a quirky driver on your computer. Test with a different port or another computer if possible.
Still having issues? If so, reviewing the support guides for your particular device brand can offer device-specific steps.
How do I transfer video from iPhone to computer without USB?
To transfer video from iPhone to computer without USB you can use the Air Transfer app. To do this,
1. Connect your iPhone and the PC to the same WiFi network;
2. Launch the Air Transfer app on your iPhone and tap the “+” icon to import videos to the app for transfer to the computer.
Once you’ve added your videos, open a web browser on your PC and enter the address shown in the Air Transfer app. This will bring up the transfer interface. On your iPhone, tap “Scan to Connect” and scan the QR code or simply select your device if it appears in the browser window. If prompted, tap “Accept” on your iPhone to confirm the connection.
Tip: Make sure both your iPhone and computer are connected to the same Wi-Fi network for the transfer to work smoothly. Now you can wirelessly download your videos from your iPhone to your computer without needing any cables.
How do I transfer video from iPhone to computer without iTunes?
You can transfer Videos from iPhone to computer without iTunes via iCloud if you have backed up iPhone data to iCloud.
Can I transfer other types of files besides videos from my iPhone to my PC wirelessly?
Absolutely! Many third-party wireless transfer tools (including options from reliable brands like Documents by Readdle, or Send Anywhere) let you move more than just videos. You can transfer photos, music files, PDFs, and a variety of documents with just a few taps. Depending on the app, you may even be able to send whole folders or organize your files as you go. Just double-check that both your iPhone and computer are connected to the same Wi-Fi network, then follow the app’s guide to start moving whatever files you need—no cables required.
How to Safely Disconnect After Transferring Videos?
Once your videos have finished transferring, it’s important to disconnect your iPhone safely to avoid any data corruption or annoying error messages next time you plug it in. Here’s a quick rundown:
- On your computer, look for a small eject icon next to your device in the file explorer (on Windows, it’s in “This PC;” on Mac, check the Finder sidebar).
- Click the eject icon and wait for a message saying it’s safe to remove your device.
- Only then, unplug your USB cable from your iPhone.
If you’re using third-party transfer tools (like EaseUS, AnyTrans, or Dr.Fone), always close the app before unplugging—just to be extra cautious.
You may also like to read: Transfer music from iPhone to iTunes free – a step-by-step guide
Related topics: Managing Your iPhone Photos and Videos
Curious about what else you can do to take control of your iPhone’s photo and video collection? Here are a few more handy topics you might want to explore:
Transferring videos from computer to iPhone without iTunes: Prefer to move your favorite video files from your PC back to your iPhone but want to sidestep iTunes? Learn about quick alternatives using AirDrop, cloud storage services, or trusted apps like Google Drive and Dropbox.
Organizing iPhone photos on Windows: Discover straightforward methods for creating albums, deleting duplicates, and arranging your photos when working from a Windows PC.
Efficient photo management on your iPhone: Dive into tips for sorting, favoriting, and hiding photos right on your device—no computer required.
Handling synced photos and videos: Find out what happens when you sync media from Finder or third-party apps, and get expert advice on removing or updating your synced albums safely.
Hungry for more tech tips? There’s a whole world of clever ways to make your memories easier to manage and enjoy!
Conclusion
Now that I have shown how to send videos from iPhone to computer, you can free up storage space on your iPhone or back up your precious videos on your computer easily. Out of the 3 ways on how to get videos from iPhone to computer described above you need to choose the one that fits you best.
If you want to use free iPhone data transfer software, I can recommend a useful tool namely ‘MobiMover’, which is designed to transfer photos, videos, music, contacts, messages, and so on between iOS devices or between iOS devices and computers. With MobiMover, you can easily get videos off iPhone to PC in Windows 10/8.1/8/7 and vice versa.