How to share photos from iPhone to iPhone?
How to transfer Photos from iPhone to iPhone?
In this article, I am going to show 4 easy methods to transfer photos from iPhone to iPhone or how to transfer photos from old iPhone to new iPhone without spending a dime.
‘How to transfer photos from iPhone to iPhone’ is a question you may often hear from iPhone users who have just upgraded their phones to a newer model. But transferring photos from iPhone to iPhone is not at all a difficult process. This guide will show you how easily you can transfer or share your photos from one iPhone or iPad to another in 4 simple ways including using a free photo transfer app that can be really useful.
Here’re the 4 methods you can try for transferring photos from iPhone to iPhone,
- Use AirDrop;
- Use iCloud;
- Use iTunes;
- Use the free photo transfer app – Simple Transfer;
Benefits of each photo transfer option
Each method above has its own strengths, depending on what you’re hoping to achieve.
- AirDrop: Perfect if you only want to send a handful of photos quickly—maybe that group selfie at a birthday party, or some vacation snaps with friends. No need for extra apps or accounts; it works instantly between nearby devices and doesn’t require the internet.
- iCloud: If you’re looking to sync every photo across all your Apple devices, iCloud is your best bet. It keeps your library up-to-date everywhere, and makes switching to a new iPhone seamless since all your photos will automatically appear once you sign in. Just make sure you have enough iCloud storage.
- iTunes: For folks who prefer a wired connection or want to backup everything—including photos—straight to a PC or Mac, iTunes (or Finder on newer Macs) still gets the job done. This method is especially helpful if your internet is spotty or you want to avoid cloud storage.
- Free photo transfer apps (like Simple Transfer): These are great if you’re moving lots of photos or large videos and want more control over which files go where. Many of these apps support cross-platform transfers too, so you’re not locked into Apple’s ecosystem.
So, whether you’re sending just a few snapshots or your entire camera roll, there’s a transfer method that fits.
Now let’s see how to transfer or how to share photos from iPhone to iPhone using the above methods.
Free Up Space before you transfer
Before you jump into transferring photos, it’s a smart move to tidy up your camera roll and free up some valuable storage on your iPhone. Over time, it’s easy for your phone to fill up with duplicates, blurry shots, screenshots you no longer need, or random images that don’t serve a purpose.
Here’s a quick plan to declutter before you start the transfer:
- Start by browsing your Photos app for obvious duplicates or accidental snaps, and delete them.
- Head to your “Albums” tab and check folders like “Screenshots,” “Selfies,” and “Recently Deleted” to clear out extras.
- Consider using a free or trusted photo management app (there are plenty on the App Store, such as Google Photos or Gemini Photos) to help you quickly sort and remove duplicate or similar images.
- Finally, empty your “Recently Deleted” album to actually free up the space.
With your camera roll cleaned up, you’ll enjoy a faster, smoother photo transfer—and you won’t waste space on unwanted images.
How to transfer photos from iPhone to iPhone
1. Use AirDrop for transferring photos from iPhone to iPhone
AirDrop is an Apple technology that uses Bluetooth and WiFi wireless networking to let users share files directly between their iOS devices and Macs. Once it’s enabled, you can use it to share photos, contacts, notes, and more between two iPhones without the need for a wireless network. Instead, your device will create a mini-WiFi network for you just for the transfer and then close it once the transfer is completed. Using AirDrop is one of the quickest and simplest ways to transfer photos from iPhone to iPhone safely. However, the use of AirDrop requires an iPhone 5 or newer model and both phones must be running on iOS 7 or higher version.
Here’re the steps to follow to transfer photos using AirDrop:
Step 1: Make sure that both Bluetooth and Wi-Fi are active in both the iPhones and that the two devices are physically close to each other;
Step 2: Go to Settings, and tap General > tap AirDrop;
Step 3: Choose ‘Everyone’ to let your device be detected by the other iPhone;
Step 4: On your iPhone go to the Photos app, tap the ‘Select’ button at the top, and choose the one or more photos that you wish to transfer. Next, tap the ‘Share’ button located at the bottom left corner of the screen represented by a box with an arrow coming out of the top;
Step 5: Now you will see rows of icons representing your various sharing options (list of devices and the names of persons of nearby AirDrop users). Tap the desired recipient you want to share with and the photo gets delivered instantly. You should see a “Sent” confirmation below the person’s name.

If you don’t see the recipient’s name in the AirDrop list, make sure his/her iPhone is unlocked and that both Bluetooth and Wi-Fi are active;
Can you transfer photos between iPhones using Bluetooth?
While it might seem logical to use Bluetooth to send photos directly between iPhones—especially since Bluetooth is built into your device—Apple doesn’t allow standalone Bluetooth file transfers like some Android devices do. Instead, Apple pairs Bluetooth with Wi-Fi magic for features like AirDrop, which makes the process faster and more secure. So if you’re thinking of sending photos the old-school Bluetooth way (like you might have with a Nokia or Samsung back in the pre-smartphone days), unfortunately, that’s not possible on iPhones.
To transfer photos wirelessly, your best bet is to stick with AirDrop or use iCloud, both of which offer seamless integration and keep your images crisp without compression.
2. Transfer photos from iPhone to iPhone using iCloud
If you want to transfer photos from iPhone to iPhone using iCloud, first make sure to back up the photos using iCloud Photo Library. Apple’s iCloud Photo Library makes it easy to access all of your photos from all of your devices. However, before you follow the steps you need to ensure the following things,
i. Both the iPhones are running on iOS 8.3 or later;
ii. Both phones are connected to a wireless network;
iii. Same Apple ID is used to log into both devices;
iv. iCloud Photo Library is turned ON for both the iPhones;
v. Your iCloud has enough storage capacity to save the photos;
Tip: Declutter Before You Transfer
Before you start transferring, a little housekeeping can go a long way. Photos—especially duplicates, screenshots, and accidental bursts—are notorious for hogging storage space. Take a moment to review your photo library: look for duplicate images, blurry shots, or old screenshots you no longer need. Deleting these not only tidies up your new device but also speeds up your transfer and saves valuable iCloud storage space.
You can manually sort through your photo albums and delete clutter, or use your iPhone’s built-in search and album features (like the “Duplicates” album in iOS 16 and later) to help spot and clear out the extras. A quick sweep now means less to transfer—and more room for the memories that matter!
Next, follow the steps below on how to transfer all photos from iPhone to iPhone:
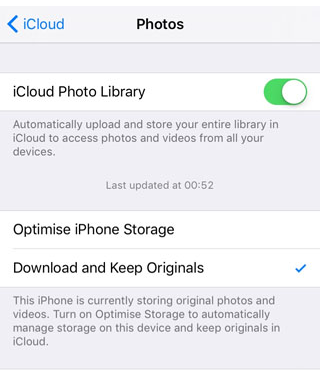
Step 1: Turn on the iCloud Photo Library on your iPhone. To do this go to Settings > tap on iCloud > tap on Photos;
Step 2: Toggle “iCloud Photo Library” ON;
Step 3: Beneath the iCloud Photo Library setting you’ll see two options – ‘Optimize iPhone Storage’ and ‘Download and Keep Originals’. Choose between these two options.
(The former allows you to upload your full-resolution photos to iCloud, and then replace the images on your iPhone with optimized versions that take up less space. The latter allows access to the full-resolution images stored on your iPhone even when you don’t have an internet connection. However, this option will fill up your iPhone’s storage more quickly);
Step 4: It takes a while to upload photos to the iCloud Photo Library depending on how many photos you have on your device and the speed of your internet connection. When you first activate the iCloud Photo Library, you’ll see a progress bar telling you how many photos have been uploaded to iCloud;
Step 5: Once the photos are uploaded and stored in your iCloud Photo Library, they are synced or transferred to all of your iCloud-enabled devices.
Step 6: You can now view those photos by opening the ‘Photos’ App and choosing ‘All Photos’ on the target iPhone; the photos will land in your Photos library on the new phone, making them immediately accessible alongside your existing images.;
Transfer Multiple Photos Using iCloud Link: If you’re looking to send a specific group of pictures rather than syncing your entire photo library, you can take advantage of the iCloud Link feature. This allows you to generate a shareable link to your selected photos—perfect if you only want to transfer a handful (or a few dozen) snapshots.
Here’s how to use an iCloud Link to move photos from one iPhone to another:
Step 1: On your source iPhone, open the Photos app and tap ‘Select’ at the top right corner. Choose the photos you’d like to transfer to your new device.
Step 2: Tap the ‘Share’ icon (the familiar box with an upward arrow) at the screen’s bottom left.
Step 3: In the sharing options, look for and tap ‘Copy iCloud Link.’ Your iPhone will take a moment to create a private sharing link for those selected photos.
Step 4: Once the link is ready, you’ll get a prompt confirming it has been copied. Now, send this link to your new iPhone—using Messages, Mail, or your preferred app.
Step 5: On your new iPhone, tap the link. This will open a web page (or inside the Photos app if you’re on iOS 13 or later) where your selected images appear.
Step 6: Tap ‘Add All’ or ‘Save Images’ to save these photos directly to the Photos app on your new device.
This method is handy if you want flexibility—whether you’re sending event highlights to yourself or sharing vacation memories with friends, you can move only what you need, without syncing entire photo libraries. iCloud Links expire automatically after 30 days, so be sure to download your images before that window closes.
Transfer Photos and Data Using iCloud Backup
If you’d like to move every photo, message, app, and bit of data from your old iPhone to a brand-new one, iCloud backup has you covered. This is a great choice when you want your new device to feel exactly like the old one—nothing left behind.
Before diving in, check that both iPhones are running iOS 8.3 or newer, both are connected to a stable Wi-Fi network, and you’re signed in with the same Apple ID on each device.
Here’s how to make it happen:
Step 1: On your old iPhone, back up everything to iCloud.
- Open Settings, then tap on your Apple ID at the top.
- Tap iCloud > iCloud Backup (or just Backup).
- Hit “Back Up Now” and wait for the process to finish.
Step 2: Once the backup is complete, turn off the old iPhone.
Step 3: Turn on your new iPhone and follow the setup instructions on-screen until you reach the “Apps & Data” screen.
Step 4: Choose “Restore from iCloud Backup.”
- Log in with your Apple ID, then pick the most recent backup you just made.
- Accept the terms and conditions, and let your iPhone start restoring all your apps, settings, photos, and messages.
The process usually takes several minutes, depending on the size of your backup and the speed of your Wi-Fi. Once it’s done, everything from your old iPhone—including every treasured photo—will be right there on your new device, ready to go.
Ensuring a Seamless Photo and Data Experience on Your New iPhone
Using these methods, you can rest assured that when you set up your new iPhone, every photo, contact, and bit of data from your previous device will be right where you left it. Your familiar albums, cherished messages, and even your app layouts will appear just as before—making the transition smooth and worry-free. There’s no need to hunt for missing files or start from scratch; once the transfer is complete, your new iPhone feels instantly like home, ready for you to pick up right where you left off.
3. How to transfer pictures from iPhone to iPhone using iTunes
Before I show how to transfer photos to iPhone using iTunes, it needs to be mentioned that this method will only work if you have disabled iCloud on your iPhone. However, disabling the iCloud on your iPhone may result in deleting the photo stream from your iPhone. So, you need to be cautious while using this process.
For transferring photos from iPhone to iPhone via iTunes, first, you have to copy photos from your iPhone to the Computer and then transfer those photos from your computer to the other iPhone. Follow the steps below to transfer photos from iPhone to iPhone via iTunes:
For Mac.
Step 1: Connect your iPhone to your Mac with a USB cable;
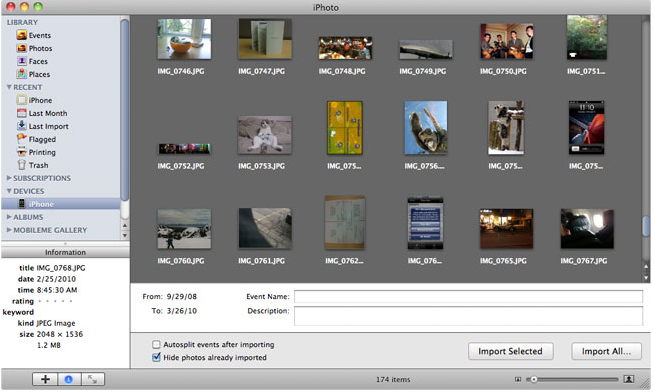
Step 2: Make sure ‘iPhoto’ runs on your Mac. Launch iPhoto if it doesn’t open automatically;
Step 3: Select the photos you want to transfer;
Step 4: Click ‘Import’ or ‘Import Selected’ to transfer photos from iPhone to Mac;
Apart from ‘iPhoto’, you can also use a program called ‘Image Capture’ to transfer photos from iPhone to Mac
For Windows.
Step 1. Connect your iPhone to your Computer with a USB cable;
Step 2. Click Import Pictures and Videos when ‘AutoPlay’ appears;
Step 3. Choose a destination folder to store your iPhone photos;
Step 4. Click Import;
Next transfer photos from your computer to the other iPhone using iTunes.
Remove the first iPhone from your computer and connect the other one. From here on, the steps are the same for both Mac and Windows:
Step 1. Connect the second iPhone to Computer with a USB cable;
Step 2. Launch iTunes if it doesn’t open automatically;
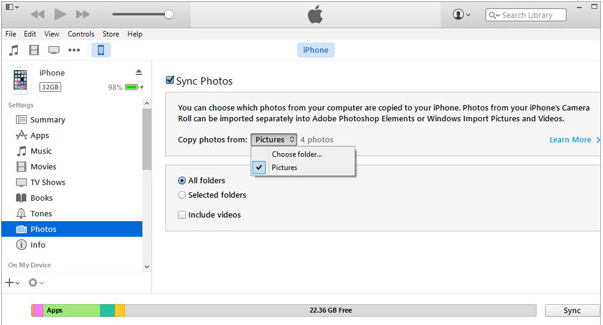
Step 3. Tap on the iPhone icon on the top;
Step 4. Click on the ‘Photos’ tab in the left panel;
Step 5. Select ‘Sync Photos’ and choose the folder from which you want to transfer the photos to the second iPhone;
Step 6. After selecting it click on the “Sync” or “Apply” button at the end of iTunes and there you have it;
Set Up an Ad-Hoc Network on Your Mac for Transfers.
If you don’t have Wi-Fi available, creating an ad-hoc network on your Mac can get the job done for quick transfers between devices. It’s like setting up your own mini Wi-Fi hotspot—no extra gear required, just your Mac.
Here’s how you can set this up:
- Click the Wi-Fi icon in the menu bar at the top right of your screen.
- Select “Create Network…” or “Open Network Preferences,” then look for an option like “Create Network” (sometimes you’ll first need to click “Advanced”).
- Give your network a name, set the security level (WPA2 is recommended), and set a password if you want to keep things private.
- Click “Create.”
Now your Mac is broadcasting its own Wi-Fi signal. Connect your iPhone (or any other device) to this network—just like you would at a coffee shop—with the network name and password you chose. Once everything’s connected, you’re ready for photo transfers, file sharing, or any local networking you need.
This little trick is handy when you need a direct, local connection—no fancy routers necessary.
Transferring Your Entire Photo Library to a Mac (or Another Device)
Thinking you’d like a safe copy of your entire photo library on your Mac—or maybe you want to transfer photos to a Windows PC instead? Good news: moving your photos off your iPhone isn’t rocket science. There are several straightforward ways to get your snapshots onto another device for backup, editing, or just to free up space.
Here’s a quick rundown of your main options:
- Use the Photos app (Mac): Connect your iPhone to your Mac using a USB cable. The Photos app will usually launch itself; if it doesn’t, open it manually. You’ll see an import screen where you can select specific albums or grab the whole library. Hit “Import All” if you want everything.
- Image Capture (Mac): Prefer a minimalist approach? Open Image Capture (comes built-in on your Mac), select your iPhone, and drag-n-drop your photos to a folder of your choice. Super simple—no bells and whistles.
- Windows Import: On a PC, plug in your iPhone and select “Import photos and videos” when prompted. Pick where you want things stored, and Windows will sweep in all your photos.
- Third-Party Apps: Tools like Google Photos, Dropbox, or OneDrive can shuttle your entire photo library to the cloud and then sync them to your computer. These apps work across platforms and don’t care if you’re using Mac or Windows.
- AirDrop (for Macs): With both your iPhone and Mac nearby, AirDrop is a breeze for sending images wirelessly—just select photos, tap the Share icon, and pick your Mac from AirDrop.
Before transferring, it’s worth taking a minute to declutter your photos—you don’t want copies of screenshots of last week’s lunch taking up precious space on your computer! Once you’ve picked your favorite option, you’ll have your photos safe and sound, exactly where you want them.
4. Transfer photos from iPhone to iPhone using a free photo transfer app

Simple Transfer by Rambax is one of the easiest photo transfer apps to use for transferring photos and large videos wirelessly, without the need for iTunes or other programs. The app is compatible with iOS 8.1+. Works on Windows, Mac, and Linux.
This free program offers a variety of features such as multiple photo and video transfers from PC to device, as well as between iOS devices simply by selecting an album and tapping on “Select All”. There is no quality loss during the transfer of the photos. Photos are transferred with full resolution including metadata and videos are transferred with the highest quality available.
Apart from that, it allows the user to create new albums in the directories that photos and videos are moved to, plus there is no limit concerning the number or size of files you can transfer. Simple Transfer also offers a slideshow of photo albums to make it easier for you to check whether you’re transferring the right files, and it’s really convenient that it supports up to 8 minutes of background transfer (i.e. the transfer is not interrupted for even after 8 minutes after it started).
‘Simple Transfer’ is one of the best choices when it comes to free photo and video transfers, and it certainly lives up to users’ expectations. This app is available only on the App Store for iPhone and iPad.
How can you Download the Photo Transfer App on Your Computer?
You can easily install the photo transfer app on your desktop, whether you use a Mac or Windows PC:
- Mac users: Head to the Mac App Store and search for the app to begin your download.
- Windows users: Download the app directly from the Microsoft Store or the developer’s official site for a straightforward installation.
- Chromebook or Chrome browser fans: The app is available on the Chrome Web Store for quick setup.
Choose the version that matches your computer, install it, and you’re ready to start moving your photos with ease.
How to Receive Photos and Videos on Your Device
Once you’re ready to receive photos or videos using Simple Transfer, the process couldn’t be easier:
- Open the app on your receiving iPhone or iPad.
- Tap the ‘Refresh Devices’ button so your device can automatically detect others on the same Wi-Fi network—this will quickly locate the device that’s sending the photos.
- Select the sender’s device from the list when it appears.
- After establishing the connection, tap the “Get Photos & Videos” button to begin the transfer process.
And that’s all there is to it! Photos and videos arrive in their original quality, with all metadata intact.
How to transfer photos—and everything else—to your new iPhone without iCloud
If you’d rather skip the whole iCloud process, Apple has made it refreshingly simple to move your photos and other data directly from your old iPhone to your shiny new one—no cloud required. This is perfect if you’re eager to get started and want to keep things straightforward.
Here’s how you do it:
- Place your new iPhone and your old iPhone side by side. Both devices should have Bluetooth turned on (and be charged up, for good measure).
- Turn on your new iPhone. A “Quick Start” screen will automatically pop up on your old device, asking if you want to use your Apple ID to set up the new one.
- Tap Continue to get the ball rolling.
- An animated graphic will appear on your new iPhone. Just hold your old iPhone over it so the animation appears within its viewfinder—it’s a bit like scanning a QR code at brunch.
- Watch for the message telling you to “Finish on New iPhone.”
- You’ll be prompted to enter your old device’s passcode on your new phone.
- Follow the instructions for setting up Face ID or Touch ID on your new device.
- When asked, tap “Transfer from iPhone.” Your photos, messages, apps, and more will zip over directly—just keep the two devices close together and plugged in until everything’s done.
Once the transfer completes, you can bid a fond farewell to your old iPhone (or set it back to factory settings for a clean slate), knowing all your data is now safely onboard your new gadget. At this point, everything from your photos to your messages and apps should be right where you left them, waiting for you on your new device. If you like, you can now switch off your old iPhone or wipe it for a fresh start, confident that your memories and essentials have made the leap without a hitch.
Compare Photo Transfer Methods
Now that we’ve covered a few handy solutions, you might be wondering which method is actually best for your scenario. Let’s do a quick rundown of the most common ways to send photos from one iPhone to another, and break down where each shines—and where it might leave you wanting more.
1. iCloud Backup & Restore
This method is your go-to if you’re setting up a brand new iPhone and want everything—photos, contacts, apps, the works.
Benefits:
- Copies your entire device, making setup smooth and seamless.
- Keeps photo albums, metadata, and the original organization intact.
Limitations:
- Requires a reliable WiFi connection and enough iCloud storage (which is a pain if your photo library has grown like a weed).
- Transfers everything, even the stuff you might prefer to leave behind.
2. Direct iPhone-to-iPhone Transfer
With Apple’s direct transfer option (often during setup), you can move all your data wirelessly using your Apple ID.
Benefits:
- Fast and convenient when both devices are side by side.
- Intact photo quality and file structure.
Limitations:
- Both iPhones need to be updated and within close range.
- Not ideal if you only want specific albums or photos moved over.
3. AirDrop
For when you need to get just a few snapshots to a friend (or your own other device) in a flash.
Benefits:
- Super quick for sharing select photos on the fly—no cables, no accounts to log in.
- No loss in photo quality.
Limitations:
- Can be clunky for transferring large quantities.
- Both devices must be nearby with WiFi and Bluetooth enabled.
4. iCloud Link (Shared Albums or Links)
Ideal for sharing a batch of photos—think vacation pics or that group selfie marathon.
Benefits:
- Lets you select exactly which photos to share.
- Easy to send to anyone with an Apple device, even via a link.
Limitations:
- Shared links usually expire after a set time.
- Recipients need internet access to view or download.
All said, the “best” method depends on whether you’re switching devices, just sharing a few shots, or want something in between. Still weighing your options? Check out the FAQ below for even more tips.
You may also like to read: How to use AirDrop on iPhone
What plugins are available for integrating with Cloud Services
If you’re looking to streamline photo transfers by syncing with popular cloud storage platforms, you’re in luck—there are several plugins designed specifically for seamless integration with services like Google Drive, Dropbox, and Flickr.
These plugins let you:
- Connect directly to your Google Drive to upload or access your photo library from anywhere.
- Sync with Dropbox for quick, secure backup and sharing between devices or with friends.
- Link to Flickr for easy management, organization, and sharing of your albums online.
With these integrations, you can quickly move your favorite memories to the cloud, ensuring you’ve always got a backup—and making sharing even easier. Whether you’re archiving vacation photos or collaborating on a shared family album, these plugins keep everything running smoothly behind the scenes.
Frequently asked questions
Before I conclude let me also address some of the queries related to how to transfer photos in iPhone, often made by iPhone users.
How to transfer iPhone pictures to new iPhone?
Here’s how to use AirDrop to transfer pictures from your old iPhone to your new one
1. On your new iPhone, go to Settings > Tap General > AirDrop;
2. Choose ‘Everyone’;
3. Next, go to the Photos app on your old iPhone;
4. Select the photos you want to transfer and tap ‘Share’;
What is the easiest way to transfer photos from iPhone?
Here’s the easiest way to transfer photos from iPhone:
1. Connect your iPhone to a PC with a USB cable;
2. Turn on your iPhone and unlock it;
3. On your PC, select the Start button and then select Photos to open the Photos app;
4. Select Import > From a USB device, then follow the instructions;
Can we transfer everything from one iPhone to another?
Absolutely! While we’ve mostly covered moving your photos, you can actually transfer all your data—contacts, messages, emails, apps, documents, and more—from your old iPhone to your new one.
The simplest way is to use Apple’s Quick Start feature, available on devices with iOS 11, iPadOS 13, or newer. With Quick Start, you just place your old and new iPhones side by side, and follow the on-screen instructions to wirelessly move everything over.
A few quick tips before you get started:
- Have both iPhones charged and connected to Wi-Fi.
- Choose a time when you don’t need either device for a few minutes, since the process can take a bit depending on how much data you’re transferring.
- You can also move data via iCloud, or by using a wired connection to your computer with iTunes or Finder if you prefer.
No matter which method you pick, your apps, settings, photos, videos, and even your wallpaper will make their way to your new device—so you’ll feel right at home as soon as you start it up.
How do I transfer photos between Android devices, or between Android and iOS devices?
Transferring photos between Android phones—or even from Android to iPhone or iPad—doesn’t have to be a digital headache. If you’re not a fan of plugging in cables or downloading extra apps, you can often make it work with just your Wi-Fi connection.
Here’s what you can do:
- Google Photos: One of the easiest ways to sync your pictures across Android and Apple devices. Simply back up your photos to Google Photos on your Android. Then, just sign in to the same account on your iPhone or iPad and download the pictures you want.
- Shared Albums: Using Google Photos or even apps like Dropbox, you can create a shared album or folder, invite your other device (or friends), and quickly export those shots.
- Wi-Fi Direct, Nearby Share & AirDrop: For Android-to-Android, try Wi-Fi Direct or Google’s Nearby Share—both allow for wireless transfers between compatible devices. If you’re going from Android to iPhone, you’ll need to use a cloud service (like Google Photos or Dropbox) since AirDrop only works between Apple devices.
The best part? With these methods, you sidestep the need for cables, dongles, or third-party transfer utilities. Just make sure both devices are connected to the internet (preferably Wi-Fi for speed), and you’ll have your photos moved over in no time.
You may also like to read this related post: How to transfer videos from iPhone to computer
Conclusion
If you are going to switch over from your old iPhone to an upgraded version, one of the primary things that may come to your mind – is how do I transfer photos from iPhone to iPhone.
After going through this post about how to transfer photos from old iPhone to new iPhone it is hoped that there should no longer be a problem for you to transfer your precious photos and videos from your old iPhone to the new one. Thanks to iOS and iCloud, this can be done quite easily and pretty much anywhere (as long as you have access to WiFi).
You may also like to read: How to transfer photos from Android to iPhone